Ⓜ️ 微调 LLM 作为聊天助手:在 Mistral 7B 上进行监督式微调#
在本教程中,你将学习如何在一个聊天风格的指令数据集上微调大型语言模型 (LLM),特别是 Mistral 7B。我们从 mistralai/Mistral-7B-v0.1 开始,这是一个仅执行文本补全的 LLM,最终得到我们自己的 argilla/Mistral-7B-v0.1-chat-OIG 模型,该模型忠实地遵循指令并充当有用的聊天助手。
本教程包含以下步骤:1. 在 Argilla 中准备一个 FeedbackDataset。2. (可选)注释指令样本。3. 设置用于监督式微调的 ArgillaTrainer。4. 使用微调后的 LLM 执行推理。5. 在 Hugging Face Hub 上发布结果模型和数据集。
在本教程中,我们使用了 p3.8xlarge AWS 实例,总共训练了 70 分钟。在计算方面,训练 Mistral 聊天模型的成本不到 15 美元。
简介#
Mistral 7B#
在本教程中,我们将微调 Mistral 7B,这是一个由 Mistral AI 团队开发的强大 LLM,具有 73 亿个参数。它因其相对于其尺寸的卓越性能而脱颖而出,在各种基准测试中优于更大的模型,如 Llama 2 13B 和 Llama 1 34B。
另一个关键方面是其在较长序列上的良好表现能力,值得注意的是,它是在宽松的 Apache 2.0 许可证下发布的。这使其可以用于商业用例,没有任何附加条件。
运行 Argilla#
对于本教程,你将需要运行一个 Argilla 服务器。部署和运行 Argilla 有两种主要选项
在 Hugging Face Spaces 上部署 Argilla: 如果你想使用外部 notebook(例如,Google Colab)运行教程,并且你拥有 Hugging Face 帐户,你可以通过几次点击在 Spaces 上部署 Argilla

有关配置部署的详细信息,请查看 Hugging Face Hub 官方指南。
使用 Argilla 的快速入门 Docker 镜像启动 Argilla:如果你想在 本地机器上运行 Argilla,这是推荐选项。请注意,此选项仅允许你在本地运行本教程,而不能与外部 notebook 服务一起运行。
有关部署选项的更多信息,请查看文档的部署部分。
提示
本教程是一个 Jupyter Notebook。有两种选项可以运行它
使用此页面顶部的 “在 Colab 中打开” 按钮。此选项允许你直接在 Google Colab 上运行 notebook。别忘了将运行时类型更改为 GPU 以加快模型训练和推理速度。
通过点击页面顶部的 “查看源代码” 链接下载 .ipynb 文件。此选项允许你下载 notebook 并在本地机器或你选择的 Jupyter notebook 工具上运行它。
安装依赖项#
让我们首先安装运行 Argilla 和本教程其余部分所需的依赖项。
[ ]:
%pip install "argilla~=1.16.0" "transformers~=4.34.0" "datasets~=2.14.5" "peft~=0.5.0" "trl~=0.7.1" "wandb~=0.15.12"
请注意,你还必须安装支持 CUDA 的 torch。如果尚未设置 torch,则此处的 widget here 应该会有所帮助。
让我们导入 Argilla 模块以进行数据读取和写入
[1]:
import argilla as rg
如果你正在使用 Docker 快速入门镜像或 Hugging Face Spaces 运行 Argilla,你需要使用 URL 和 API_KEY 初始化 Argilla 客户端
[ ]:
# Replace api_url with the url to your HF Spaces URL if using Spaces
# Replace api_key if you configured a custom API key
rg.init(
    api_url="https://:6900",
    api_key="owner.apikey",
    workspace="admin"
)
如果你正在运行私有的 Hugging Face Space,你还需要按如下方式设置 HF_TOKEN
[ ]:
# # Set the HF_TOKEN environment variable
# import os
# os.environ['HF_TOKEN'] = "your-hf-token"

# # Replace api_url with the url to your HF Spaces URL
# # Replace api_key if you configured a custom API key
# # Replace workspace with the name of your workspace
# rg.init(
#     api_url="https://[your-owner-name]-[your_space_name].hf.space",
#     api_key="owner.apikey",
#     workspace="admin",
#     extra_headers={"Authorization": f"Bearer {os.environ['HF_TOKEN']}"},
# )
启用遥测#
我们从你与教程的互动中获得了宝贵的见解。为了改进我们自己,以便为你提供最合适的内容,使用以下代码行将帮助我们了解本教程是否有效地为你服务。虽然这是完全匿名的,但如果你愿意,可以选择跳过此步骤。有关更多信息,请查看 遥测 页面。
[ ]:
try:
    from argilla.utils.telemetry import tutorial_running
    tutorial_running()
except ImportError:
    print("Telemetry is introduced in Argilla 1.20.0 and not found in the current installation. Skipping telemetry.")
在 Argilla 中准备 FeedbackDataset#
在 Argilla 中,FeedbackDataset 是一个功能强大且可广泛配置的类,负责定义标注过程。特别是,我们定义了 字段 和 问题。
前者负责定义将被标注的数据的结构,而后者确定标注者可以以何种方式标注数据。在实践中,用于微调 LLM 的 FeedbackDataset 实例通常具有 “prompt” 和 “response” 文本字段,有时还伴随 “context” 文本字段或一些额外的元数据(例如,样本 ID)。
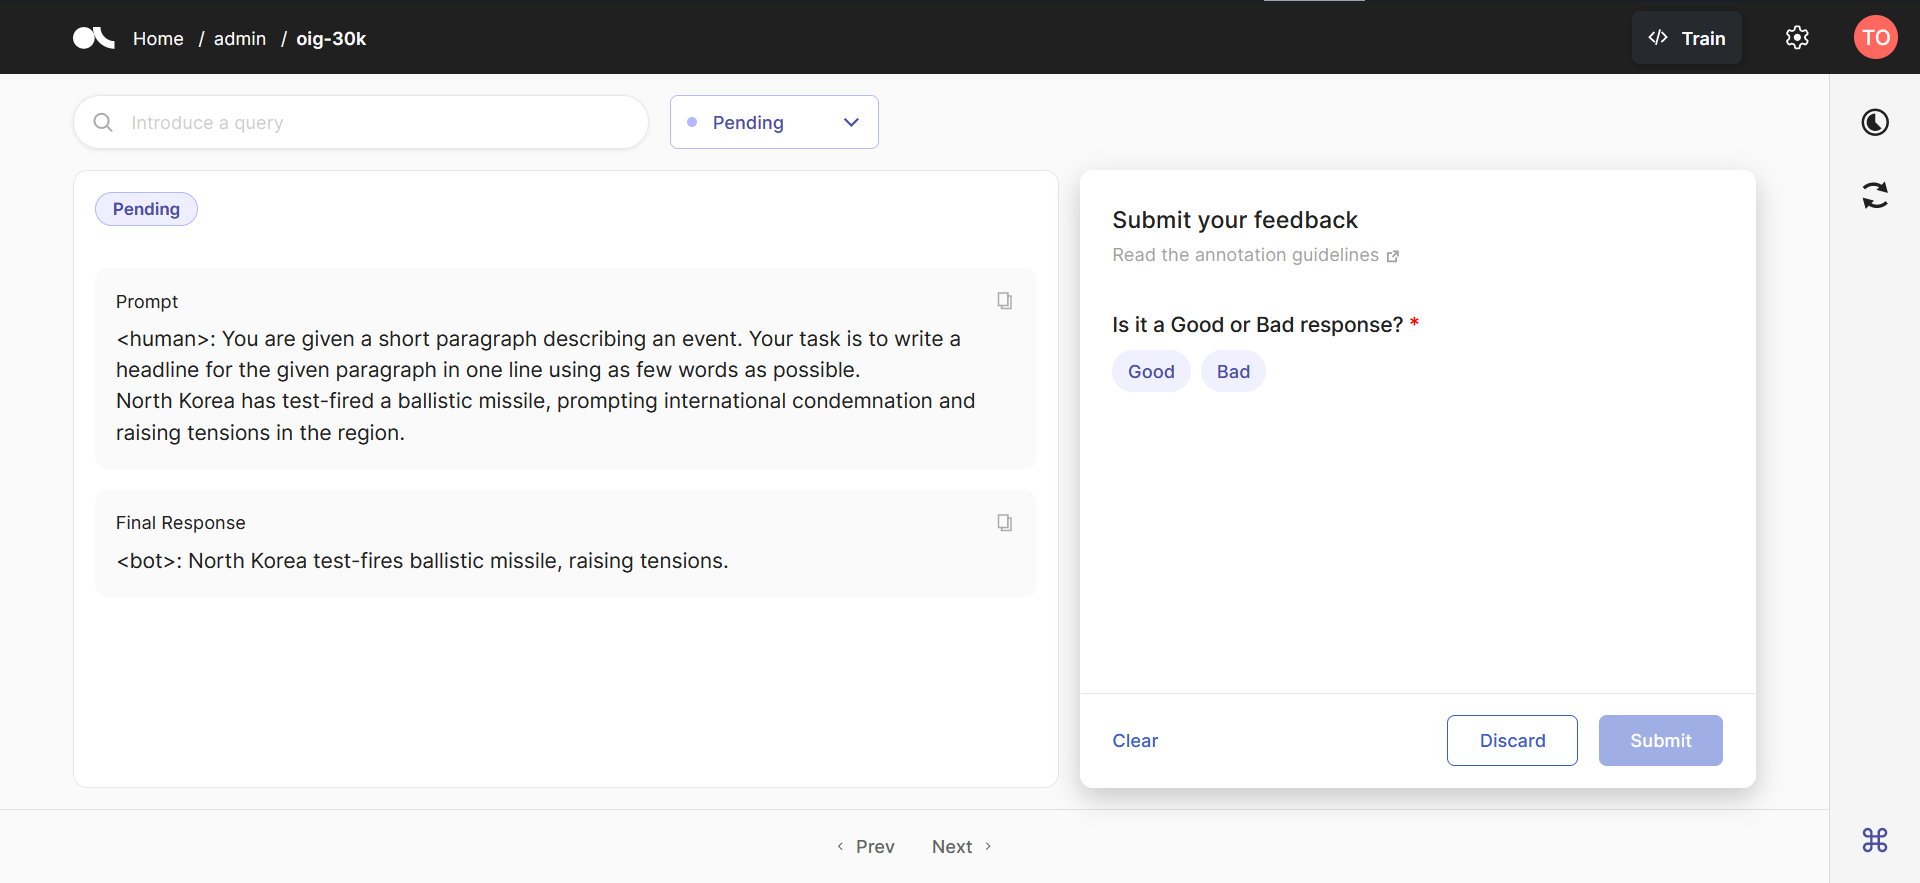
问题提供了很大的灵活性 - 文本问题允许标注者提供更好的响应或建议来改进提示,而标签问题可用于选择样本是否被认为是 “好” 或 “坏”。使用多标签问题,标注者可以选择样本是否是有偏差的、有害的、不正确的等等。
我们建议根据你对标注过程的目标和价值观设置问题。在准备训练数据时,所有标注都将可用,从而使你能够仔细地管理你的训练数据。例如,根据你的标注,你将能够忽略那些(经常)被标记为有害或低质量的样本,或者你可以使用标注者提供的对响应或提示的建议来代替现有的建议或提示。此外,在某些情况下,你可能只有提示开始,你可以使用 Argilla 请求你的标注者提供响应。然后,你可以在你的训练数据中使用这些响应。
对于本教程#
为了本教程的目的,我们将使用一个包含所有聊天历史记录和当前提示的 “prompt” 字段,以及一个包含响应的 “response” 字段。此外,我们引入了一个 “background” 文本字段,有时用于在用户提示之前提供额外的背景信息。下面的几个单元格中显示了一个示例数据样本,以帮助澄清背景的含义。对于问题,我们将使用一个简单的 LabelQuestion,询问标注者响应是 "Good" 还是 "Bad"。
[5]:
dataset = rg.FeedbackDataset(
    fields = [
        rg.TextField(name="background"),
        rg.TextField(name="prompt"),
        rg.TextField(name="response", title="Final Response"),
    ],
    questions = [
        rg.LabelQuestion(name="quality", title="Is it a Good or Bad response?", labels=["Good", "Bad"])
    ]
)
创建后,我们必须创建单独的 记录 并将它们推送到数据集。对于本教程,我们将使用来自 Open Instruction Generalist 聊天风格指令数据集的一些现有的 Apache-2.0 数据。由于此数据集的规模很大,我们将使用 streaming=True 加载 dataset,并从此数据集中半随机地抽取 30k 个样本。
[ ]:
from datasets import load_dataset

data = load_dataset("laion/OIG", split="train", streaming=True)
# Randomly sample through shuffle + take, but note that shuffling with a streaming
# dataset works with a buffer size, so the random 30k samples are not truly random
# Reduce the buffer size to speed up the data selection process.
data = data.shuffle(buffer_size=1_000_000).take(30_000)
加载的数据有一个 “text” 列,其中包含如下数据
Background: Tubulin in molecular biology can refer either to the tubulin protein superfamily of globular proteins, or one of the member proteins of that superfamily. α- and β-tubulins polymerize into microtubules, a major component of the eukaryotic cytoskeleton. Microtubules function in many essential cellular processes, including mitosis. Tubulin-binding drugs kill cancerous cells by inhibiting microtubule dynamics, which are required for DNA segregation and therefore cell division. , there are six members of the tubulin superfamily, although not all are present in all species. Both α and β tubulins have a mass of around 50 kDa and are thus in a similar range compared to actin (with a mass of ~42 kDa). In contrast, tubulin polymers (microtubules) tend to be much bigger than actin filaments due to their cylindrical nature. Tubulin was long thought to be specific to eukaryotes. More recently, however, several prokaryotic proteins have been shown to be related to tubulin. <human>: What are some examples of drugs that bind to tubulin? <bot>: These include paclitaxel, colchicine, and the "vinca" alkaloids, each of which have a distinct binding site on β-tubulin. <human>: Are there any other examples? <bot>: In addition, the anti-worm drug albendazole selectively targets the colchicine site in worm, but not human or "Drosophilia", β-Tubulin. <human>: What is another specific example of a drug that binds to tubulin? <bot>: Class III β-tubulin is a microtubule element expressed exclusively in neurons, and is a popular identifier specific for neurons in nervous tissue. <human>: What is the difference between class III and other isotypes? <bot>: It binds colchicine much more slowly than other isotypes of β-tubulin. <human>: Are there six classes of isotypes? <bot>: β1-tubulin, sometimes called class VI β-tubulin, is the most divergent at the amino acid sequence level. <human>: What are the functions of the different isotypes? <bot>: It is expressed exclusively in megakaryocytes and platelets in humans and appears to play an important role in the formation of platelets.
让我们分解一下: - 文本使用 <human>: 和 <bot>: 来表示用户提供和生成的文本的开始。 - 文本使用 Background: 来表示与聊天相关的一些附加上下文。并非所有样本都包含任何背景。 - 数据集包含多步骤聊天风格指令。
为了将其放入我们的 FeedbackDataset 中,我们必须将其拆分为 “background”、“prompt”(包含所有聊天历史记录和最后一个提示)以及最终的 “response”。
[ ]:
from typing import Dict, Any

def extract_background_prompt_response(text: str) -> Dict[str, Any]:
    '''Extract the anthropic prompt from a prompt and response pair.'''
    start_prompt = text.find("<human>:")
    end_prompt = text.rfind("<bot>:")
    # Background is anything before the first <human>:
    background = text[:start_prompt].strip()
    # Prompt is anything between the first <human>: (inclusive) and the last <bot>: (exclusive)
    prompt = text[start_prompt: end_prompt].strip()
    # Response is everything after the last <bot>: (inclusive)
    response = text[end_prompt:].strip()
    return {"background": background, "prompt": prompt, "response": response}


data = data.map(extract_background_prompt_response, input_columns="text")
现在我们可以轻松地将此数据集转换为 FeedbackRecord 实例,并将它们添加到 dataset 中。
[ ]:
records = [
    rg.FeedbackRecord(
        fields={
            "background": sample["background"],
            "prompt": sample["prompt"],
            "response": sample["response"],
        },
    )
    for sample in data
]
dataset.add_records(records)
现在我们已经在本地拥有了所有记录,我们还想将它们推送到 Argilla 服务器。只有这样我们才能在 Argilla UI 中看到它们。
[ ]:
dataset.push_to_argilla("oig-30k")
推送后,我们可以随时使用 load_from_argilla 再次加载此数据
[ ]:
dataset = rg.FeedbackDataset.from_argilla("oig-30k")
(可选)注释指令样本#
如果你正在使用你自己的专有数据、来自不可靠来源的数据,或者需要你的标注者提供响应,那么你必须执行数据标注。但是,为了本教程的目的,我们将假设所有数据都是高质量的并跳过此步骤。有关此阶段的更多信息,请参阅 用于 LLM 的数据收集 文档。
设置用于监督式微调的 ArgillaTrainer#
模型 & 分词器#
接下来,我们必须设置 ArgillaTrainer。首先,我们将加载 Mistral 7B model 和 tokenizer。我们将使用 float16 加载模型以提高内存使用率和效率,并且 device_map="auto" 会自动选择加载模型的最佳设备。例如,这将优先考虑你的 GPU 而不是 CPU。
此外,对于开放式生成,需要将 pad_token_id 设置为 eos_token_id。如果你没有定义 pad_token_id,它通常已经设置为 eos_token_id,但你会被警告你应该自己设置它。
[ ]:
from transformers import AutoModelForCausalLM, AutoTokenizer
import torch

model_id = "mistralai/Mistral-7B-v0.1"
model = AutoModelForCausalLM.from_pretrained(model_id, torch_dtype=torch.float16, device_map="auto")
tokenizer = AutoTokenizer.from_pretrained(model_id)
tokenizer.pad_token_id = tokenizer.eos_token_id
训练任务#
接下来,我们可以为监督式微调设置 TrainingTask。此任务需要一个 formatting_func,用于格式化来自 Argilla 的数据,以便进行训练。此格式化函数首先检查数据质量是否达标。这是通过检查标注并检查样本是否未标注、标注为 “Bad” 或丢弃来完成的。为了本教程的目的,我将忽略这一部分,并认为所有数据都是高质量的。
然后,我们将数据转换为我们期望的聊天格式,其中每个步骤都包含
<s><human>: {prompt} <bot>: {response}</s>
或
Background: {background} <s><human>: {prompt} <bot>: {response}</s>
在这种格式中,<s> 和 </s> 是 LLM 的 BOS 和 EOS 标记。如果要微调不同的模型,则必须将这些标记更改为正确的 BOS 和 EOS 标记。当处理多个连续步骤时,聊天格式如下
<s><human>: {prompt_1} <bot>: {response_1}</s><s><human>: {prompt_2} <bot>: {response_2}</s><s><human>: {prompt_3} <bot>: {response_3}</s>
生成时,我们可以向 LLM 提供以下格式
<s><human>: {prompt_1} <bot>: {response_1}</s><s><human>: {prompt_2} <bot>:
模型将生成给定历史记录的助手响应,后跟 </s>。生成将自然地在此 EOS 标记处停止。如果用户选择再次响应,那么我们可以再次将 <s><human>: {prompt} <bot>: 添加到先前的输出并生成更多响应。
请注意,OIG 数据本身不包含这些 BOS 和 EOS 标记,因此我们需要在每个提示-响应对之间手动添加它们。
[14]:
from typing import Dict, Iterator, Any
from argilla.feedback import TrainingTask

ANNOTATED_ONLY = False

def formatting_func(sample: Dict[str, Any]) -> Iterator[str]:
    if ANNOTATED_ONLY:
        # Discard if there are no annotations...
        if not sample["quality"]:
            return

        # or if it is annotated as "Bad" or discarded.
        first_annotation = sample["quality"][0]
        if first_annotation["value"] == "Bad" or first_annotation["status"] == "discarded":
            return

    # Filter out responses that are likely low quality
    if len(sample["response"]) <= 2:
        return

    # Add </s><s> between all prompt-response pairs
    prompt = sample["prompt"]
    prompt = prompt.replace("<human>:", f"{tokenizer.eos_token}{tokenizer.bos_token}<human>:")
    prompt = prompt[prompt.find("<human>:"):]
    # Add response and optionally the background to the full text.
    output = prompt + " " + sample["response"]
    if sample["background"]:
        output = sample["background"] + " " + output
    output = output + tokenizer.eos_token
    # We expect one less <s> than </s>, because the Mistral tokenizer will automatically add the BOS
    # at the start of the text when this text is tokenized. When that's done, the format will be exactly
    # what we want
    assert output.count("<s>") + 1 == output.count("</s>")
    return output

task = TrainingTask.for_supervised_fine_tuning(formatting_func)
通常,在开始训练之前手动查看数据会很方便,只是为了验证数据是否确实格式正确。幸运的是,Argilla 实现了在 FeedbackDataset 上应用 TrainingTask 以用于特定训练框架的方法,你将获得训练数据,就像该特定框架希望的那样。
[15]:
formatted_dataset = dataset.prepare_for_training(framework="trl", task=task)
formatted_dataset
[15]:
Dataset({
    features: ['id', 'text'],
    num_rows: 23806
})
[42]:
print(formatted_dataset[80]["text"])
<human>: The neopositivists subscribed to a notion of philosophy as the conceptual clarification of the methods, insights and discoveries of the sciences. They saw in the logical symbolism elaborated by Frege (1848–1925) and Bertrand Russell (1872–1970) a powerful instrument that could rationally reconstruct all scientific discourse into an ideal, logically perfect, language that would be free of the ambiguities and deformations of natural language. This gave rise to what they saw as metaphysical pseudoproblems and other conceptual confusions. By combining Frege's thesis that all mathematical truths are logical with the early Wittgenstein's idea that all logical truths are mere linguistic tautologies, they arrived at a twofold classification of all propositions: the analytic (a priori) and the synthetic (a posteriori). On this basis, they formulated a strong principle of demarcation between sentences that have sense and those that do not: the so-called verification principle. Any sentence that is not purely logical, or is unverifiable is devoid of meaning. As a result, most metaphysical, ethical, aesthetic and other traditional philosophical problems came to be considered pseudoproblems.

When was Bertrand Russell born?
<bot>: 1872
</s><s><human>: When did Bertrand Russell die?
<bot>: 1970
</s><s><human>: What did Frege say about math?
<bot>: all mathematical truths are logical
</s><s><human>: What did Wittgenstein say about logic?
<bot>: all logical truths are mere linguistic tautologies
</s><s><human>: What are pseudoproblems?
<bot>: most metaphysical, ethical, aesthetic and other traditional philosophical problems
</s><s><human>: When was Frege's thesis published?
<bot>: Sorry, I cannot find a relevant answer in the given context.
</s><s><human>: When was Wittgenstein born?
<bot>: Sorry, I cannot find a relevant answer in the given context.
</s><s><human>: When did Wittgenstein die?
<bot>: Sorry, I cannot find a relevant answer in the given context.
</s><s><human>: Who was a neopositivist?
<bot>: Sorry, I cannot find a relevant answer in the given context.
</s><s><human>: What gave a sentence meaning? <bot>: Sorry, I cannot find a relevant answer in the given context.</s>
这似乎与我们期望的格式完全匹配!
数据整理#
在训练 LLM 时,我们希望验证文本是否被正确地分词和整理。特别是,数据整理可能非常重要,因为某些数据整理器会将所有特殊标记(例如,填充、BOS 和 EOS 标记)替换为 -100 的标签,这是训练期间被忽略的标签。如果是这种情况,那么模型将不会学习生成 EOS 标记。因此,模型将始终以无休止的标记响应 - 远非理想。
默认情况下,使用监督式微调训练的模型使用 DataCollatorForLanguageModeling 数据整理器,所以让我们进行实验
[49]:
from transformers import DataCollatorForLanguageModeling

data_collator = DataCollatorForLanguageModeling(tokenizer, mlm=False)
data_collator([tokenizer(formatted_dataset[0]["text"])])
[49]:
{'input_ids': tensor([[    1,   523, 18529,  9670, 12628,   272,  2296,   808,   302, 11382,
         28725,  3133,  8373, 28747,  5936, 16280,  4969,  1059,  9697,   438,
          1830,   647,   464, 20746, 18566,  9917,  3578,  1996,   378,   533,
          5446, 28705, 28770,  2421,   647,   464,  1733,   824,  2516,  9746,
          7230,  5573, 10487,  3578,  1421,  2063,  4372,   272,  2996,   464,
          5985,   272,  2078,  5944,   297,  1745,  3725,   395,   264,   464,
          5613, 28742,   442,   464,  2501,  4135,   523, 10093,  9670,  1770,
             2]]), 'attention_mask': tensor([[1, 1, 1, 1, 1, 1, 1, 1, 1, 1, 1, 1, 1, 1, 1, 1, 1, 1, 1, 1, 1, 1, 1, 1,
         1, 1, 1, 1, 1, 1, 1, 1, 1, 1, 1, 1, 1, 1, 1, 1, 1, 1, 1, 1, 1, 1, 1, 1,
         1, 1, 1, 1, 1, 1, 1, 1, 1, 1, 1, 1, 1, 1, 1, 1, 1, 1, 1, 1, 1, 1, 1]]), 'labels': tensor([[    1,   523, 18529,  9670, 12628,   272,  2296,   808,   302, 11382,
         28725,  3133,  8373, 28747,  5936, 16280,  4969,  1059,  9697,   438,
          1830,   647,   464, 20746, 18566,  9917,  3578,  1996,   378,   533,
          5446, 28705, 28770,  2421,   647,   464,  1733,   824,  2516,  9746,
          7230,  5573, 10487,  3578,  1421,  2063,  4372,   272,  2996,   464,
          5985,   272,  2078,  5944,   297,  1745,  3725,   395,   264,   464,
          5613, 28742,   442,   464,  2501,  4135,   523, 10093,  9670,  1770,
          -100]])}
正如你所见,最终的 EOS 确实被设置为 -100,这意味着它不会被学习。相反,我们将创建一个自定义数据整理器,它直接将 input_ids 复制到 labels。通过子类化 `DataCollatorForSeq2Seq <https://hugging-face.cn/docs/transformers/main_classes/data_collator#transformers.DataCollatorForSeq2Seq>`__ 类,这很简单。
[51]:
from transformers import DataCollatorForSeq2Seq, BatchEncoding

class DataCollatorForSeq2SeqCopyLabels(DataCollatorForSeq2Seq):
    def __call__(self, features, return_tensors=None) -> BatchEncoding:
        for feature in features:
            if "labels" not in feature:
                feature["labels"] = feature["input_ids"].copy()
        return super().__call__(features, return_tensors=return_tensors)
[52]:
data_collator = DataCollatorForSeq2SeqCopyLabels(tokenizer)
data_collator([tokenizer(formatted_dataset[0]["text"])])
[52]:
{'input_ids': tensor([[    1,   523, 18529,  9670, 12628,   272,  2296,   808,   302, 11382,
         28725,  3133,  8373, 28747,  5936, 16280,  4969,  1059,  9697,   438,
          1830,   647,   464, 20746, 18566,  9917,  3578,  1996,   378,   533,
          5446, 28705, 28770,  2421,   647,   464,  1733,   824,  2516,  9746,
          7230,  5573, 10487,  3578,  1421,  2063,  4372,   272,  2996,   464,
          5985,   272,  2078,  5944,   297,  1745,  3725,   395,   264,   464,
          5613, 28742,   442,   464,  2501,  4135,   523, 10093,  9670,  1770,
             2]]), 'attention_mask': tensor([[1, 1, 1, 1, 1, 1, 1, 1, 1, 1, 1, 1, 1, 1, 1, 1, 1, 1, 1, 1, 1, 1, 1, 1,
         1, 1, 1, 1, 1, 1, 1, 1, 1, 1, 1, 1, 1, 1, 1, 1, 1, 1, 1, 1, 1, 1, 1, 1,
         1, 1, 1, 1, 1, 1, 1, 1, 1, 1, 1, 1, 1, 1, 1, 1, 1, 1, 1, 1, 1, 1, 1]]), 'labels': tensor([[    1,   523, 18529,  9670, 12628,   272,  2296,   808,   302, 11382,
         28725,  3133,  8373, 28747,  5936, 16280,  4969,  1059,  9697,   438,
          1830,   647,   464, 20746, 18566,  9917,  3578,  1996,   378,   533,
          5446, 28705, 28770,  2421,   647,   464,  1733,   824,  2516,  9746,
          7230,  5573, 10487,  3578,  1421,  2063,  4372,   272,  2996,   464,
          5985,   272,  2078,  5944,   297,  1745,  3725,   395,   264,   464,
          5613, 28742,   442,   464,  2501,  4135,   523, 10093,  9670,  1770,
             2]])}
现在我们在 labels 的末尾看到了 2,即 EOS 标记,正如我们所期望的那样!
生成回调#
在训练 LLM 时,始终建议在训练期间执行某种形式的生成。这至关重要,因为仅损失本身并不能很好地指示模型性能,并且它是衡量模型是否朝着正确的方向发展并按预期学习的主要方法。为此,我们将创建一个回调,它在每次评估时生成一些文本并将其打印出来。
[53]:
from typing import Optional
import torch
from transformers import TrainerCallback, TrainerControl, TrainerState, GenerationConfig, TrainingArguments, PreTrainedModel, PreTrainedTokenizer


class GenerationCallback(TrainerCallback):
    def __init__(self, prompt: str) -> None:
        super().__init__()
        self.prompt = prompt

    def on_evaluate(self, args: TrainingArguments, state: TrainerState, control: TrainerControl, model: Optional[PreTrainedModel] = None, tokenizer: Optional[PreTrainedTokenizer] = None, **kwargs):
        # Tokenize the prompt and send it to the right device
        inputs = tokenizer(self.prompt, return_tensors="pt").to(model.device)

        with torch.no_grad():
            outputs = model.generate(
                **inputs,
                generation_config=GenerationConfig(
                    max_new_tokens=50,
                    pad_token_id=tokenizer.pad_token_id,
                    eos_token_id=tokenizer.eos_token_id,
                ),
            )
            print(tokenizer.batch_decode(outputs, skip_special_tokens=False)[0])


generation_callback = GenerationCallback("<human>: What were Nelson Mandela's relations with the ANC? <bot>:")
ArgillaTrainer & 超参数#
接下来,我们可以初始化 ArgillaTrainer!我们已经准备好了它需要的所有组件。
[ ]:
from argilla.feedback import ArgillaTrainer

trainer = ArgillaTrainer(
    dataset=dataset,
    model=model,
    tokenizer=tokenizer,
    task=task,
    framework="trl",
    train_size=0.99,
)
下一步是使用期望的参数设置配置 trainer 以进行训练。我们将从 TRL SFTTrainer 的配置选项开始。此 trainer 接受 PEFT 配置,允许我们使用出色的 LoRA。这项技术加速了大型模型的微调,同时消耗更少的内存。训练后,这将生成小的 adapter_config.json 和 adapter_model.bin 文件,这些文件可以与原始模型组合以生成微调后的模型。有关如何再次加载这些模型的信息,请参阅 此文档。
我们还将最大序列长度设置为 1024,以降低内存使用率,并为 trainer 提供我们的自定义 data_collator 和 generation_callback。
[ ]:
from peft import LoraConfig, TaskType

peft_config = LoraConfig(
    task_type=TaskType.CAUSAL_LM,
    inference_mode=False,
    r=8,
    lora_alpha=16,
    lora_dropout=0.05,
    target_modules=["q_proj", "v_proj"],
)
trainer.update_config(
    data_collator=data_collator,
    callbacks=[generation_callback],
    peft_config=peft_config,
    max_seq_length=1024,
)
除此之外,我们还想配置 TrainingArguments 以设置超参数。请注意,我们在此处仅训练 3000 步。这已经证明足以微调一个遵循我们聊天格式的合理模型。
[ ]:
trainer.update_config(
    per_device_train_batch_size=3,
    per_device_eval_batch_size=3,
    eval_accumulation_steps=16,
    max_steps=3000,
    logging_steps=50,
    learning_rate=5e-5,
    save_strategy="no",
    evaluation_strategy="steps",
    eval_steps=500,
    lr_scheduler_type="cosine",
    warmup_ratio=0.1,
    remove_unused_columns=False,
    fp16=True,
    num_train_epochs=1,
)
然后,剩下的就是训练模型。我们提供一个输出目录,用于保存适配器文件。
[ ]:
trainer.train("Mistral-7B-v0.1-chat-OIG-3k")
使用微调后的 LLM 执行推理#
训练后,模型仍然以 model 的形式驻留在内存中,但通常情况下,我们希望重新加载训练好的模型。使用 AutoPeftModelForCausalLM,这很简单
[1]:
from transformers import AutoTokenizer
from peft import AutoPeftModelForCausalLM
import torch

model_path = "Mistral-7B-v0.1-chat-OIG-3k"
model = AutoPeftModelForCausalLM.from_pretrained(
    model_path,
    torch_dtype=torch.bfloat16,
    device_map="auto",
)
tokenizer = AutoTokenizer.from_pretrained(model_id)
tokenizer.pad_token_id = tokenizer.eos_token_id
Loading checkpoint shards: 100%|██████████| 2/2 [00:08<00:00,  4.14s/it]
Special tokens have been added in the vocabulary, make sure the associated word embeddings are fine-tuned or trained.
此时,推理也变得简单了。有关更多信息,请参阅 generate() 方法。
[5]:
text = "<human>: What were Nelson Mandela's relations with the ANC? <bot>:"
inputs = tokenizer(text, return_tensors="pt").to(model.device)

with torch.no_grad():
    outputs = model.generate(input_ids=inputs["input_ids"], max_new_tokens=250, pad_token_id=tokenizer.pad_token_id)
print(tokenizer.batch_decode(outputs, skip_special_tokens=False)[0])
<s> <human>: What were Nelson Mandela's relations with the ANC? <bot>: Nelson Mandela was a member of the ANC.</s>
[7]:
text = "<human>: What were Nelson Mandela's relations with the ANC? <bot>: Nelson Mandela was a member of the ANC.</s><s><human>: How old was he when he joined? <bot>: "
inputs = tokenizer(text, return_tensors="pt").to(model.device)

with torch.no_grad():
    outputs = model.generate(input_ids=inputs["input_ids"], max_new_tokens=250, pad_token_id=tokenizer.pad_token_id)
print(tokenizer.batch_decode(outputs, skip_special_tokens=False)[0])
<s> <human>: What were Nelson Mandela's relations with the ANC? <bot>: Nelson Mandela was a member of the ANC.</s><s> <human>: How old was he when he joined? <bot>: 22</s>
在 Hugging Face Hub 上发布结果模型和数据集#
最后,我们将希望将我们训练好的模型和数据集保存到 Hugging Face Hub,甚至是私有的。让我们从适配器模型开始
[ ]:
model_id = "argilla/Mistral-7B-v0.1-chat-OIG"
model.push_to_hub(model_id, private=True)
tokenizer.push_to_hub(model_id)
这导致了 Hub 上的 argilla/Mistral-7B-v0.1-chat-OIG。我们可以像这样将数据集保存到 Hub
[ ]:
dataset = rg.FeedbackDataset.from_argilla("oig-30k", workspace="admin")
dataset.push_to_huggingface("argilla/oig-30k", private=True)
这创建了 argilla/oig-30k 仓库。
使用我们发布的模型执行推理#
如果你想尝试 我们为本教程训练的模型,那么你可以运行以下代码片段,从 Hugging Face Hub 加载适配器文件并尝试你自己的提示。以下单元格可以与本教程的其余部分完全分开运行。
[ ]:
from transformers import AutoTokenizer
from peft import AutoPeftModelForCausalLM
import torch

model_path = "argilla/Mistral-7B-v0.1-chat-OIG"
model = AutoPeftModelForCausalLM.from_pretrained(
    model_path,
    torch_dtype=torch.bfloat16,
    device_map="auto",
)
tokenizer = AutoTokenizer.from_pretrained(model_id)
tokenizer.pad_token_id = tokenizer.eos_token_id
请随意在此处尝试各种不同的提示
[ ]:
prompt = "<human>: Finish this sequence: purple, red, orange, yellow, ... <bot>: "
inputs = tokenizer(prompt, return_tensors="pt").to(model.device)

with torch.no_grad():
    outputs = model.generate(input_ids=inputs["input_ids"], max_new_tokens=250, pad_token_id=tokenizer.pad_token_id)
print(tokenizer.batch_decode(outputs, skip_special_tokens=False)[0])
结论#
总而言之,我们学习了如何使用 ArgillaTrainer 通过 TRL 将监督式微调应用于 Mistral-7B,以创建聊天风格的助手模型。
如果你对微调 LLM 感兴趣,请务必查看以下页面