🎼 速查表#
安装#
首先要做的!你可以使用基本的 pip install 从 pypi 安装,但我们也提供一些自定义的 extras 和更多与开发者相关的安装选项。
pip install argilla
pip install argilla[listeners] # use argilla.listeners background processes
pip install argilla[server] # running FastAPI locally
pip install argilla[postgresql] # use PostgreSQL instead of SQLite as database
pip install argilla[integrations] # use integrations with other libraries/frameworks
pip install argilla[tests] # running tests locally
pip install -U git+https://github.com/argilla-io/argilla.git
注意
确保你安装了最新版本的 Argilla(和其他软件包),以便可以使用所有功能!要检查你拥有的版本,请使用 pip show argilla。你还可以安装特定版本的软件包(例如,运行 pip install argilla==1.11.0),或者只需使用 pip install argilla --upgrade 更新到最新版本。
在能够从我们的 Python 库中使用 Argilla 之前,你首先需要部署我们的 FastAPI 服务器、Elastic Search 和 Argilla UI。我们还有关于 部署 和 配置 的更全面的教程。
docker run -d --name argilla -p 6900:6900 argilla/argilla-quickstart:latest
wget -O docker-compose.yaml https://raw.githubusercontent.com/argilla-io/argilla/main/docker/docker-compose.yaml && docker-compose up -d
警告
HuggingFace Spaces 现在具有持久存储,Argilla 1.11.0 及更高版本支持此功能,但你需要通过 HuggingFace Spaces 设置手动激活它。否则,除非你升级到付费空间,否则在 48 小时不活动后,空间将被关闭,你将丢失所有数据。为了避免数据丢失,我们强烈建议使用 HuggingFace 提供的持久存储层。

连接到 Argilla#
要从我们的 Python 库开始使用你的数据,我们首先需要连接到我们的 FastAPI 服务器。这是通过 httpx 使用 API 密钥和 URL 完成的。或者更详细地查看 这里。
默认情况下,Argilla 使用后台的 argilla.apikey 连接到 localhost:6900。
# MacOS
export ARGILLA_API_URL="argilla-api-url"
export ARGILLA_API_KEY="argilla-api-key"

# Windows
setx ARGILLA_API_URL="argilla-api-url"
setx ARGILLA_API_URL="argilla-api-key"
import argilla as rg

rg.init(
    api_url="argilla-api-url",
    api_key="argilla-api-key"
)
from argilla.client.client import Argilla

client = Argilla(
    api_url="argilla-api-url",
    api_key="argilla-api-key"
)
从 1.16.0 版本开始,你可以使用 CLI 连接到 Argilla 服务器。
首先使用 CLI 登录到 Argilla 服务器
argilla login --api-url https://:6900 --api-key argilla.apikey
然后调用不带参数的 init 函数,以使用 login 命令创建的存储凭据
import argilla as rg

rg.init()
配置数据集#
在开始任何文本数据项目之前,我们建议设置注释指南和标签模式。需要更多上下文?查看 这里。
import argilla as rg

dataset = rg.FeedbackDataset(
    guidelines="Add some guidelines for the annotation team here.",
    fields=[
        rg.TextField(name="prompt", title="Human prompt"),
        rg.TextField(name="output", title="Generated output", use_markdown=True)
    ],
    questions =[
        rg.RatingQuestion(
            name="rating",
            title="Rate the quality of the response:",
            description="1 = very bad - 5= very good",
            required=True,
            values=[1,2,3,4,5]
        ),
        rg.TextQuestion(
            name="corrected-text",
            title="Provide a correction to the response:",
            required=False,
            use_markdown=True
        )
    ]
)

dataset.push_to_argilla(name="my_dataset", workspace="my_workspace")
import argilla as rg

settings = rg.TextClassificationSettings(label_schema=["A", "B", "C"])

rg.configure_dataset_settings(name="my_dataset", settings=settings)
import argilla as rg

settings = rg.TokenClassificationSettings(label_schema=["A", "B", "C"])

rg.configure_dataset_settings(name="my_dataset", settings=settings)
因为我们不要求 Text2Text 使用标签模式,所以我们可以通过 rg.log() 直接记录记录来创建数据集。
请注意,反馈数据集支持不同类型的问题。有关每种问题的更多信息,请查看 此部分。
rg.LabelQuestion(
    name="relevant",
    title="Is the response relevant for the given prompt?",
    labels={"YES": "Yes", "NO": "No"}, # or ["YES","NO"]
    required=True,
    visible_labels=None
)

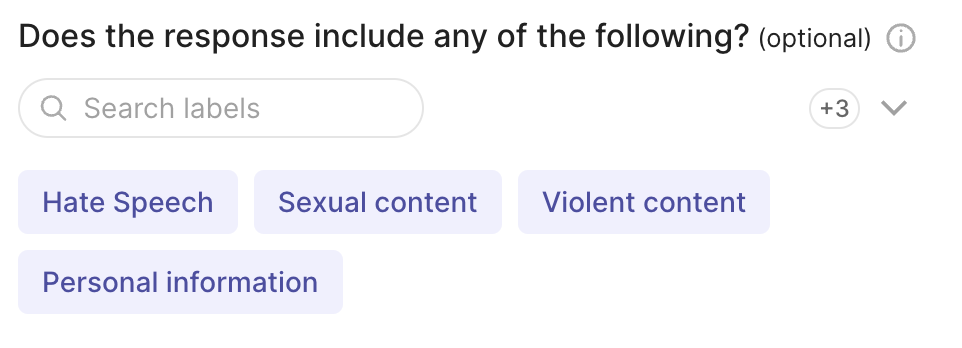
rg.MultiLabelQuestion(
    name="content_class",
    title="Does the response include any of the following?",
    description="Select all that apply",
    labels={"hate": "Hate Speech" , "sexual": "Sexual content", "violent": "Violent content", "pii": "Personal information", "untruthful": "Untruthful info", "not_english": "Not English", "inappropriate": "Inappropriate content"}, # or ["hate", "sexual", "violent", "pii", "untruthful", "not_english", "inappropriate"]
    required=False,
    visible_labels=4,
    labels_order="natural"
)
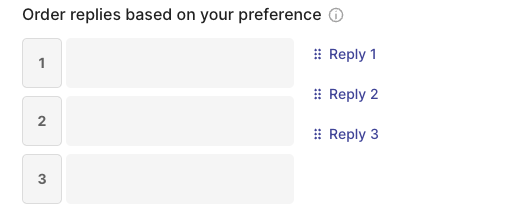
rg.RankingQuestion(
    name="preference",
    title="Order replies based on your preference",
    description="1 = best, 3 = worst. Ties are allowed.",
    required=True,
    values={"reply-1": "Reply 1", "reply-2": "Reply 2", "reply-3": "Reply 3"} # or ["reply-1", "reply-2", "reply-3"]
)
rg.RatingQuestion(
    name="quality",
    title="Rate the quality of the response:",
    description="1 = very bad - 5= very good",
    required=True,
    values=[1, 2, 3, 4, 5]
)

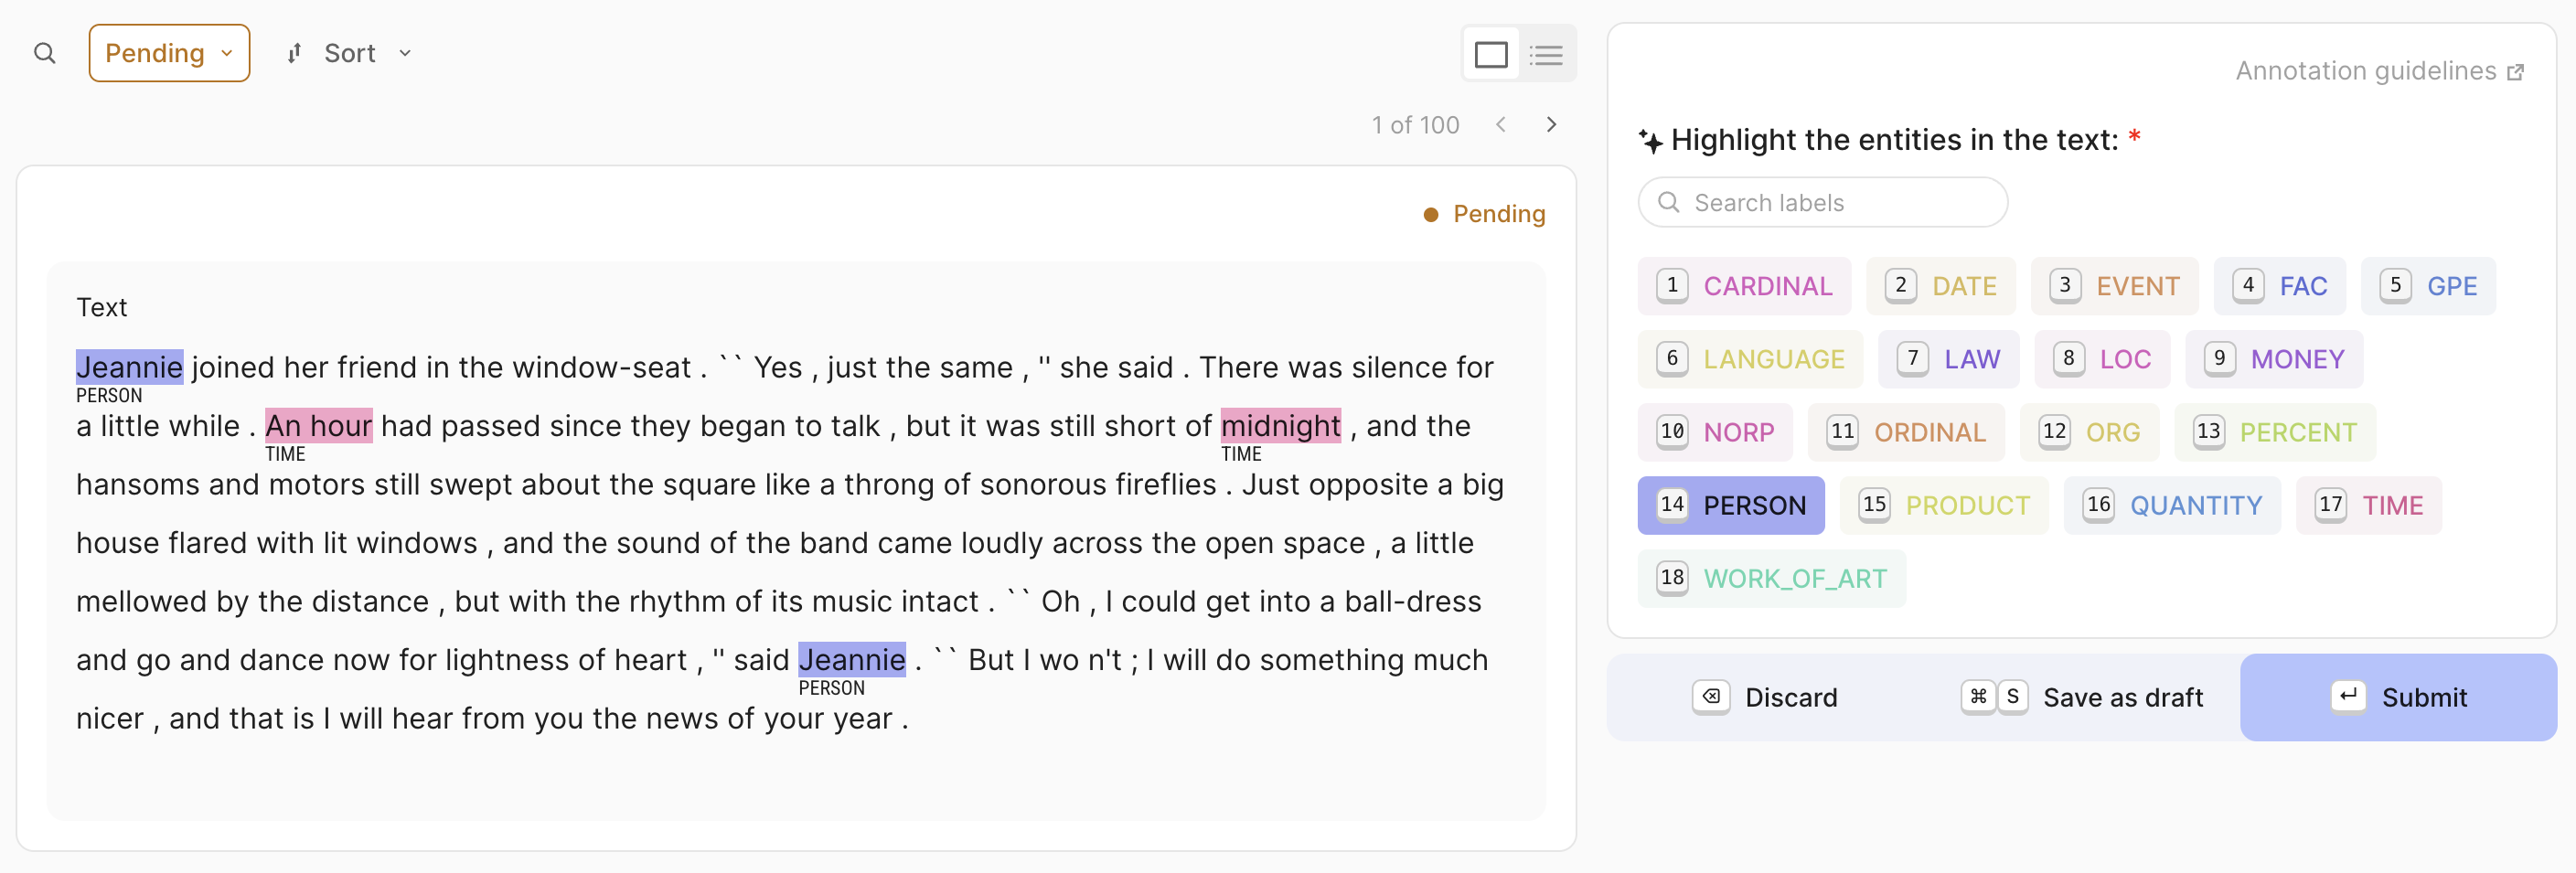
rg.SpanQuestion(
    name="entities",
    title="Highlight the entities in the text:",
    labels={"PER": "Person", "ORG": "Organization", "EVE": "Event"},
    # or ["PER", "ORG", "EVE"],
    field="text",
    required=True,
    allow_overlapping=False
)
rg.TextQuestion(
    name="corrected-text",
    title="Provide a correction to the response:",
    required=False,
    use_markdown=True
)

创建记录#
我们在 Argilla 生态系统中支持专注于 NLP 的不同任务:文本 分类、Token 分类、Text2Text 和与 LLM 相关的 反馈。要了解有关创建的更多信息,请查看 这里。
import argilla as rg
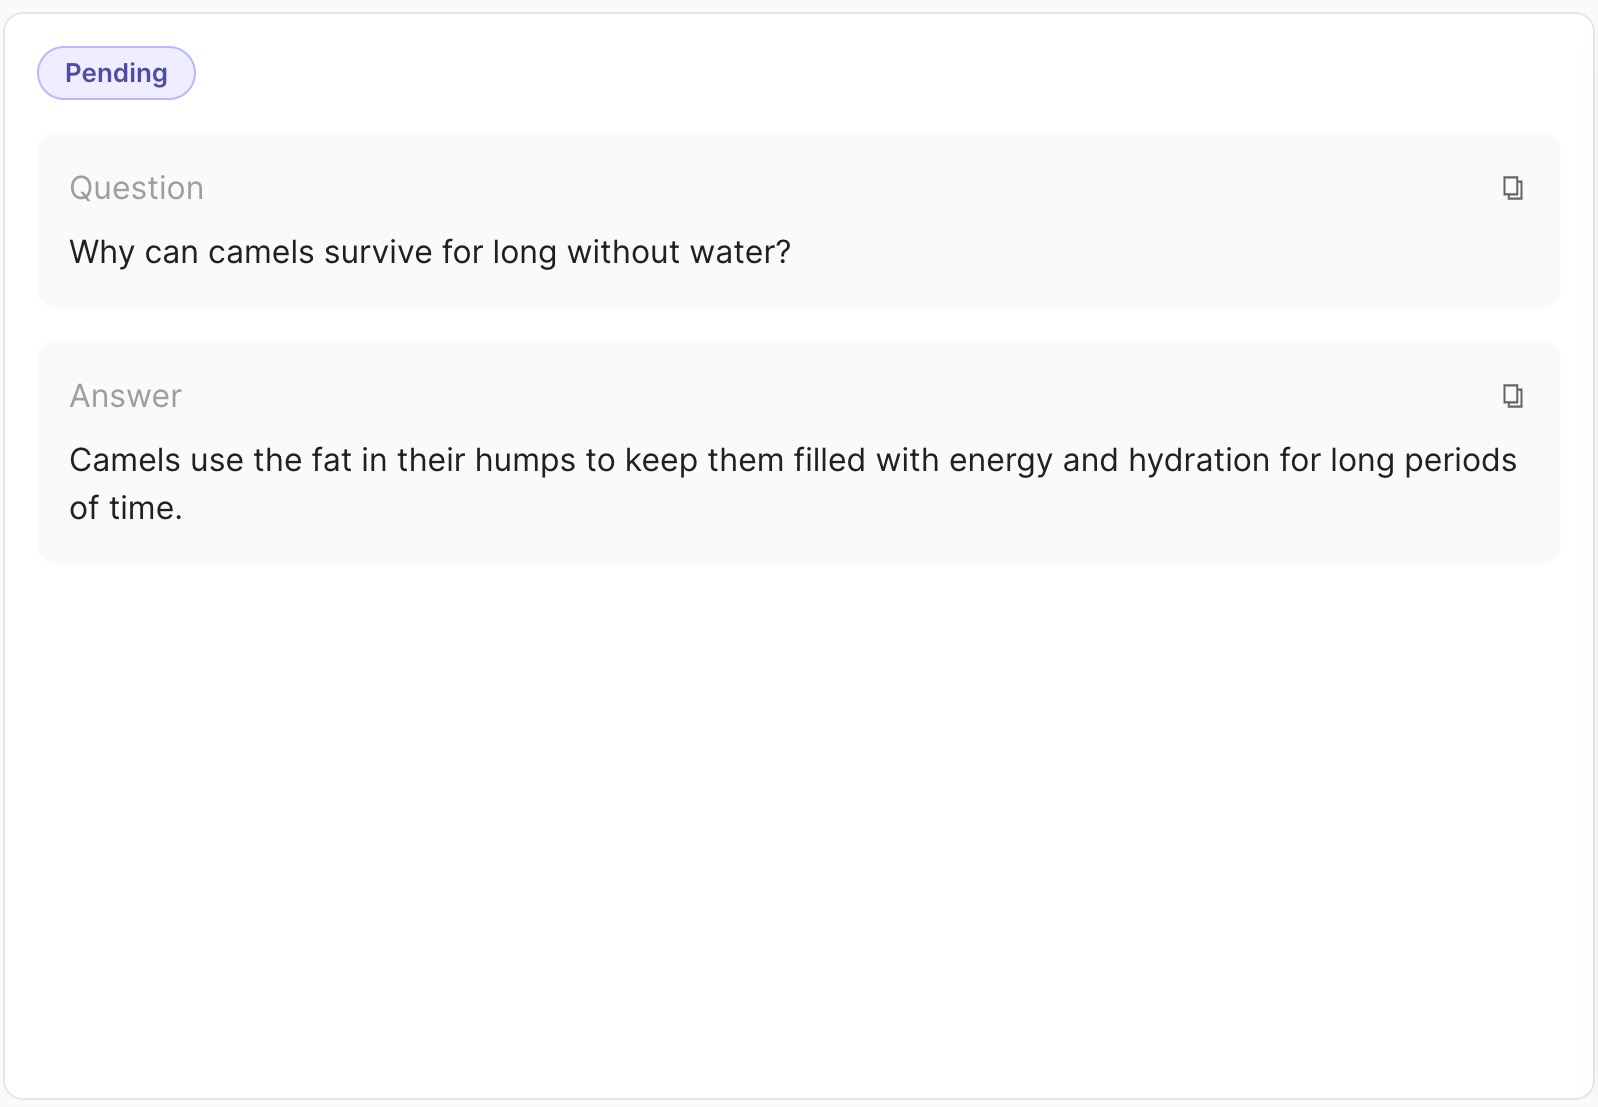
record = rg.FeedbackRecord(
fields={
"question": "Why can camels survive long without water?",
"answer": "Camels use the fat in their humps to keep them filled with energy and hydration for long periods of time."
},
metadata={"source": "encyclopedia"},
external_id='rec_1'
)
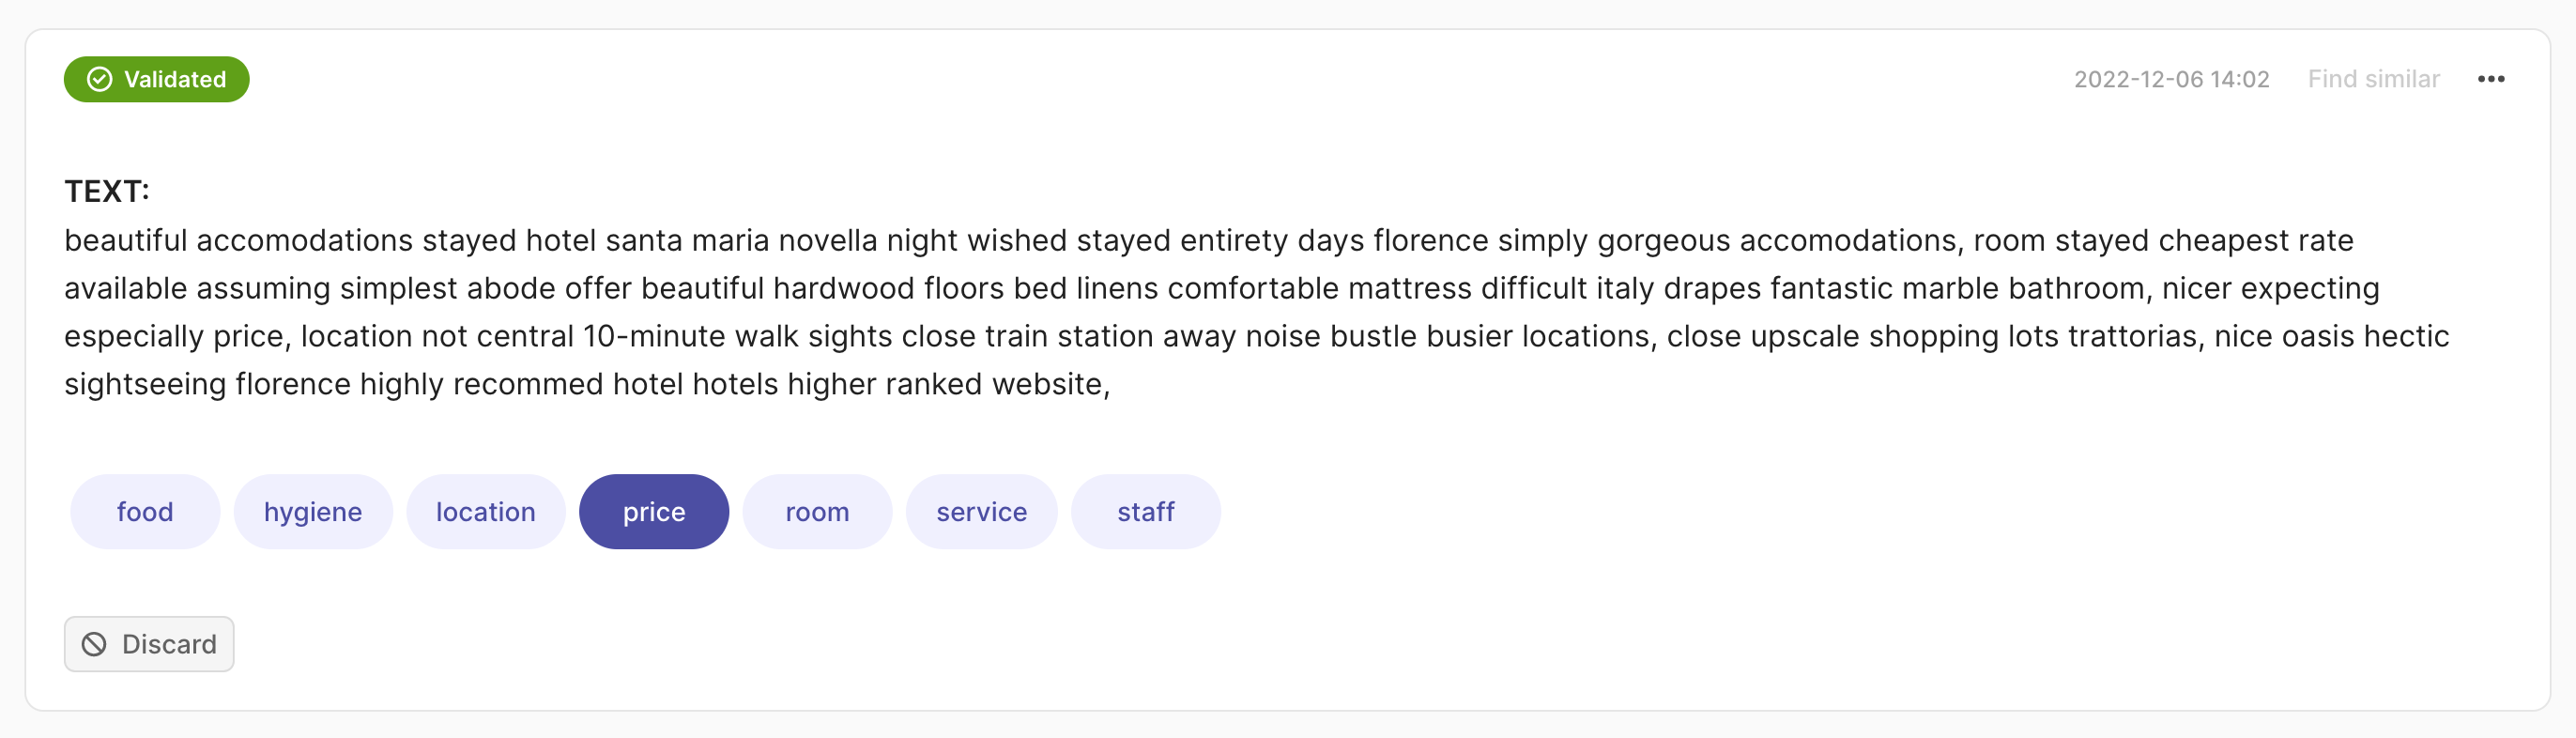
import argilla as rg

rec = rg.TextClassificationRecord(
    text="beautiful accomodations stayed hotel santa... hotels higer ranked website.",
    prediction=[("price", 0.75), ("hygiene", 0.25)],
    annotation="price"
)
rg.log(records=rec, name="my_dataset")
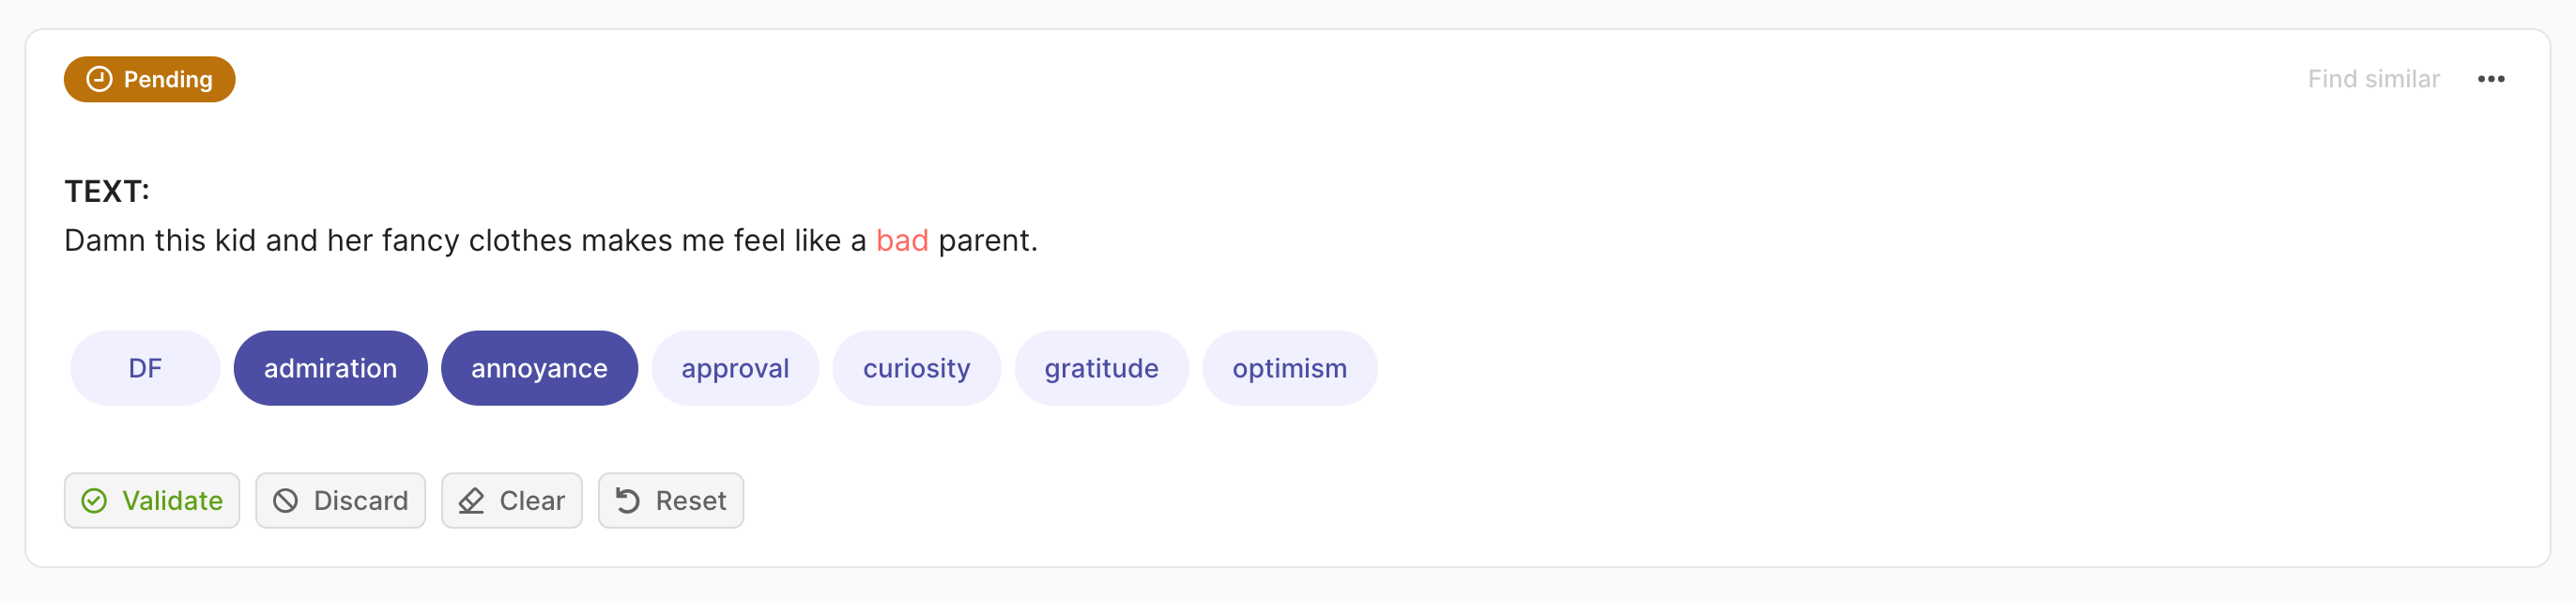
import argilla as rg

rec = rg.TextClassificationRecord(
    text="damn this kid and her fancy clothes makes me feel like a bad parent.",
    prediction=[("admiration", 0.75), ("annoyance", 0.25)],
    annotation=["price", "annoyance"],
    multi_label=True
)
rg.log(records=rec, name="my_dataset")
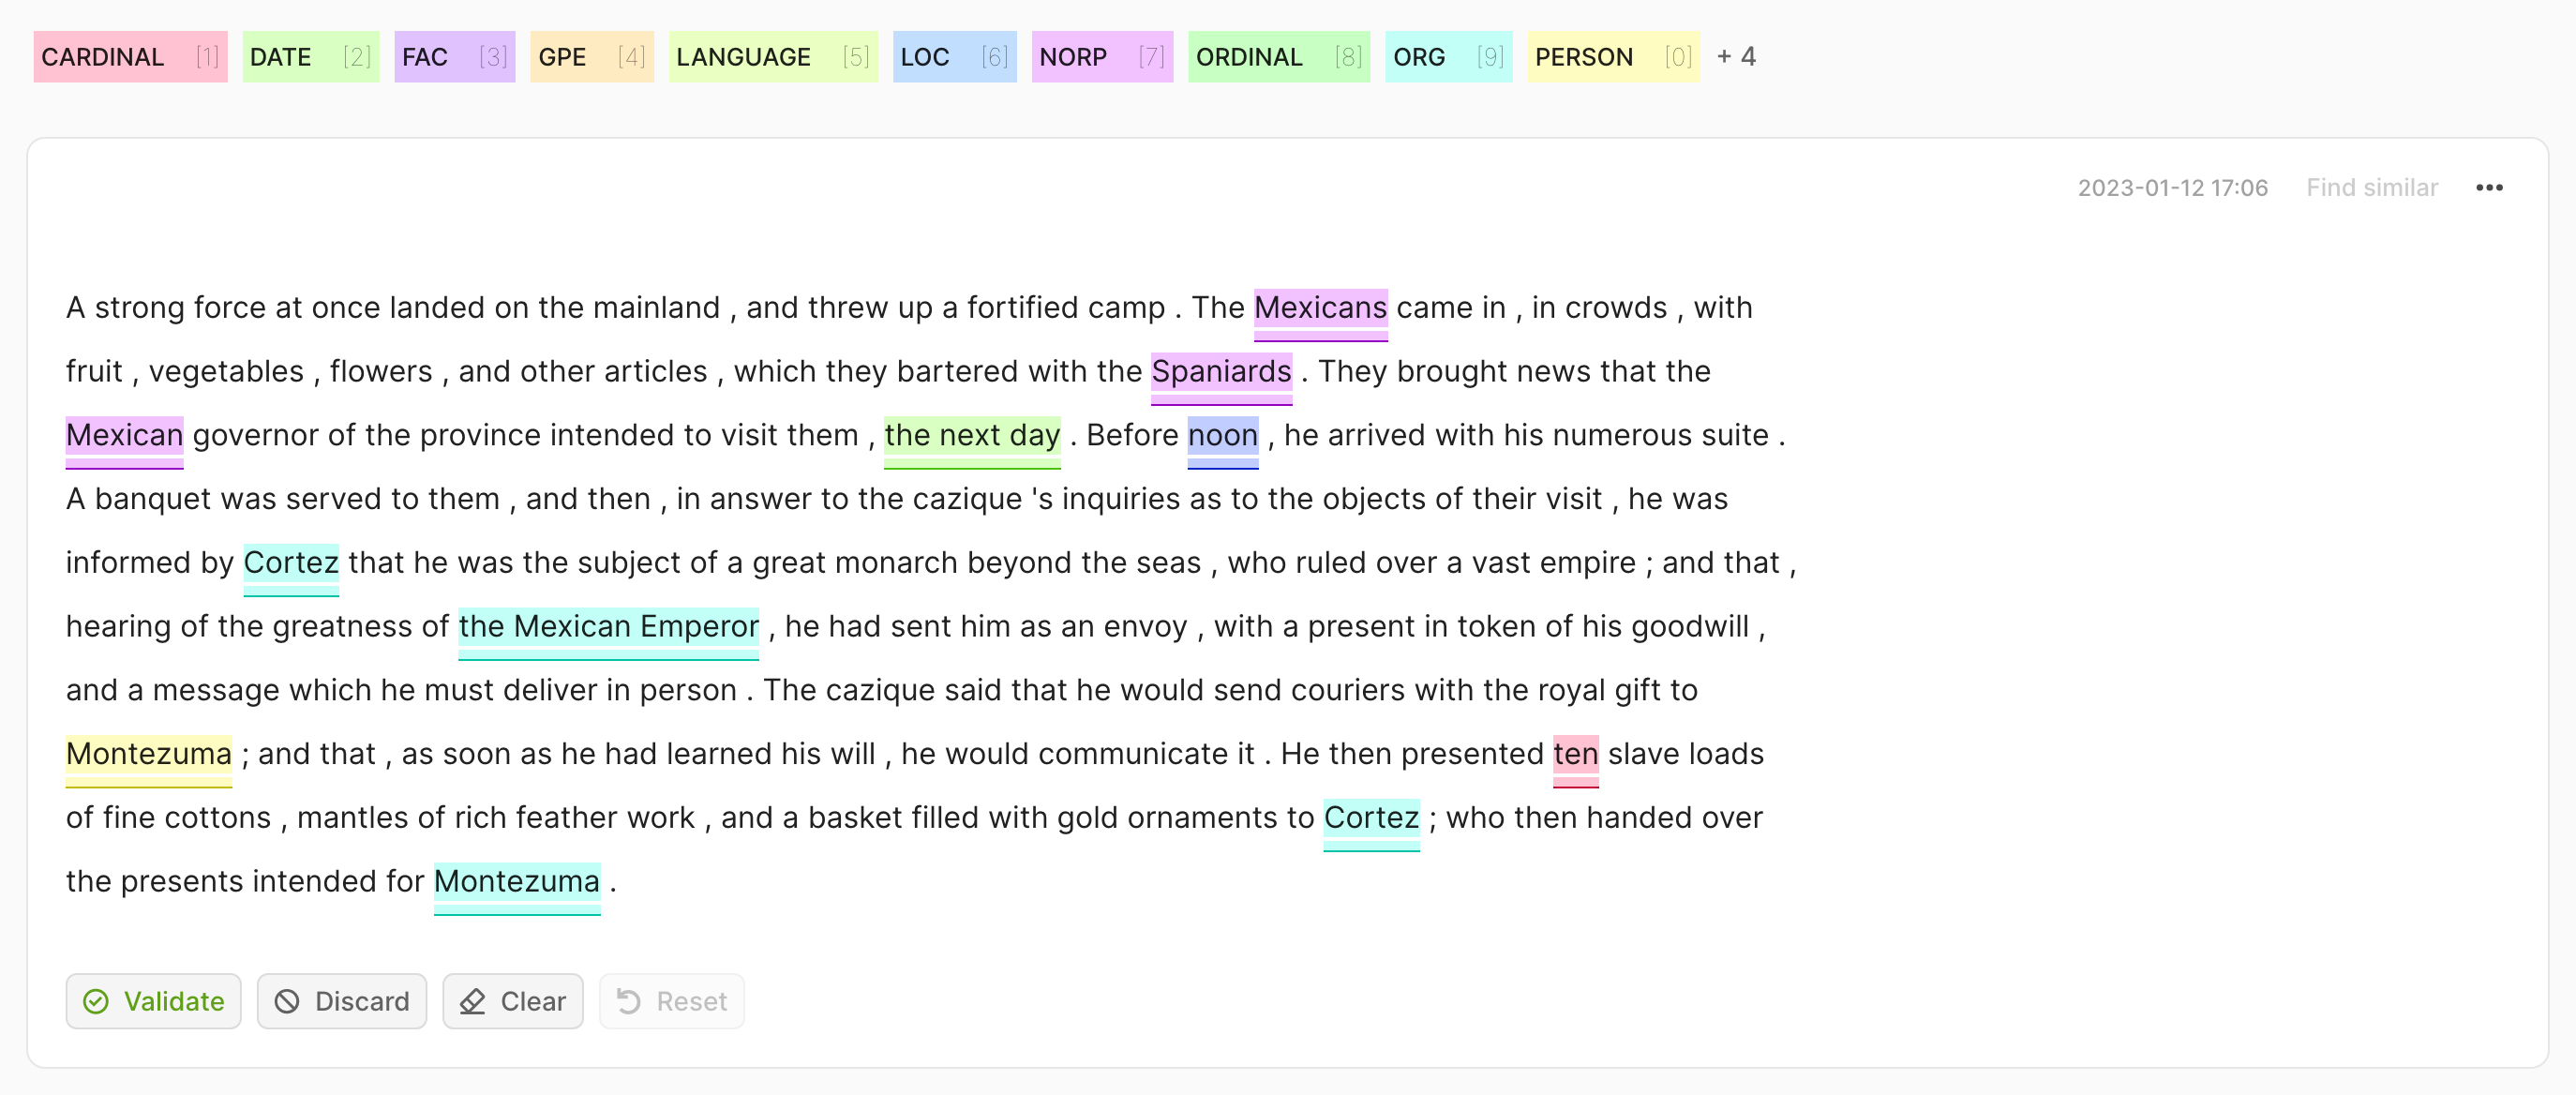
import argilla as rg

record = rg.TokenClassificationRecord(
    text="Michael is a professor at Harvard",
    tokens=["Michael", "is", "a", "professor", "at", "Harvard"],
    prediction=[("NAME", 0, 7, 0.75), ("LOC", 26, 33, 0.8)],
    annotation=[("NAME", 0, 7), ("LOC", 26, 33)],
)
rg.log(records=rec, name="my_dataset")
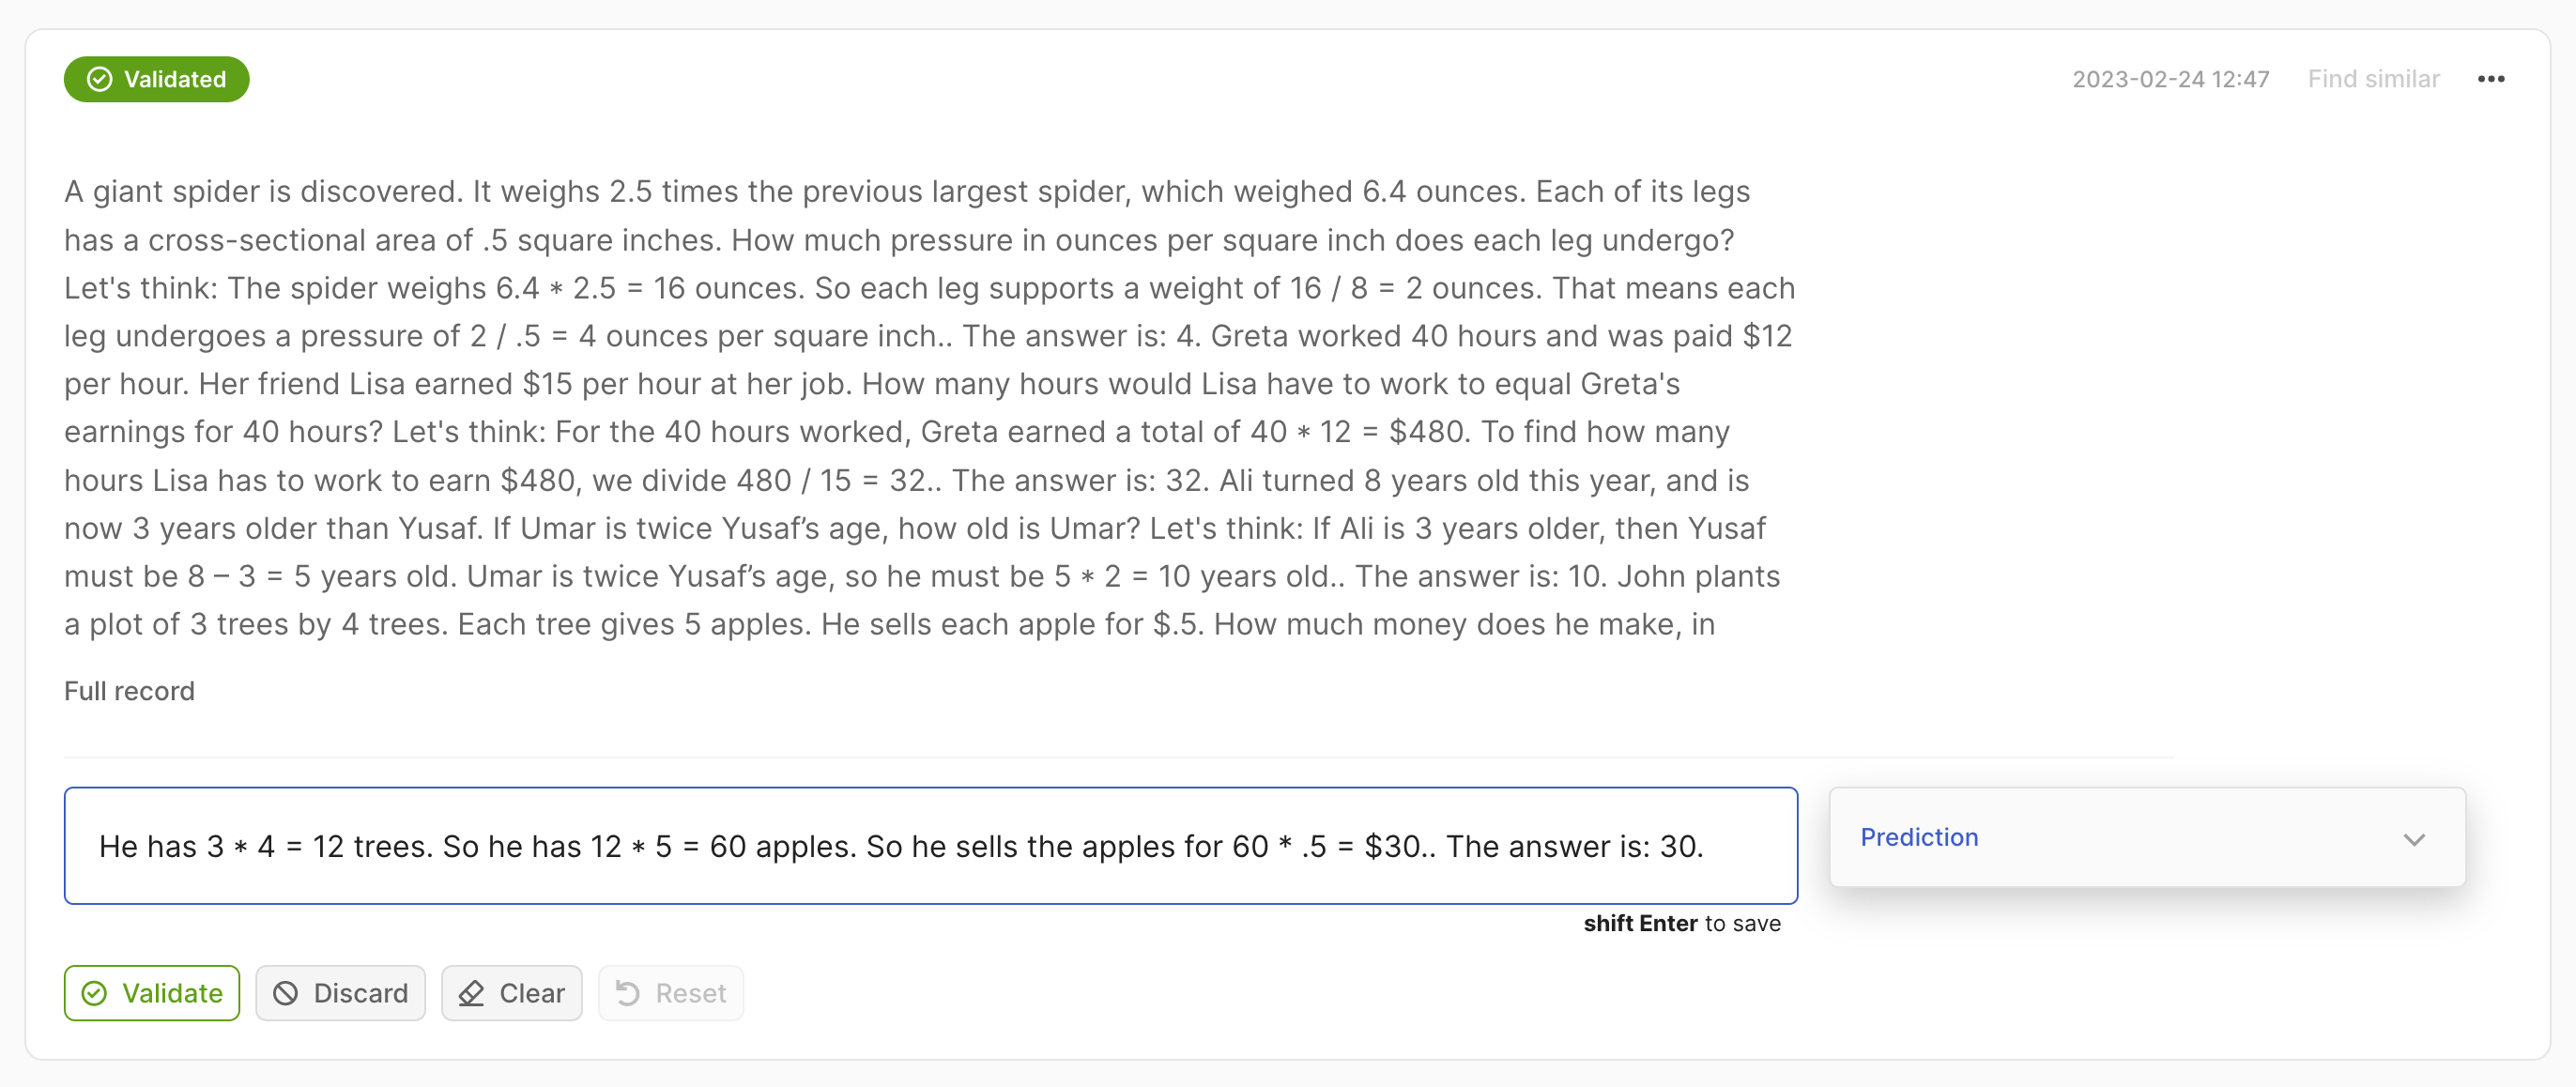
import argilla as rg

record = rg.Text2TextRecord(
    text="A giant giant spider is discovered... how much does he make in a year?",
    prediction=["He has 3*4 trees. So he has 12*5=60 apples."],
)
rg.log(records=rec, name="my_dataset")
查询数据集#
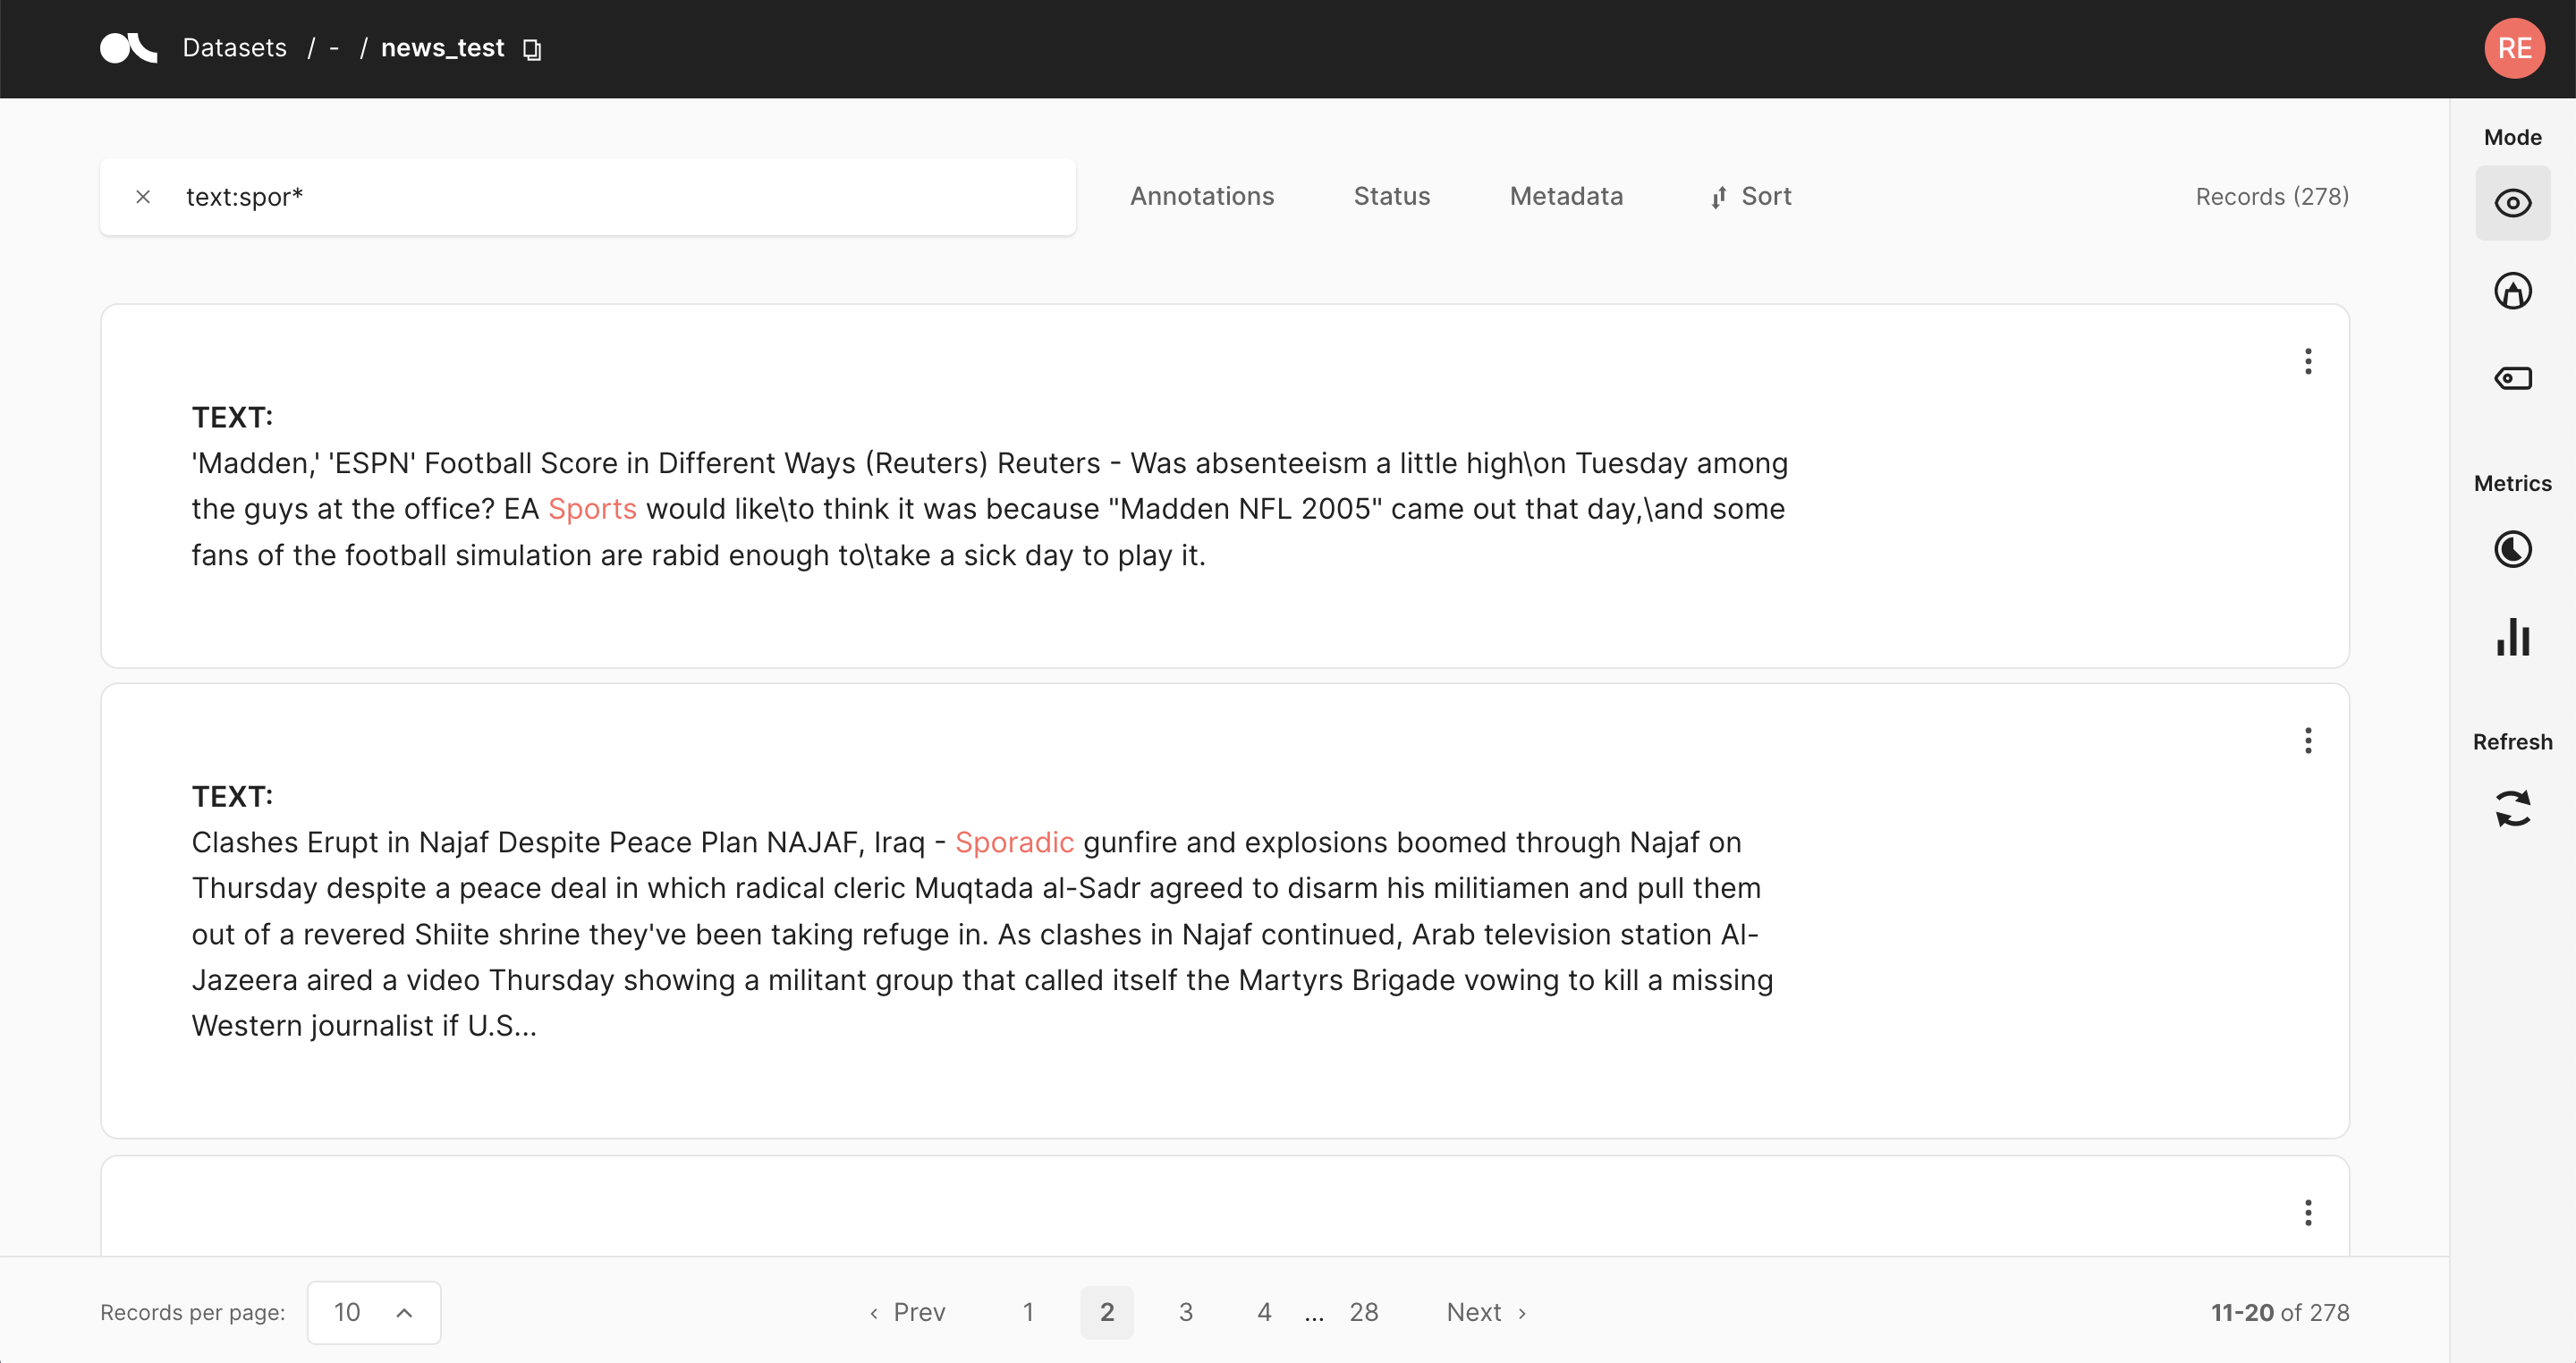
要从 UI 或 Python 库搜索你的数据,你需要能够编写 Lucene 查询语言 (LQL),它是 Elastic Search 和 Open Search 的原生语言。要了解有关查询和搜索的更多信息,请查看 这里。
text 字段使用 Elasticsearch 的 standard analyzer,它忽略大小写并删除大部分标点符号;text.exact 字段使用 whitespace analyzer,它区分大小写,并考虑标点符号;
text:dog.或text:fox:匹配两个记录。text.exact:dog或text.exact:FOX:不匹配任何记录。text.exact:dog.或text.exact:fox:仅匹配第一个记录。text.exact:DOG或text.exact:FOX\!:仅匹配第二个记录。
类似的推理也适用于 inputs,要在 subject 键包含单词 news 的记录中查找,你可以搜索
inputs.subject:news
同样,与 text 字段一样,你也可以使用空格分析器通过指定 exact 字段来执行更细粒度的搜索。
inputs.subject.exact:NEWS
假设你提供了记录所属的拆分作为元数据,即 metadata={"split": "train"} 或 metadata={"split": "test"}。然后,你可以通过在查询中指定相应的字段来仅搜索你的训练数据
metadata.split:train
就像元数据一样,你也可以在查询中使用过滤器字段。以下是一些模拟查询字符串中过滤器的示例
status:Validatedannotated_as:HAMpredicted_by:Model A
可以为日期、数字或字符串字段指定范围。包含范围用方括号指定,排除范围用花括号指定
score:[0.5 TO 0.6]score:{0.9 TO *}event_timestamp:[1984-01-01T01:01:01.000000 TO *]last_updated:{* TO 1984-01-01T01:01:01.000000}
你可以在搜索中使用熟悉的布尔运算符 AND、OR 和 NOT 组合任意数量的术语和字段。以下示例展示了这些运算符的强大功能
text:(quick AND fox):返回包含单词 quick 和 fox 的记录。AND运算符是默认运算符,因此text:(quick fox)是等效的。text:(quick OR brown):返回包含单词 quick 或 brown 的记录。text:(quick AND fox AND NOT news):返回包含单词 quick 和 fox,但不包含 news 的记录。metadata.split:train AND text:fox:返回包含单词 fox 并且具有元数据 “split: train” 的记录。NOT _exists_:metadata.split:返回没有元数据 split 的记录。
正则表达式模式可以嵌入到查询字符串中,方法是用正斜杠 “/” 将它们括起来
text:/joh?n(ath[oa]n)/:匹配 jonathon、jonathan、johnathon 和 johnathan。
官方 Elasticsearch 文档 中解释了支持的正则表达式语法。
你可以使用 fuzzy 运算符搜索与搜索词相似但不完全相同的术语。这对于涵盖人为拼写错误很有用
text:quikc~:匹配 quick 和 quikc。
可以使用通配符在单个搜索词上运行搜索,使用 ? 替换单个字符,使用 * 替换零个或多个字符
text:(qu?ck bro*)text.exact:"Lazy Dog*":例如,匹配 “Lazy Dog”、“Lazy Dog.” 或 “Lazy Dogs”。inputs.\*:news:在所有输入字段中搜索单词 news。
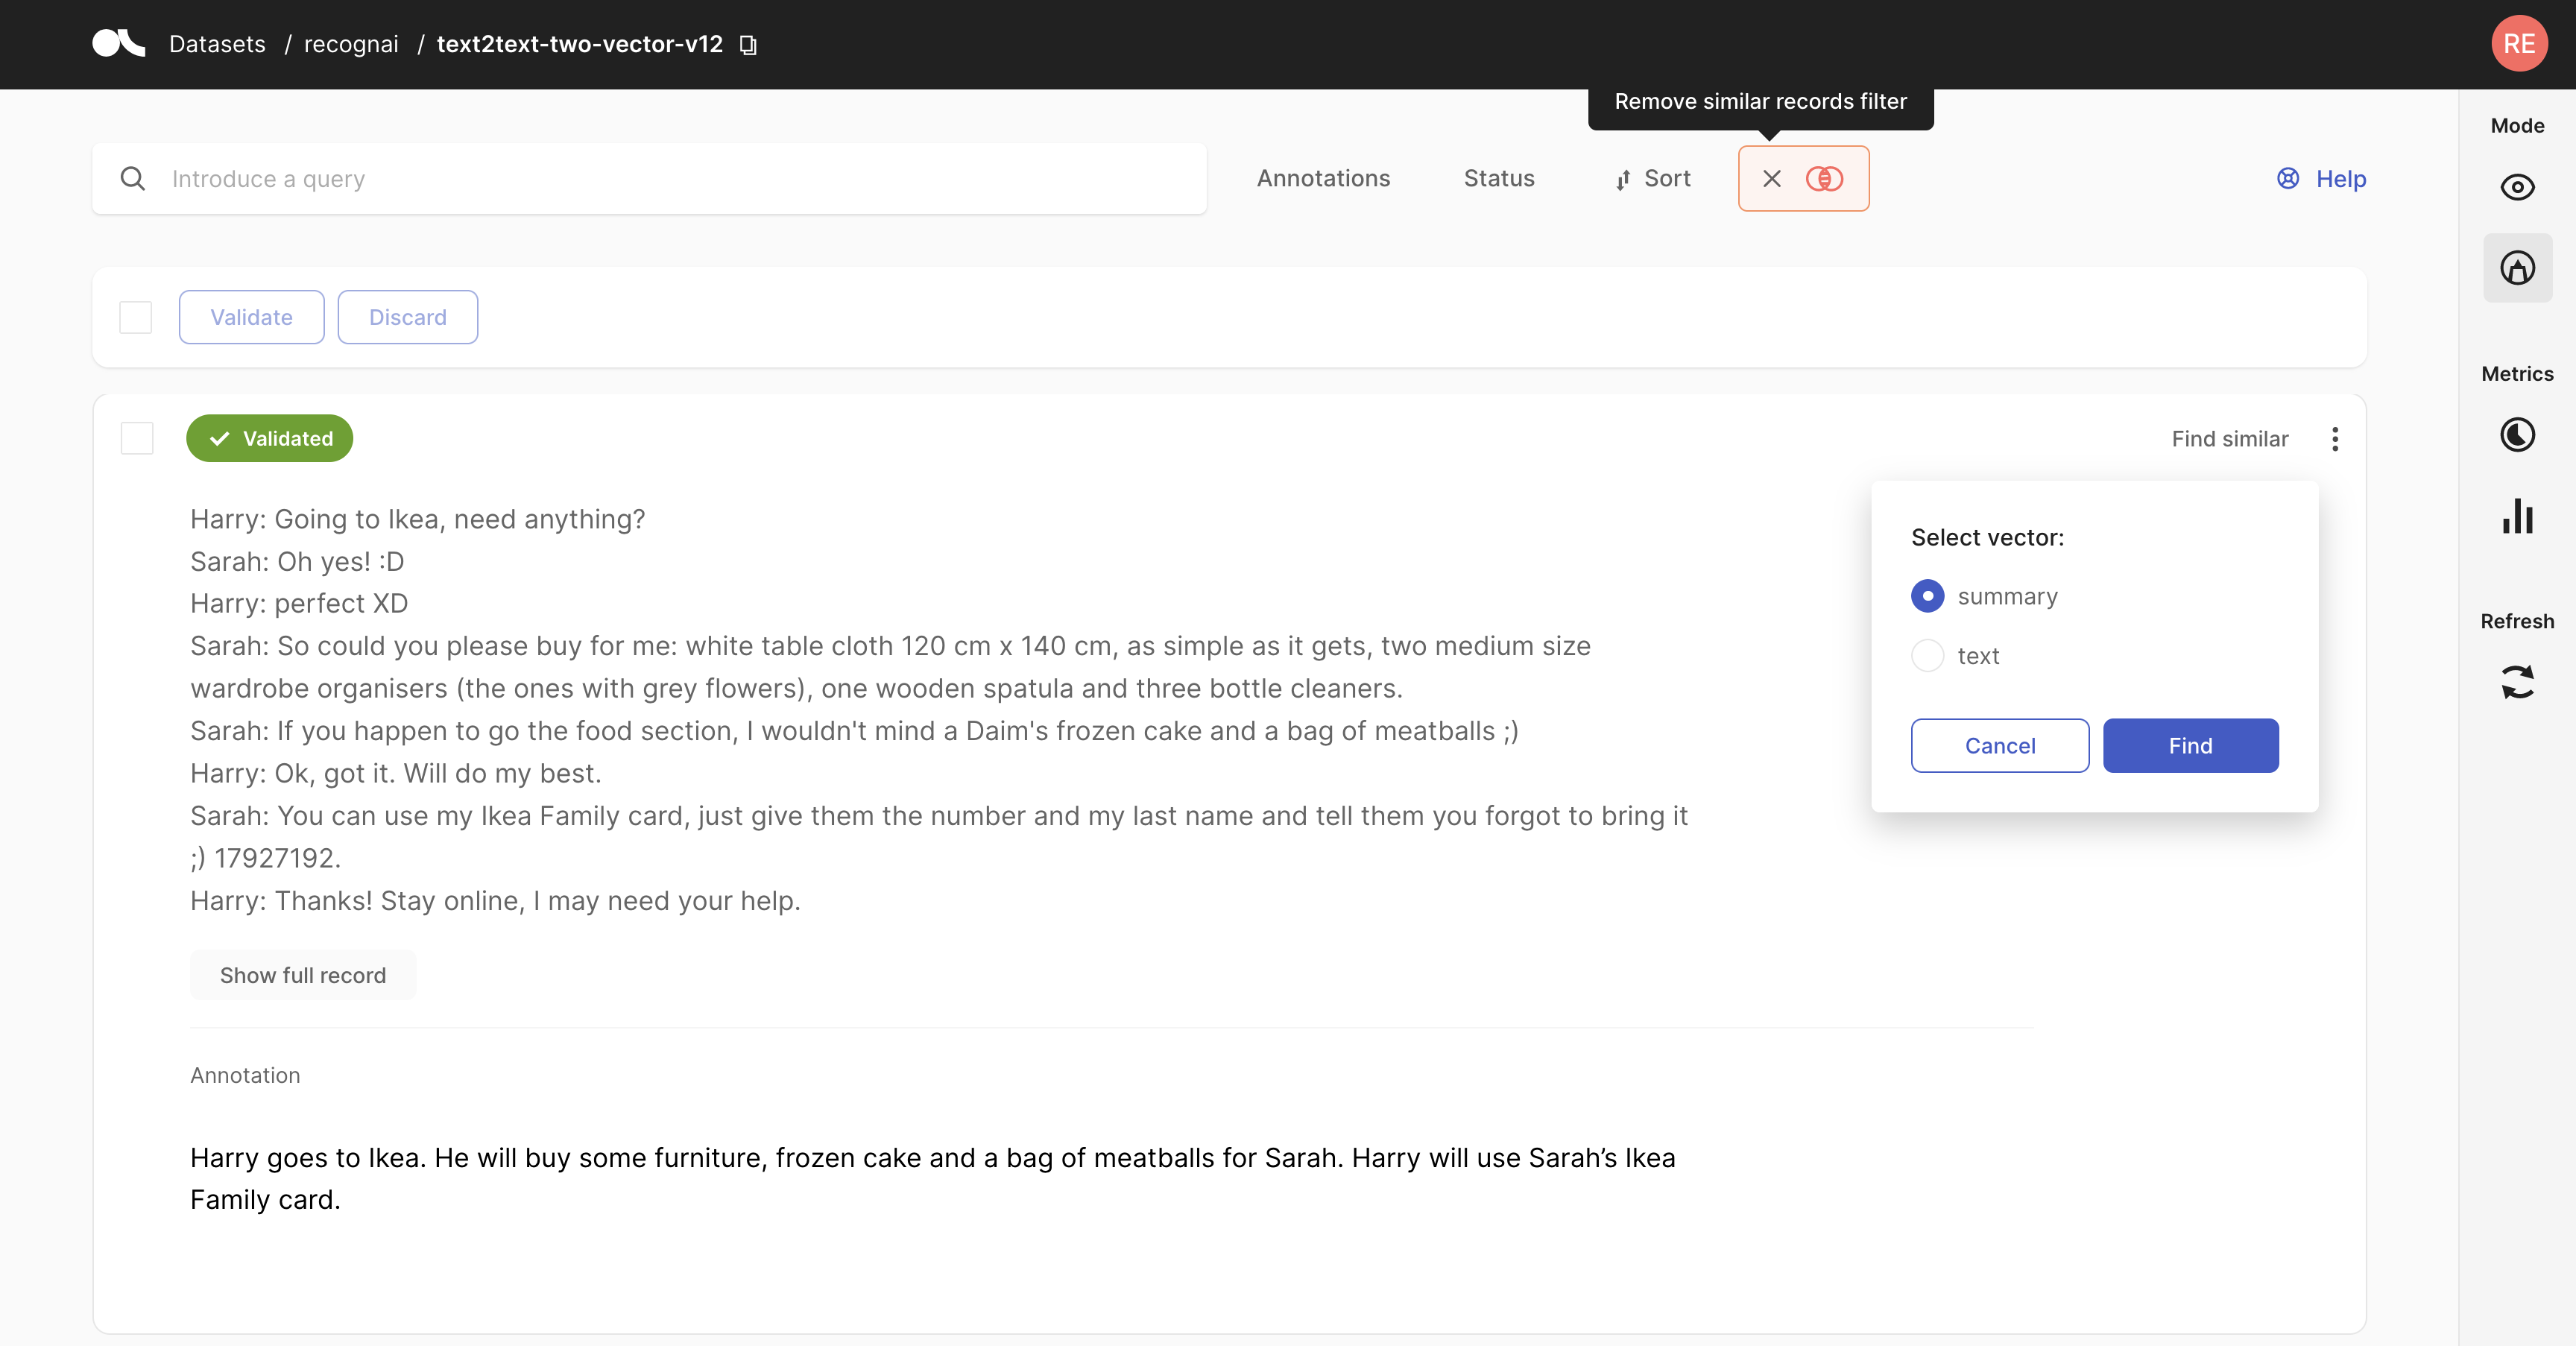
语义搜索#
语义搜索或向量搜索是一种非常强大的工具,可以根据逻辑直觉而不是关键字来筛选文本。我们使用原生的 Elastic Search 向量支持来帮助我们的用户导航他们的记录。想了解更多关于这方面的信息吗?查看 这里。
import argilla as rg

# We allow for a maximum of 5 vectors.
record = rg.TextClassificationRecord(
    text="Hello world, I am a vector record!",
    vectors= {"my_vector_name": [0, 42, 1984]}
)
rg.log(name="dataset", records=record)
import argilla as rg

# We return the 50 most similar records
records = rg.load(name="dataset", vector=("my_vector_name", [0, 43, 1985]))
弱监督#
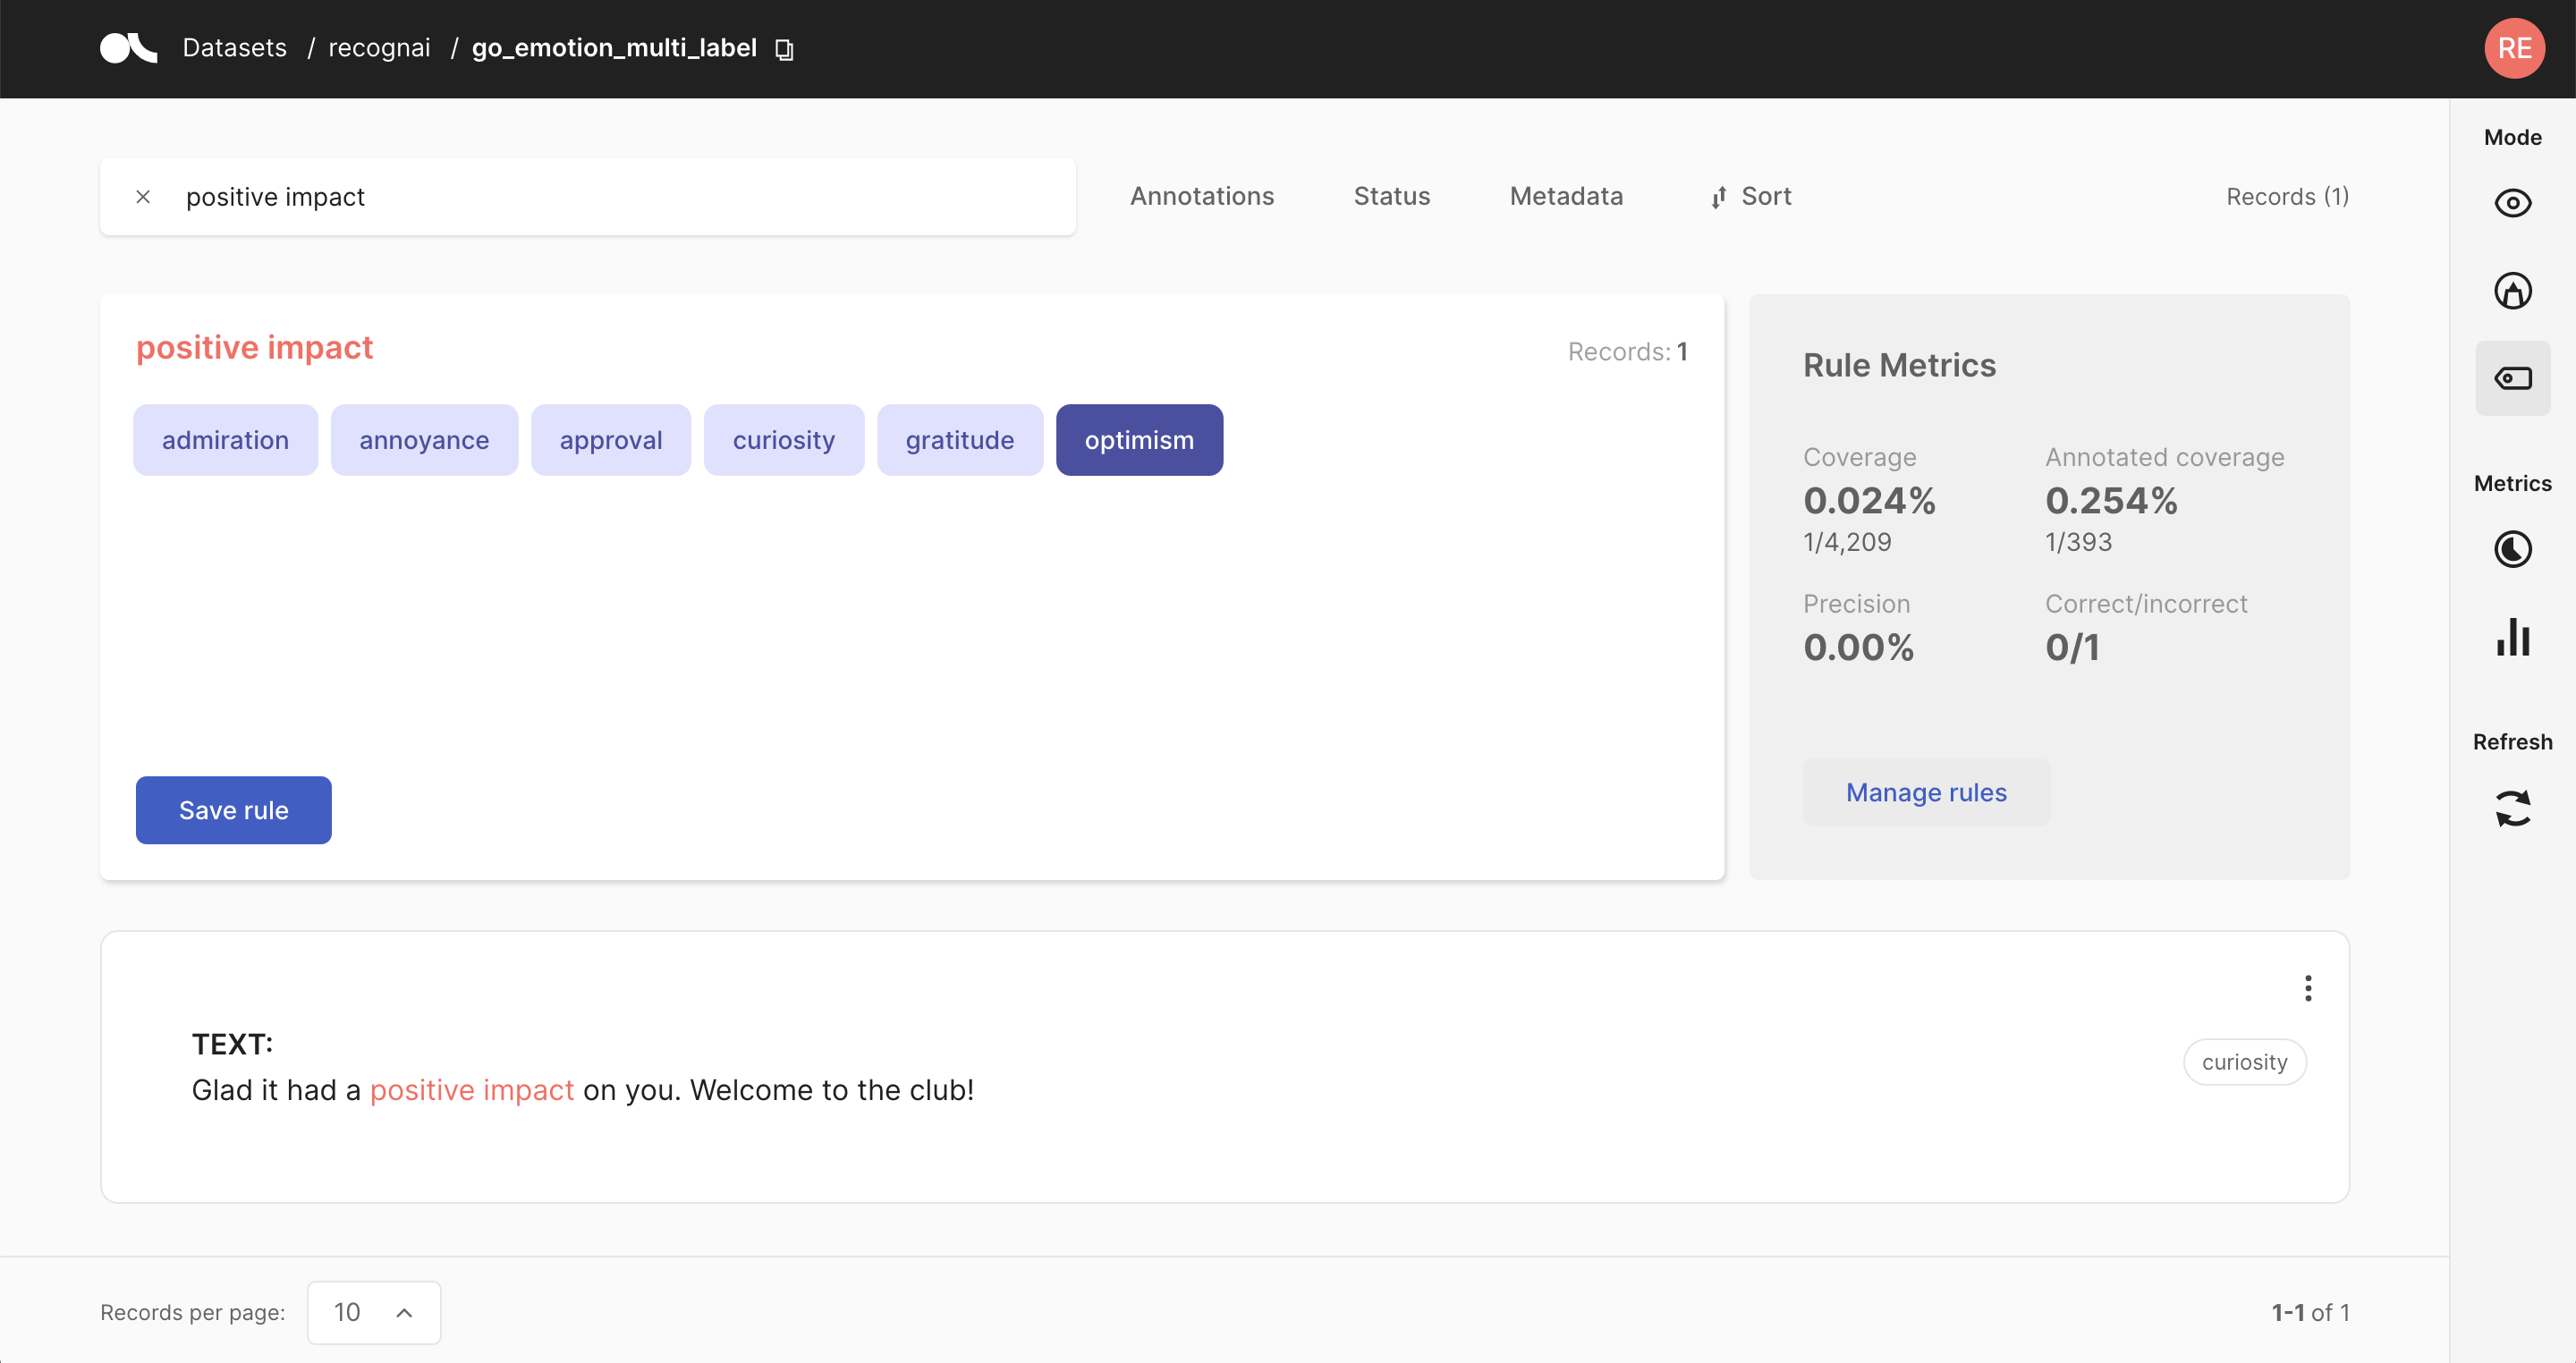
NLP 的弱监督就像用“近似”答案而不是完美答案来教模型一样。它使用巧妙的技巧和快捷方式来避免对劳动密集型标注的需求。这就像给模型提供训练轮,让它自己学习。虽然它不如传统监督准确,但它允许在更大的规模上进行训练。想了解更多信息,请查看 这里。
from argilla.labeling.text_classification import add_rules, delete_rules, Rule, update_rules

# Create
rule = Rule(query="positive impact", label="optimism")
add_rules(dataset="my_dataset", rules=[rule])

# Update
rule.label = "pessimism"
update_rules(dataset="my_dataset", rules=[rule])

# Delete
delete_rules(dataset="my_dataset", rules=[rule])
from argilla.labeling.text_classification import WeakLabels, load_rules

rules = load_rules("my_dataset")

weak_labels = WeakLabels(
    rules=rules,
    dataset="my_dataset"
)

weak_labels.summary()
from argilla.labeling.text_classification import MajorityVoter, #Snorkel, #FlyingSquid

majority_model = MajorityVoter(weak_labels)
majority_model.score(output_str=True)
records_for_training = majority_model.predict()

# optional: log the records to a new dataset in Argilla
rg.log(records_for_training, name="majority_voter_results")
训练模型#
我们和你一样喜欢我们的开源训练库,因此我们与所有这些库集成了,以限制你花费在数据准备上的时间,并让你在实际训练中获得更多乐趣。我们支持 spacy、transformers、setfit、openai、autotrain 等等。想了解所有支持吗?从 FeedbackDataset 训练/微调模型,如 此处 解释的那样,或者从 TextClassificationDataset 或 TokenClassificationDataset 此处 开始。
from argilla.training import ArgillaTrainer

trainer = ArgillaTrainer(
    name="my_dataset",
    workspace="my_workspace",
    framework="my_framework",
    model="my_framework_model",
    train_size=0.8,
    seed=42,
    limit=10,
    query="my-query"
)
trainer.update_config() # see usage below
trainer.train()
records = trainer.predict(["my-text"], as_argilla_records=True)
# `OpenAI.FineTune`
trainer.update_config(
    training_file = None,
    validation_file = None,
    model = "gpt-3.5-turbo-0613",
    hyperparameters = {"n_epochs": 1},
    suffix = None
)

# `OpenAI.FineTune` (legacy)
trainer.update_config(
    training_file = None,
    validation_file = None,
    model = "curie",
    n_epochs = 2,
    batch_size = None,
    learning_rate_multiplier = 0.1,
    prompt_loss_weight = 0.1,
    compute_classification_metrics = False,
    classification_n_classes = None,
    classification_positive_class = None,
    classification_betas = None,
    suffix = None
)
# `AutoTrain.autotrain_advanced`
trainer.update_config(
    model = "autotrain", # hub models like roberta-base
    autotrain = [{
        "source_language": "en",
        "num_models": 5
    }],
    hub_model = [{
        "learning_rate":  0.001,
        "optimizer": "adam",
        "scheduler": "linear",
        "train_batch_size": 8,
        "epochs": 10,
        "percentage_warmup": 0.1,
        "gradient_accumulation_steps": 1,
        "weight_decay": 0.1,
        "tasks": "text_binary_classification", # this is inferred from the dataset
    }]
)
# `setfit.SetFitModel`
trainer.update_config(
    pretrained_model_name_or_path = "all-MiniLM-L6-v2",
    force_download = False,
    resume_download = False,
    proxies = None,
    token = None,
    cache_dir = None,
    local_files_only = False
)
# `setfit.SetFitTrainer`
trainer.update_config(
    metric = "accuracy",
    num_iterations = 20,
    num_epochs = 1,
    learning_rate = 2e-5,
    batch_size = 16,
    seed = 42,
    use_amp = True,
    warmup_proportion = 0.1,
    distance_metric = "BatchHardTripletLossDistanceFunction.cosine_distance",
    margin = 0.25,
    samples_per_label = 2
)
# `spacy.training`
trainer.update_config(
    dev_corpus = "corpora.dev",
    train_corpus = "corpora.train",
    seed = 42,
    gpu_allocator = 0,
    accumulate_gradient = 1,
    patience = 1600,
    max_epochs = 0,
    max_steps = 20000,
    eval_frequency = 200,
    frozen_components = [],
    annotating_components = [],
    before_to_disk = None,
    before_update = None
)
# `transformers.AutoModelForTextClassification`
trainer.update_config(
    pretrained_model_name_or_path = "distilbert-base-uncased",
    force_download = False,
    resume_download = False,
    proxies = None,
    token = None,
    cache_dir = None,
    local_files_only = False
)
# `transformers.TrainingArguments`
trainer.update_config(
    per_device_train_batch_size = 8,
    per_device_eval_batch_size = 8,
    gradient_accumulation_steps = 1,
    learning_rate = 5e-5,
    weight_decay = 0,
    adam_beta1 = 0.9,
    adam_beta2 = 0.9,
    adam_epsilon = 1e-8,
    max_grad_norm = 1,
    learning_rate = 5e-5,
    num_train_epochs = 3,
    max_steps = 0,
    log_level = "passive",
    logging_strategy = "steps",
    save_strategy = "steps",
    save_steps = 500,
    seed = 42,
    push_to_hub = False,
    hub_model_id = "user_name/output_dir_name",
    hub_strategy = "every_save",
    hub_token = "1234",
    hub_private_repo = False
)
# `peft.LoraConfig`
trainer.update_config(
    r=8,
    target_modules=None,
    lora_alpha=16,
    lora_dropout=0.1,
    fan_in_fan_out=False,
    bias="none",
    inference_mode=False,
    modules_to_save=None,
    init_lora_weights=True,
)
# `transformers.AutoModelForTextClassification`
trainer.update_config(
    pretrained_model_name_or_path = "distilbert-base-uncased",
    force_download = False,
    resume_download = False,
    proxies = None,
    token = None,
    cache_dir = None,
    local_files_only = False
)
# `transformers.TrainingArguments`
trainer.update_config(
    per_device_train_batch_size = 8,
    per_device_eval_batch_size = 8,
    gradient_accumulation_steps = 1,
    learning_rate = 5e-5,
    weight_decay = 0,
    adam_beta1 = 0.9,
    adam_beta2 = 0.9,
    adam_epsilon = 1e-8,
    max_grad_norm = 1,
    learning_rate = 5e-5,
    num_train_epochs = 3,
    max_steps = 0,
    log_level = "passive",
    logging_strategy = "steps",
    save_strategy = "steps",
    save_steps = 500,
    seed = 42,
    push_to_hub = False,
    hub_model_id = "user_name/output_dir_name",
    hub_strategy = "every_save",
    hub_token = "1234",
    hub_private_repo = False
)
# `SpanMarkerConfig`
trainer.update_config(
    pretrained_model_name_or_path = "distilbert-base-cased"
    model_max_length = 256,
    marker_max_length = 128,
    entity_max_length = 8,
)
# `transformers.TrainingArguments`
trainer.update_config(
    per_device_train_batch_size = 8,
    per_device_eval_batch_size = 8,
    gradient_accumulation_steps = 1,
    learning_rate = 5e-5,
    weight_decay = 0,
    adam_beta1 = 0.9,
    adam_beta2 = 0.9,
    adam_epsilon = 1e-8,
    max_grad_norm = 1,
    learning_rate = 5e-5,
    num_train_epochs = 3,
    max_steps = 0,
    log_level = "passive",
    logging_strategy = "steps",
    save_strategy = "steps",
    save_steps = 500,
    seed = 42,
    push_to_hub = False,
    hub_model_id = "user_name/output_dir_name",
    hub_strategy = "every_save",
    hub_token = "1234",
    hub_private_repo = False
)
# Parameters from `trl.RewardTrainer`, `trl.SFTTrainer`, `trl.PPOTrainer` or `trl.DPOTrainer`.
# `transformers.TrainingArguments`
trainer.update_config(
    per_device_train_batch_size = 8,
    per_device_eval_batch_size = 8,
    gradient_accumulation_steps = 1,
    learning_rate = 5e-5,
    weight_decay = 0,
    adam_beta1 = 0.9,
    adam_beta2 = 0.9,
    adam_epsilon = 1e-8,
    max_grad_norm = 1,
    learning_rate = 5e-5,
    num_train_epochs = 3,
    max_steps = 0,
    log_level = "passive",
    logging_strategy = "steps",
    save_strategy = "steps",
    save_steps = 500,
    seed = 42,
    push_to_hub = False,
    hub_model_id = "user_name/output_dir_name",
    hub_strategy = "every_save",
    hub_token = "1234",
    hub_private_repo = False
)
# Parameters related to the model initialization from `sentence_transformers.SentenceTransformer`
trainer.update_config(
    model="sentence-transformers/all-MiniLM-L6-v2",
    modules = False,
    device="cuda",
    cache_folder="dir/folder",
    use_auth_token=True
)
# and from `sentence_transformers.CrossEncoder`
trainer.update_config(
    model="cross-encoder/ms-marco-MiniLM-L-6-v2",
    num_labels=2,
    max_length=128,
    device="cpu",
    tokenizer_args={},
    automodel_args={},
    default_activation_function=None
)
# Related to the training procedure from `sentence_transformers.SentenceTransformer`
trainer.update_config(
    steps_per_epoch = 2,
    checkpoint_path: str = None,
    checkpoint_save_steps: int = 500,
    checkpoint_save_total_limit: int = 0
)
# and from `sentence_transformers.CrossEncoder`
trainer.update_config(
    loss_fct = None
    activation_fct = nn.Identity(),
)
# The remaining arguments are common for both procedures
trainer.update_config(
    evaluator: SentenceEvaluator = evaluation.EmbeddingSimilarityEvaluator,
    epochs: int = 1,
    scheduler: str = 'WarmupLinear',
    warmup_steps: int = 10000,
    optimizer_class: Type[Optimizer] = torch.optim.AdamW,
    optimizer_params : Dict[str, object]= {'lr': 2e-5},
    weight_decay: float = 0.01,
    evaluation_steps: int = 0,
    output_path: str = None,
    save_best_model: bool = True,
    max_grad_norm: float = 1,
    use_amp: bool = False,
    callback: Callable[[float, int, int], None] = None,
    show_progress_bar: bool = True,
)
# Other parameters that don't correspond to the initialization or the trainer, but
# can be set externally.
trainer.update_config(
    batch_size=8,  # It will be passed to the DataLoader to generate batches during training.
    loss_cls=losses.BatchAllTripletLoss
)
