🔗 使用 LLM 进行少样本 Token 分类建议,基于 spacy-llm#
本教程将指导你完成使用 spacy-llm 和少样本学习的命名实体识别 (NER) 管道。步骤如下:
运行 Argilla 并加载
spacy-llm以及其他库为模型定义少样本示例
为你的管道定义配置并初始化它
创建
TokenClassificationRecord并将推理存储在其中推送到 Argilla
简介#
NER 是一项自然语言处理任务,其中 token 被分类为预定义的类别,例如人、组织或地点,作为命名 实体。因此,NER 是将非结构化数据转化为结构化数据的主要步骤之一。通过 Argilla,你将有机会验证和注释从 NER 管道中获得的命名实体。
spacy-llm 是一个将 LLM 的优势集成到常规 spaCy 管道中的软件包,从而允许为各种任务进行快速且实用的提示。此外,由于它不需要训练数据,因此模型可以立即在你的管道中使用。如果你想训练自己的模型或创建自定义任务,spacy-llm 也有助于实现任何自定义管道。
在本教程中,我们将创建一个 spacy-llm 管道,以对 banking77 数据集执行 NER。这是一个由客户的在线银行查询及其与相应意图的注释组成的数据集。我们将向我们的模型展示一些正面和负面示例,以提高其性能,我们实际上将为特定的命名实体定义一个类别。
运行 Argilla#
对于本教程,你将需要运行 Argilla 服务器。部署和运行 Argilla 有两个主要选项:
在 Hugging Face Spaces 上部署 Argilla:如果你想使用外部 Notebook(例如 Google Colab)运行教程,并且你拥有 Hugging Face 上的帐户,则只需点击几下即可在 Spaces 上部署 Argilla

有关配置部署的详细信息,请查看 官方 Hugging Face Hub 指南。
使用 Argilla 的快速启动 Docker 镜像启动 Argilla:如果你想在 本地机器上运行 Argilla,这是推荐的选项。请注意,此选项仅允许你在本地运行教程,而不能与外部 Notebook 服务一起运行。
有关部署选项的更多信息,请查看文档的部署部分。
提示
本教程是一个 Jupyter Notebook。有两种运行它的选项:
使用此页面顶部的“在 Colab 中打开”按钮。此选项允许你在 Google Colab 上直接运行 Notebook。不要忘记将运行时类型更改为 GPU 以加快模型训练和推理速度。
通过点击页面顶部的“查看源代码”链接下载 .ipynb 文件。此选项允许你下载 Notebook 并在本地机器或你选择的 Jupyter Notebook 工具上运行它。
设置#
你将需要安装一些库以及 Argilla 才能进行本教程。
[ ]:
!pip install "spacy-llm[transformers]" argilla datasets -qqq
让我们导入所需的库。
[ ]:
import os
import json
import configparser
import argilla as rg
from spacy_llm.util import assemble
from datasets import load_dataset
你需要使用 API_URL 和 API_KEY 初始化 Argilla 客户端
[ ]:
# Replace api_url with the url to your HF Spaces URL if using Spaces
# Replace api_key if you configured a custom API key
# Replace workspace with the name of your workspace
rg.init(
    api_url="https://:6900",
    api_key="owner.apikey",
    workspace="admin"
)
如果你正在运行私有的 Hugging Face Space,你还需要按如下方式设置 HF_TOKEN
[ ]:
# # Set the HF_TOKEN environment variable
# import os
# os.environ['HF_TOKEN'] = "your-hf-token"

# # Replace api_url with the url to your HF Spaces URL
# # Replace api_key if you configured a custom API key
# # Replace workspace with the name of your workspace
# rg.init(
#     api_url="https://[your-owner-name]-[your_space_name].hf.space",
#     api_key="owner.apikey",
#     workspace="admin",
#     extra_headers={"Authorization": f"Bearer {os.environ['HF_TOKEN']}"},
# )
为了能够将 GPT3.5 和 OpenAI 的其他模型与 spacy-llm 一起使用,我们将需要从 openai.com 获取 API 密钥,并将其设置为环境变量。
[ ]:
os.environ["OPENAI_API_KEY"] = <YOUR_OPENAI_API_KEY>
启用遥测#
我们从你与我们的教程互动的方式中获得宝贵的见解。为了改进我们自己,为您提供最合适的内容,使用以下代码行将帮助我们了解本教程是否有效地为您服务。虽然这是完全匿名的,但如果你愿意,可以选择跳过此步骤。有关更多信息,请查看遥测页面。
[ ]:
try:
    from argilla.utils.telemetry import tutorial_running
    tutorial_running()
except ImportError:
    print("Telemetry is introduced in Argilla 1.20.0 and not found in the current installation. Skipping telemetry.")
加载数据集#
让我们从 HuggingFace Hub 导入我们的数据集。
[ ]:
dataset_hf = load_dataset("banking77", split="train")
我们可以查看数据集中的一个样本,以了解它包含什么。
[ ]:
dataset_hf.to_pandas().head()
spacy-llm 管道#
有两种方法可以为你的 LLM 任务实现 spacy-llm 管道:在源代码中运行管道或使用 config.cfg 文件来定义管道的所有设置和超参数。在本教程中,我们将使用配置文件,你可以从 此处 获得有关直接在 Python 中运行的更多信息。
在定义管道之前,让我们首先创建将用于我们模型的少样本学习的示例。
少样本示例#
在 spacy-llm 中,你有机会将你的示例注入到 LLM 的提示中。由于这将提高你特定任务的性能,spacy-llm 使在你的管道中拥有少样本示例变得非常容易。你可以在 此处 获得详细信息。
让我们以 json 格式定义一些非常基本的例句。
[ ]:
json_file = [
  {
    "text": "I was charged with an exchange rate for my purchase and it was not right.",
    "spans": [
      {
        "text": "charged",
        "is_entity": 'false',
        "label": "==NONE==",
        "reason": "is an action done to the customer by the bank, not by them"
      },
      {
        "text": "purchase",
        "is_entity": "true",
        "label": "ACTIVITY",
        "reason": "is an action that the customer did, not the bank"
      }
    ]
  },
  {
    "text": "The exchange rate for the last item I bought seems to be correct.",
    "spans": [
      {
        "text": "exchange rate",
        "is_entity": "false",
        "label": "==NONE==",
        "reason": "is a name for currency, not an action or performance"
      },
      {
        "text": "item",
        "is_entity": "false",
        "label": "==NONE==",
        "reason": "is a generic name for the object bought, not a performance"
      },
      {
        "text": "bought",
        "is_entity": "true",
        "label": "ACTIVITY",
        "reason": "is the verb for the action that the customer performed"
      }
    ]
  }
]
请注意,我们引入了正面和负面示例。除了正面示例之外,告诉模型某些 token 在某些上下文中不是命名实体将更能提高性能。
将 json 文件转储到基本目录中。
[ ]:
with open("fewshot.json", "w") as outfile:
    json.dump(json_file, outfile)
配置管道#
让我们通过 config.cfg 创建带有设置和参数的 spacy-llm 管道。我们将实现 NER 任务,我们在 pipeline 命令中定义该任务。然后,我们将组件添加到我们的管道中,以使用其模型和超参数指定任务。
[ ]:
config_string = """
  [paths]
  examples = "fewshot.json"

  [nlp]
  lang = "en"
  pipeline = ["llm","sentencizer"]

  [components]

  [components.llm]
  factory = "llm"

  [components.llm.task]
  @llm_tasks = "spacy.NER.v3"
  labels = ["PERSON", "ORGANIZATION", "CARDINAL", "PERCENT", "ACTIVITY"]

  [components.llm.task.examples]
  @misc = "spacy.FewShotReader.v1"
  path = "${paths.examples}"

  [components.llm.model]
  @llm_models = "spacy.GPT-3-5.v1"
  config = {"temperature": 0.5}

  [components.sentencizer]
  factory = "sentencizer"
  punct_chars = null
"""
请注意,标签应包括我们在少样本示例中定义的任何自定义命名实体。否则,模型将提出其自己对自定义命名实体的定义并相应地运行,这对于特定的命名实体来说可能是一个问题。
spacy-llm 提供了各种模型来在你的管道中实现。你可以查看可用的 OpenAI 模型,并查看如果你想使用开源模型提供的 HuggingFace 模型。
现在,使用 ConfigParser,我们可以创建配置文件。
[ ]:
config = configparser.ConfigParser()
config.read_string(config_string)

with open("config.cfg", 'w') as configfile:
   config.write(configfile)
让我们组装配置文件。
[ ]:
nlp = assemble("config.cfg")
我们现在可以使用该模型生成预测。
[ ]:
doc = nlp("The same item is 50% more expensive now, so they did not purchase it.")
doc.ents
数据集#
现在我们有了一个用于 NER 任务的功能管道,我们现在可以创建一个 TokenClassificationRecord 来存储其中的推理。我们将使用管道来为我们的数据集生成预测,并将它们存储在记录中。
创建记录#
我们将 token 和预测存储在 TokenClassificationRecord 中。让我们创建一个 tokenizers 函数来对我们数据集中的句子进行 token 化。
[ ]:
def tokenizer(doc):
  return [token.text for token in doc]
让我们从数据集项创建记录列表。有关你可以添加到记录中的其他字段的信息,请参阅 文档。
[ ]:
records = [
    rg.TokenClassificationRecord(
        text=doc.text,
        tokens=tokenizer(doc),
        prediction=[(ent.label_, ent.start_char, ent.end_char) for ent in doc.ents],
        prediction_agent="gpt-3.5-turbo"
    ) for doc in [nlp(item) for item in dataset_hf["text"]]
]
让我们从记录列表创建 DatasetForTokenClassification。
[ ]:
dataset = rg.DatasetForTokenClassification(records)
推送到 Argilla#
使用 rg.log 将数据集推送到 Argilla
[ ]:
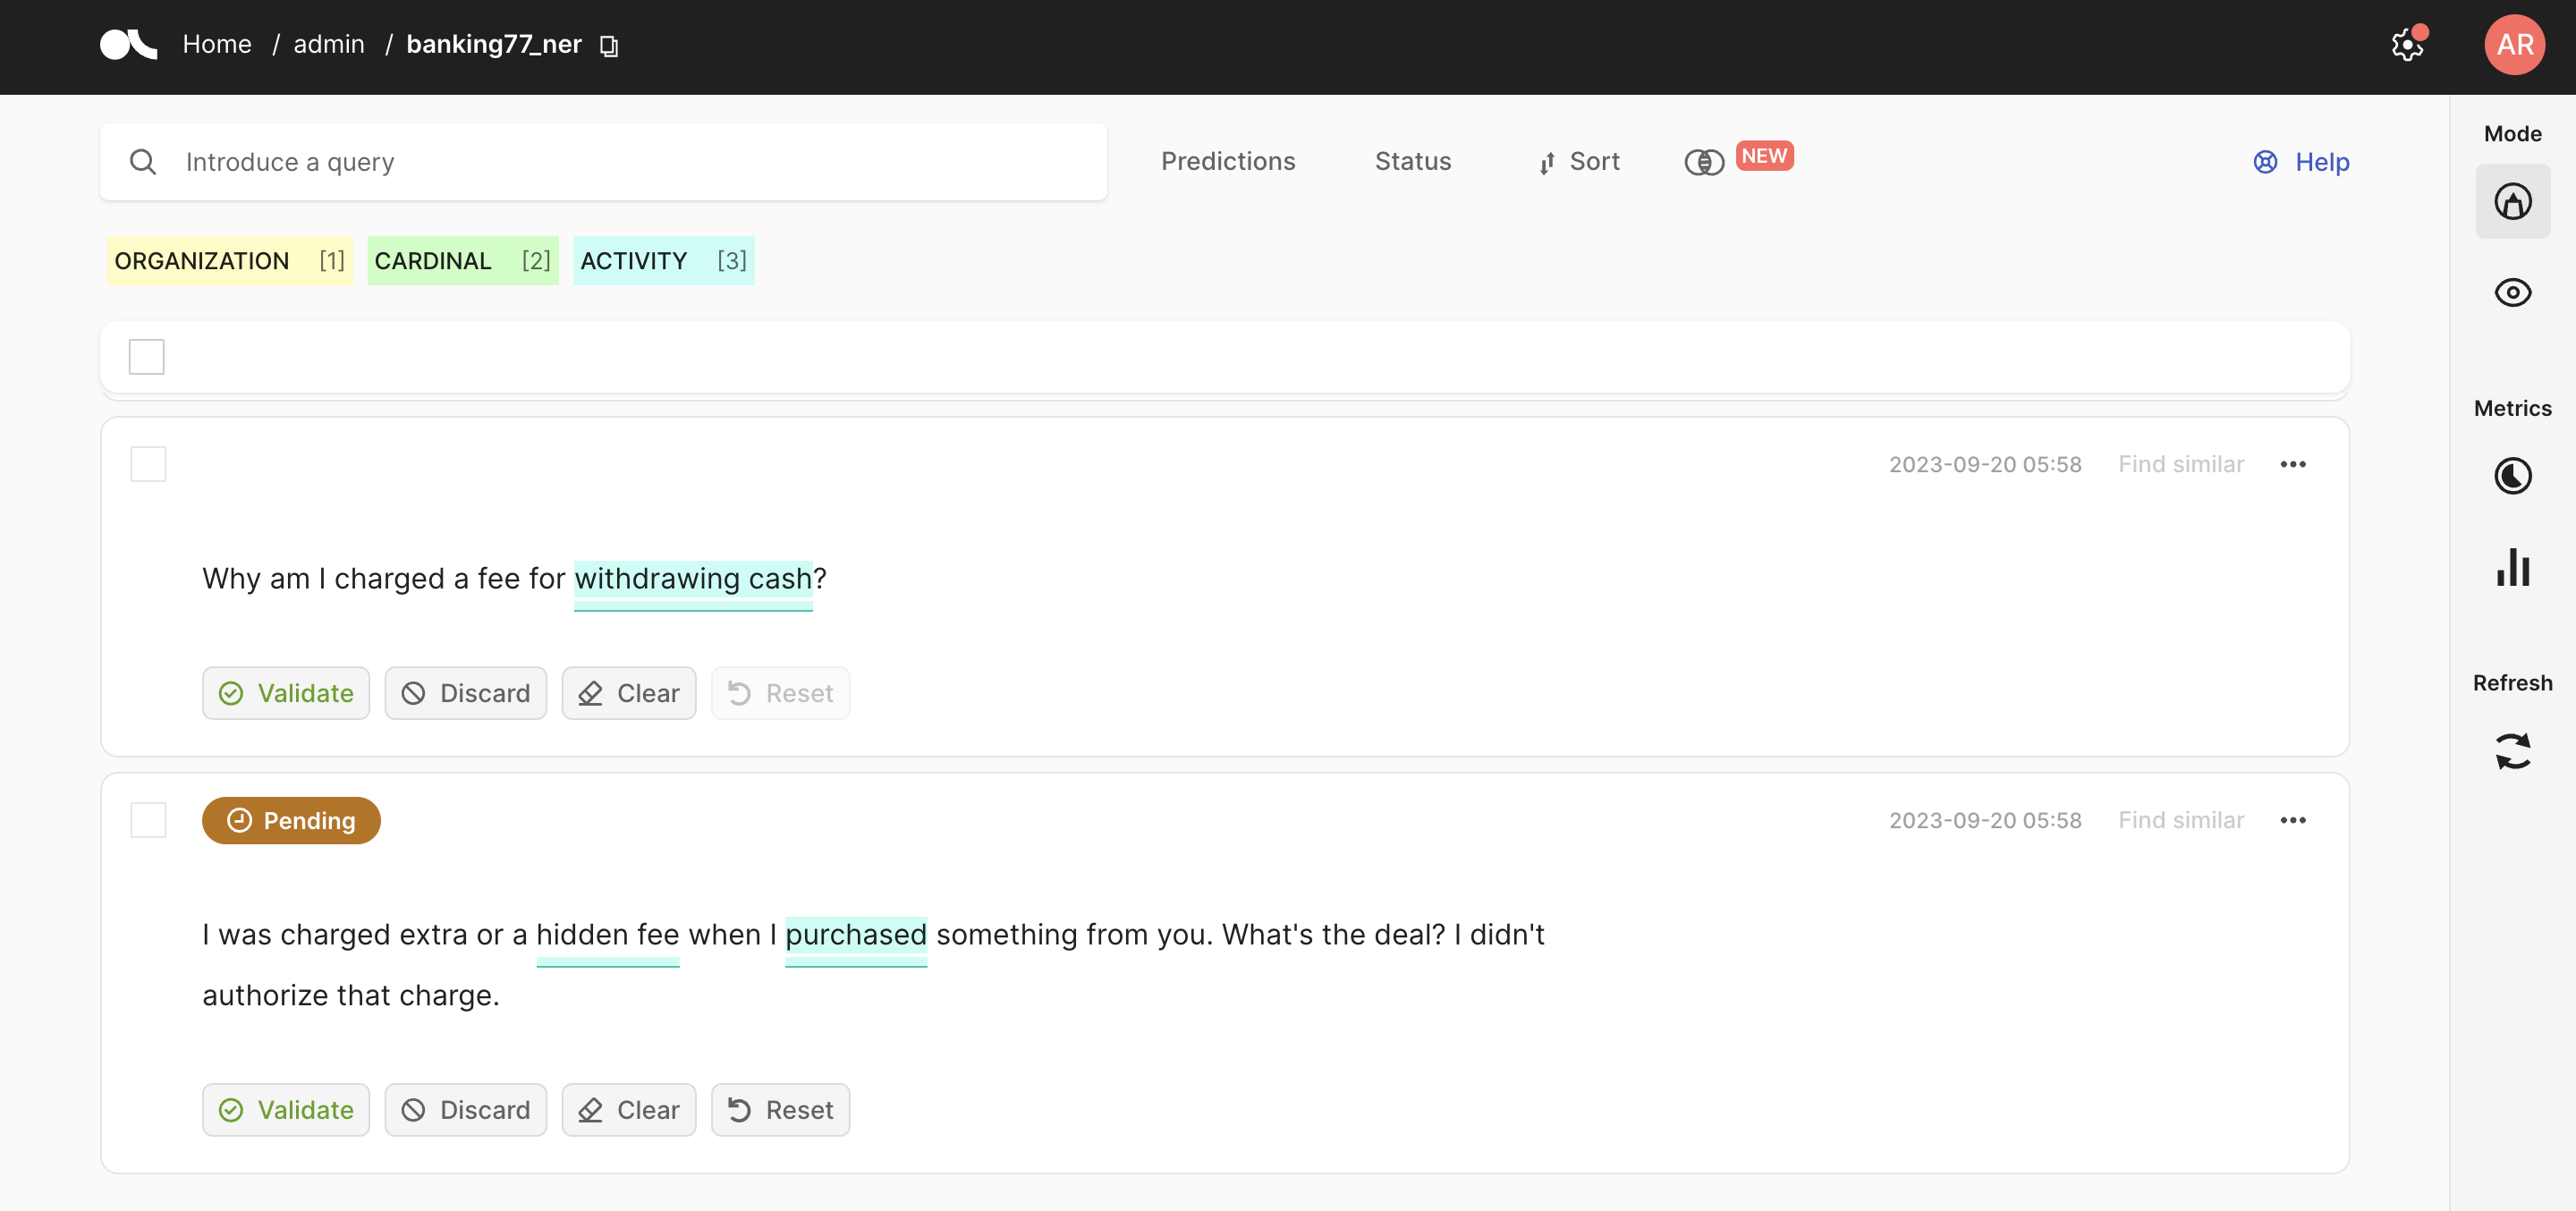
rg.log(dataset, "banking77_ner", workspace="admin")
我们的数据集现在已准备好使用 GPT3.5 的预测进行注释!你可以验证或放弃模型做出的预测。
在本教程中,我们通过使用 GPT3.5 的模型预测为 NER 任务实现了 spacy-llm 管道。此外,我们采用了一种少样本学习方法来提高我们模型的性能,这由 spacy-llm 促进。你可以在 此处 查看更多关于使用带有 Argilla 的 spaCy 的教程