🕵️♀️ 使用可解释性方法分析预测#
在本教程中,您将学习使用 Transformers 和以下库记录和探索 NLP 模型解释
Transformers Interpret
Shap
Argilla 中的可解释性和解释信息不限于这两个库。您可以使用您选择的方法填充此信息,以突出显示特定 token。
本教程对于开始使用和理解 Argilla 记录中解释信息的底层结构非常有用。
除了在模型开发和评估期间浏览示例外,在 Argilla 中存储可解释性信息对于监控和评估生产模型非常有用(更多关于这方面的教程即将推出!)
让我们开始吧!
运行 Argilla#
对于本教程,您需要运行 Argilla 服务器。部署和运行 Argilla 有两个主要选项
在 Hugging Face Spaces 上部署 Argilla:如果您想使用外部 notebook(例如 Google Colab)运行教程,并且您在 Hugging Face 上拥有帐户,则只需点击几下即可在 Spaces 上部署 Argilla

有关配置部署的详细信息,请查看官方 Hugging Face Hub 指南。
使用 Argilla 的快速入门 Docker 镜像启动 Argilla:如果您想在本地机器上运行 Argilla,建议使用此选项。请注意,此选项仅允许您在本地运行教程,而不能与外部 notebook 服务一起运行。
有关部署选项的更多信息,请查看文档的部署部分。
提示
本教程是一个 Jupyter Notebook。 有两个选项可以运行它
使用此页面顶部的“在 Colab 中打开”按钮。此选项允许您直接在 Google Colab 上运行 notebook。不要忘记将运行时类型更改为 GPU,以加快模型训练和推理速度。
通过单击页面顶部的“查看源代码”链接下载 .ipynb 文件。此选项允许您下载 notebook 并在本地机器或您选择的 Jupyter Notebook 工具上运行它。
[ ]:
%pip install argilla transformers-interpret==0.5.2 datasets transformers shap==0.40.0 numba==0.53.1 -qqq
让我们导入 Argilla 模块以进行数据读取和写入
[ ]:
import argilla as rg
如果您使用 Docker 快速入门镜像或 Hugging Face Spaces 运行 Argilla,则需要使用 URL 和 API_KEY 初始化 Argilla 客户端
[ ]:
# Replace api_url with the url to your HF Spaces URL if using Spaces
# Replace api_key if you configured a custom API key
# Replace workspace with the name of your workspace
rg.init(
    api_url="https://:6900",
    api_key="owner.apikey",
    workspace="admin"
)
如果您运行的是私有 Hugging Face Space,您还需要按如下方式设置 HF_TOKEN
[ ]:
# # Set the HF_TOKEN environment variable
# import os
# os.environ['HF_TOKEN'] = "your-hf-token"

# # Replace api_url with the url to your HF Spaces URL
# # Replace api_key if you configured a custom API key
# # Replace workspace with the name of your workspace
# rg.init(
#     api_url="https://[your-owner-name]-[your_space_name].hf.space",
#     api_key="owner.apikey",
#    workspace="admin",
#     extra_headers={"Authorization": f"Bearer {os.environ['HF_TOKEN']}"},
# )
最后,让我们包含我们需要导入的内容
[ ]:
from datasets import load_dataset

import transformers
from transformers import AutoModelForSequenceClassification, AutoTokenizer

import torch

from transformers_interpret import SequenceClassificationExplainer
import shap

from argilla import TokenAttributions, TextClassificationRecord

from sklearn.preprocessing import MinMaxScaler
启用遥测#
我们从您与我们的教程互动的方式中获得宝贵的见解。为了改进我们自己,为您提供最合适的内容,使用以下代码行将帮助我们了解本教程是否有效地为您服务。虽然这是完全匿名的,但如果您愿意,可以选择跳过此步骤。有关更多信息,请查看遥测页面。
[ ]:
try:
    from argilla.utils.telemetry import tutorial_running
    tutorial_running()
except ImportError:
    print("Telemetry is introduced in Argilla 1.20.0 and not found in the current installation. Skipping telemetry.")
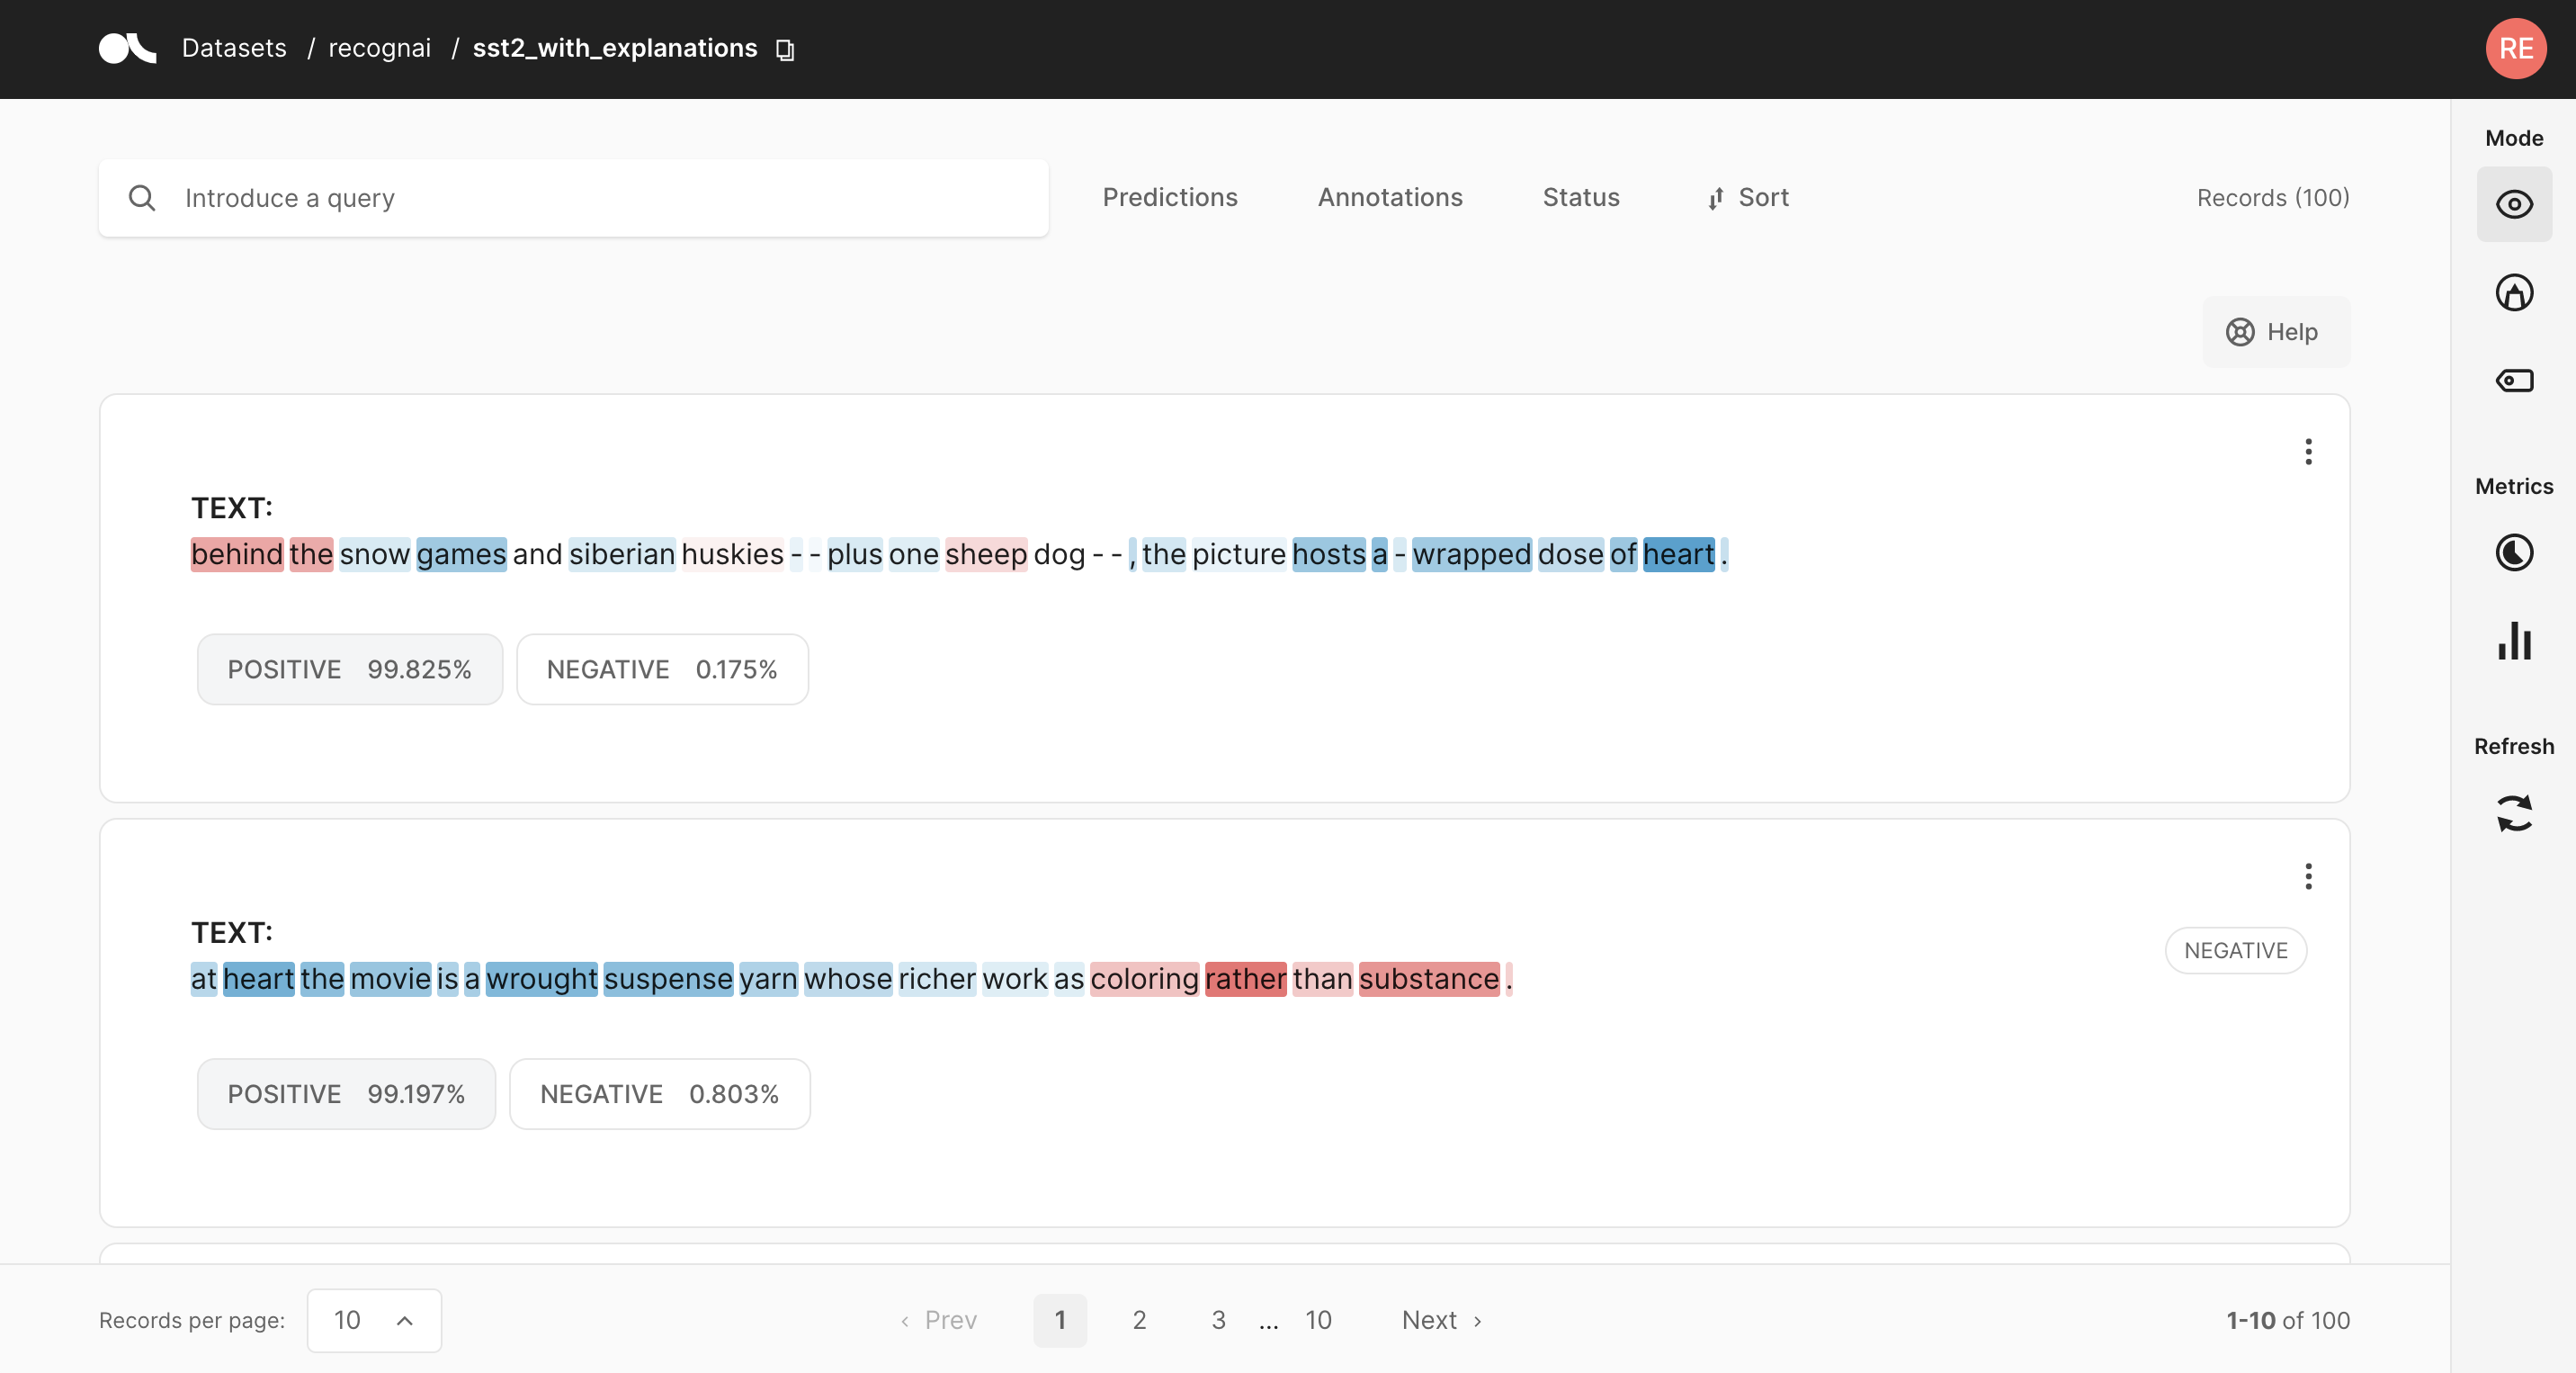
Token 归因以及高亮颜色意味着什么?#
Argilla 使您能够将 token 归因注册为数据集记录的一部分。为了获得 token 归因,您可以使用诸如 Integrated Gradients 或 SHAP 之类的方法。这些方法试图提供一种解释模型预测的机制。归因的工作原理如下
[0,1] 正向归因(蓝色) 反映了那些使模型预测特定预测标签的 token。
[-1, 0] 负向归因(红色) 反映了那些可能影响模型预测特定预测标签以外的标签的 token。
使用 Transformers Interpret#
在此示例中,我们将使用 sst 情感数据集和基于 distilbert 的情感分类器。为了获得模型解释信息,我们将使用优秀的 Transformers Interpret 库,由 Charles Pierse 开发。
警告
计算模型解释信息是计算密集型的,如果您没有 GPU,可能会非常慢。即使您有 GPU,也可能需要大约 3-4 分钟才能计算此数据集中 500 条记录的此信息。尝试使用修改 .select(range(1500)) 方法调用来减少记录数。
创建具有模型预测和解释的完全可搜索的数据集#
[ ]:
# Load Stanford sentiment treebank test set
dataset = load_dataset("sst", "default", split="test")

# Let's use a sentiment classifier fine-tuned on sst
model_name = "distilbert-base-uncased-finetuned-sst-2-english"
model = AutoModelForSequenceClassification.from_pretrained(model_name)

# Use gpu if available
device = torch.device("cuda" if torch.cuda.is_available() else "cpu")
model.to(device)

tokenizer = AutoTokenizer.from_pretrained(model_name)

# Define the explainer using transformers_interpret
cls_explainer = SequenceClassificationExplainer(model, tokenizer)

# Remove overlapping ##tokens
def merge_word_attributions(word_attributions):
    sentence =[]
    i = 0
    for attribution in word_attributions:
        word = attribution[0]
        score =  attribution[1]

        if "##" in word:
            previous_word = sentence[i-1][0]
            previous_score = sentence[i-1][1]
            sentence[i-1] = (previous_word+ word[2:], previous_score if abs(previous_score) > abs(score) else score)
        else:
            sentence.append(attribution)
            i+=1
    return sentence


records = []
for example in dataset.select(range(500)):
    # Build Token attributions objects
    word_attributions = merge_word_attributions(cls_explainer(example["sentence"]))
    token_attributions = [
        TokenAttributions(
            token=token, attributions={cls_explainer.predicted_class_name: score}
        )  # Ignore first (CLS) and last (SEP) tokens
        for token, score in word_attributions[1:-1]
    ]
    # Build Text classification records
    record = rg.TextClassificationRecord(
        text=example["sentence"],
        prediction=[(cls_explainer.predicted_class_name, cls_explainer.pred_probs)],
        explanation={"text": token_attributions},
    )
    records.append(record)

# Build Argilla dataset with interpretations for each record
rg.log(records, name="transformers_interpret_example")
使用 Shap#
在此示例中,我们将使用广泛使用的 Shap 库,由 Scott Lundberg 开发。
创建具有模型预测和解释的完全可搜索的数据集#
此示例与上面的示例非常相似。主要区别在于我们需要缩放 Shap 的值以匹配 Argilla UI 所需的范围。此限制用于可视化目的。如果您对监控用例更感兴趣,则可能不需要重新缩放。
警告
计算模型解释信息是计算密集型的,如果您没有 GPU,可能会非常慢。即使您有 GPU,也可能需要大约 1-2 分钟才能计算此数据集中 100 条记录的此信息。尝试使用修改 .select(range(1500)) 方法调用来减少记录数。
[ ]:
from pygments.token import Text
# Let's use a sentiment classifier fine-tuned on sst
model_name = "distilbert-base-uncased-finetuned-sst-2-english"
model = AutoModelForSequenceClassification.from_pretrained(model_name)
tokenizer = AutoTokenizer.from_pretrained(model_name)


# Use gpu if available
device = torch.device("cuda" if torch.cuda.is_available() else "cpu")
model.to(device)

# Transformers pipeline model
pipeline = transformers.pipeline(
    "sentiment-analysis",
    model=model,
    tokenizer=tokenizer,
    device=device,
    top_k=None
)

# Load Stanford treebank dataset only the first 100 records for testing
sst = load_dataset("sst2", split="train[0:100]")

# Use shap's library text explainer
explainer = shap.Explainer(pipeline)
shap_values = explainer(sst["sentence"])

# Instantiate the scaler
scaler = MinMaxScaler(feature_range=[-1, 1])

predictions = pipeline(sst["sentence"])

for i in range(0, len(shap_values.values)):
    # Scale shap values between -1 and 1 (using e.g., scikit-learn MinMaxScaler
    scaled = scaler.fit_transform(shap_values.values[i])

    # Get prediction label idx for indexing attributions and shap_values
    # Sort by score to get the max score prediction
    sorted_predictions = sorted(predictions[i], key=lambda d: d["score"], reverse=True)
    label_idx = 0 if sorted_predictions[0]["label"] == "NEGATIVE" else 1

    # Build token attributions
    token_attributions = [
        TokenAttributions(
            token=token, attributions={shap_values.output_names[label_idx]: score}
        )
        for token, score in zip(shap_values.data[i], [row[label_idx] for row in scaled])
    ]
    # Build annotation label
    annotation = "POSITIVE" if sst["label"][i] == 1 else "NEGATIVE"

    # Build Argilla record
    record = TextClassificationRecord(
        Text=sst["sentence"][i],
        prediction=[(pred["label"], pred["score"]) for pred in predictions[i]],
        annotation=label,
        explanation={"text": token_attributions},
    )
    # Add record
    records.append(record)
# Log records
rg.log(records, name="argilla_shap_example")