🤔 使用 ModAL 的文本分类主动学习#
在本教程中,我们将逐步介绍使用 Argilla、ModAL 和 scikit-learn 构建主动学习原型的过程。
💻 我们使用 YouTube Spam Collection 数据集训练垃圾邮件过滤器。
🎩 为此,我们将轻量级 scikit-learn 分类器嵌入到通过 ModAL 的主动学习器中。
🏆 我们围绕 Argilla 设计了一个主动学习循环,以从头开始快速构建训练数据集。
简介#
主动学习是机器学习的一个特例,其中学习算法可以交互式地查询用户(或其他信息源)以标记具有所需输出的新数据点。在统计文献中,有时也称为最优实验设计。信息源也称为教师或 Oracle。 [维基百科]
在本教程中,我们的目标是向您展示如何将 Argilla 整合到涉及人机环路的主动学习工作流程中。我们将通过结合 scikit-learn、主动学习框架 ModAL 和 Argilla 来构建一个简单的文本分类器。Scikit-learn 将提供我们将嵌入到 ModAL 的主动学习器中的模型,而您和 Argilla 将充当信息源,教导模型成为样本高效的分类器。
本教程仅是出于教育目的的初步概念验证,并启发您关于交互式学习过程的一些想法,以及它们如何帮助从头开始快速构建训练数据集。
运行 Argilla#
对于本教程,您需要运行 Argilla 服务器。部署和运行 Argilla 有两个主要选项
在 Hugging Face Spaces 上部署 Argilla:如果您想使用外部笔记本(例如 Google Colab)运行教程,并且您在 Hugging Face 上有一个帐户,您只需点击几下即可在 Spaces 上部署 Argilla

有关配置部署的详细信息,请查看 Hugging Face Hub 官方指南。
使用 Argilla 的快速入门 Docker 镜像启动 Argilla:如果您想在 本地机器上运行 Argilla,这是推荐的选项。请注意,此选项仅允许您在本地运行教程,而不能与外部笔记本服务一起运行。
有关部署选项的更多信息,请查看文档的部署部分。
提示
本教程是一个 Jupyter Notebook。有两种运行方式
使用此页面顶部的“在 Colab 中打开”按钮。此选项允许您直接在 Google Colab 上运行 notebook。不要忘记将运行时类型更改为 GPU,以加快模型训练和推理速度。
通过单击页面顶部的“查看源代码”链接下载 .ipynb 文件。此选项允许您下载 notebook 并在本地机器或您选择的 Jupyter Notebook 工具上运行它。
[ ]:
%pip install argilla modAL scikit-learn matplotlib -qqq # matplotlib is optional
让我们导入 Argilla 模块以用于读取和写入数据
[ ]:
import argilla as rg
如果您使用 Docker 快速入门镜像或 Hugging Face Spaces 运行 Argilla,则需要使用 URL 和 API_KEY 初始化 Argilla 客户端
[ ]:
# Replace api_url with the url to your HF Spaces URL if using Spaces
# Replace api_key if you configured a custom API key
# Replace workspace with the name of your workspace
rg.init(
    api_url="https://:6900",
    api_key="owner.apikey",
    workspace="admin"
)
如果您正在运行私有的 Hugging Face Space,您还需要按如下方式设置 HF_TOKEN
[ ]:
# # Set the HF_TOKEN environment variable
# import os
# os.environ['HF_TOKEN'] = "your-hf-token"

# # Replace api_url with the url to your HF Spaces URL
# # Replace api_key if you configured a custom API key
# # Replace workspace with the name of your workspace
# rg.init(
#     api_url="https://[your-owner-name]-[your_space_name].hf.space",
#     api_key="owner.apikey",
#     workspace="admin",
#     extra_headers={"Authorization": f"Bearer {os.environ['HF_TOKEN']}"},
# )
最后,让我们包含我们需要的导入
[ ]:
import pandas as pd
from sklearn.naive_bayes import MultinomialNB
from sklearn.model_selection import train_test_split
from sklearn.exceptions import NotFittedError
from sklearn.feature_extraction.text import CountVectorizer
from modAL.models import ActiveLearner
import matplotlib.pyplot as plt
import numpy as np
from urllib import request
from pathlib import Path
from tempfile import TemporaryDirectory
启用遥测
我们从您与我们的教程互动的方式中获得宝贵的见解。为了改进我们自己,为您提供最合适的内容,使用以下代码行将帮助我们了解本教程是否有效地为您服务。虽然这是完全匿名的,但如果您愿意,可以选择跳过此步骤。有关更多信息,请查看遥测页面。
[ ]:
try:
    from argilla.utils.telemetry import tutorial_running
    tutorial_running()
except ImportError:
    print("Telemetry is introduced in Argilla 1.20.0 and not found in the current installation. Skipping telemetry.")
1. 加载和准备数据
Argilla 允许您记录和跟踪不同 NLP 任务的数据,例如 Token Classification 或 Text Classification。
在本教程中,我们将使用 YouTube Spam Collection 数据集,这是一个用于检测 YouTube 视频中垃圾评论的二元分类任务。
让我们加载数据并查看它
[1]:
train_df = pd.read_csv("data/active_learning/train.csv")
test_df = pd.read_csv("data/active_learning/test.csv")
[2]:
test_df
[2]:
| COMMENT_ID | AUTHOR | DATE | CONTENT | CLASS | VIDEO | |
|---|---|---|---|---|---|---|
| 0 | z120djlhizeksdulo23mj5z52vjmxlhrk04 | Murlock Nightcrawler | 2015-05-24T07:04:29.844000 | Charlie from LOST? | 0 | 3 |
| 1 | z133ibkihkmaj3bfq22rilaxmp2yt54nb | Debora Favacho (Debora Sparkle) | 2015-05-21T14:08:41.338000 | BEST SONG EVER X3333333333 | 0 | 4 |
| 2 | z12gxdortqzwhhqas04cfjrwituzghb5tvk0k | Muhammad Asim Mansha | NaN | Aslamu Lykum... From Pakistan | 1 | 3 |
| 3 | _2viQ_Qnc6_ZYkMn1fS805Z6oy8ImeO6pSjMLAlwYfM | mile panika | 2013-11-03T14:39:42.248000 | I absolutely adore watching football plus I’ve... | 1 | 4 |
| 4 | z120s1agtmmetler404cifqbxzvdx15idtw0k | Sheila Cenabre | 2014-08-19T12:33:11 | I really love this video.. http://www.bubblews... | 1 | 1 |
| ... | ... | ... | ... | ... | ... | ... |
| 387 | z13pup2w2k3rz1lxl04cf1a5qzavgvv51vg0k | geraldine lopez | 2015-05-20T23:44:25.920000 | love the you lie the good | 0 | 3 |
| 388 | z13psdarpuzbjp1hh04cjfwgzonextlhf1w | bilal bilo | 2015-05-22T20:36:36.926000 | I liked<br /> | 0 | 4 |
| 389 | z131xnwierifxxkj204cgvjxyo3oydb42r40k | YULIOR ZAMORA | 2014-09-10T01:35:54 | I loved it so much ... | 0 | 1 |
| 390 | z12pwrxj0kfrwnxye04cjxtqntycd1yia44 | ארז אריה | 2015-05-15T19:46:53.719000 | good party | 0 | 2 |
| 391 | z13oxvzqrzvyit00322jwtjo2tzqylhof04 | Octavia W | 2015-05-22T02:33:26.041000 | Waka waka | 0 | 4 |
392 rows × 6 columns
如我们所见,数据包含评论 ID、评论作者、日期、内容(评论本身)和一个类列,指示评论是否为垃圾邮件或正常邮件。我们将在测试数据集中仅使用类列,以说明使用 Argilla 的主动学习方法的有效性。对于训练数据集,我们将简单地忽略该列,并假设我们正在从头开始收集训练数据。
2. 定义我们的分类器和主动学习器
在本教程中,我们将使用多项式 朴素贝叶斯分类器,它适用于具有离散特征的分类(例如,文本分类的词频计数)
[3]:
# Define our classification model
classifier = MultinomialNB()
然后,我们将定义我们的主动学习器,它使用分类器作为最不确定预测的估计器
[4]:
# Define active learner
learner = ActiveLearner(
    estimator=classifier,
)
我们分类器的特征将是不同单词 n-grams 的计数:也就是说,对于每个示例,我们计算连续 n 个单词的序列数,其中 n 从 1 到 5 不等。
此操作的输出将是我们的训练和测试数据集的 n-gram 计数矩阵,其中一行中的每个元素等于在示例中找到的特定单词 n-gram 的计数
[5]:
# The resulting matrices will have the shape of (`nr of examples`, `nr of word n-grams`)
vectorizer = CountVectorizer(ngram_range=(1, 5))

X_train = vectorizer.fit_transform(train_df.CONTENT)
X_test = vectorizer.transform(test_df.CONTENT)
3. 主动学习循环
现在我们可以开始我们的主动学习循环,该循环包括迭代以下 MLOps 步骤
注释样本
教导主动学习器
绘制改进(可选)
在开始学习循环之前,让我们定义两个变量
我们希望每次迭代注释的实例数,
一个变量,用于通过记录每次迭代后达到的准确率来跟踪我们的改进。
[6]:
# Number of instances we want to annotate per iteration
n_instances = 10

# Accuracies after each iteration to keep track of our improvement
accuracies = []
步骤 1:注释样本
训练循环的第一步是注释 n 个具有最不确定预测的示例。在第一次迭代中,这些将只是随机示例,因为分类器仍未训练,我们还没有预测。
[7]:
# Query examples from our training pool with the most uncertain prediction
query_idx, query_inst = learner.query(X_train, n_instances=n_instances)

# Get predictions for the queried examples
try:
    probabilities = learner.predict_proba(X_train[query_idx])
# For the very first query we do not have any predictions
except NotFittedError:
    probabilities = [[0.5, 0.5]] * n_instances
[ ]:
# Build the Argilla records
records = [
    rg.TextClassificationRecord(
        id=idx,
        text=train_df.CONTENT.iloc[idx],
        prediction=list(zip(["HAM", "SPAM"], probs)),
        prediction_agent="MultinomialNB",
    )
    for idx, probs in zip(query_idx, probabilities)
]

# Log the records
rg.log(records, name="active_learning_tutorial")
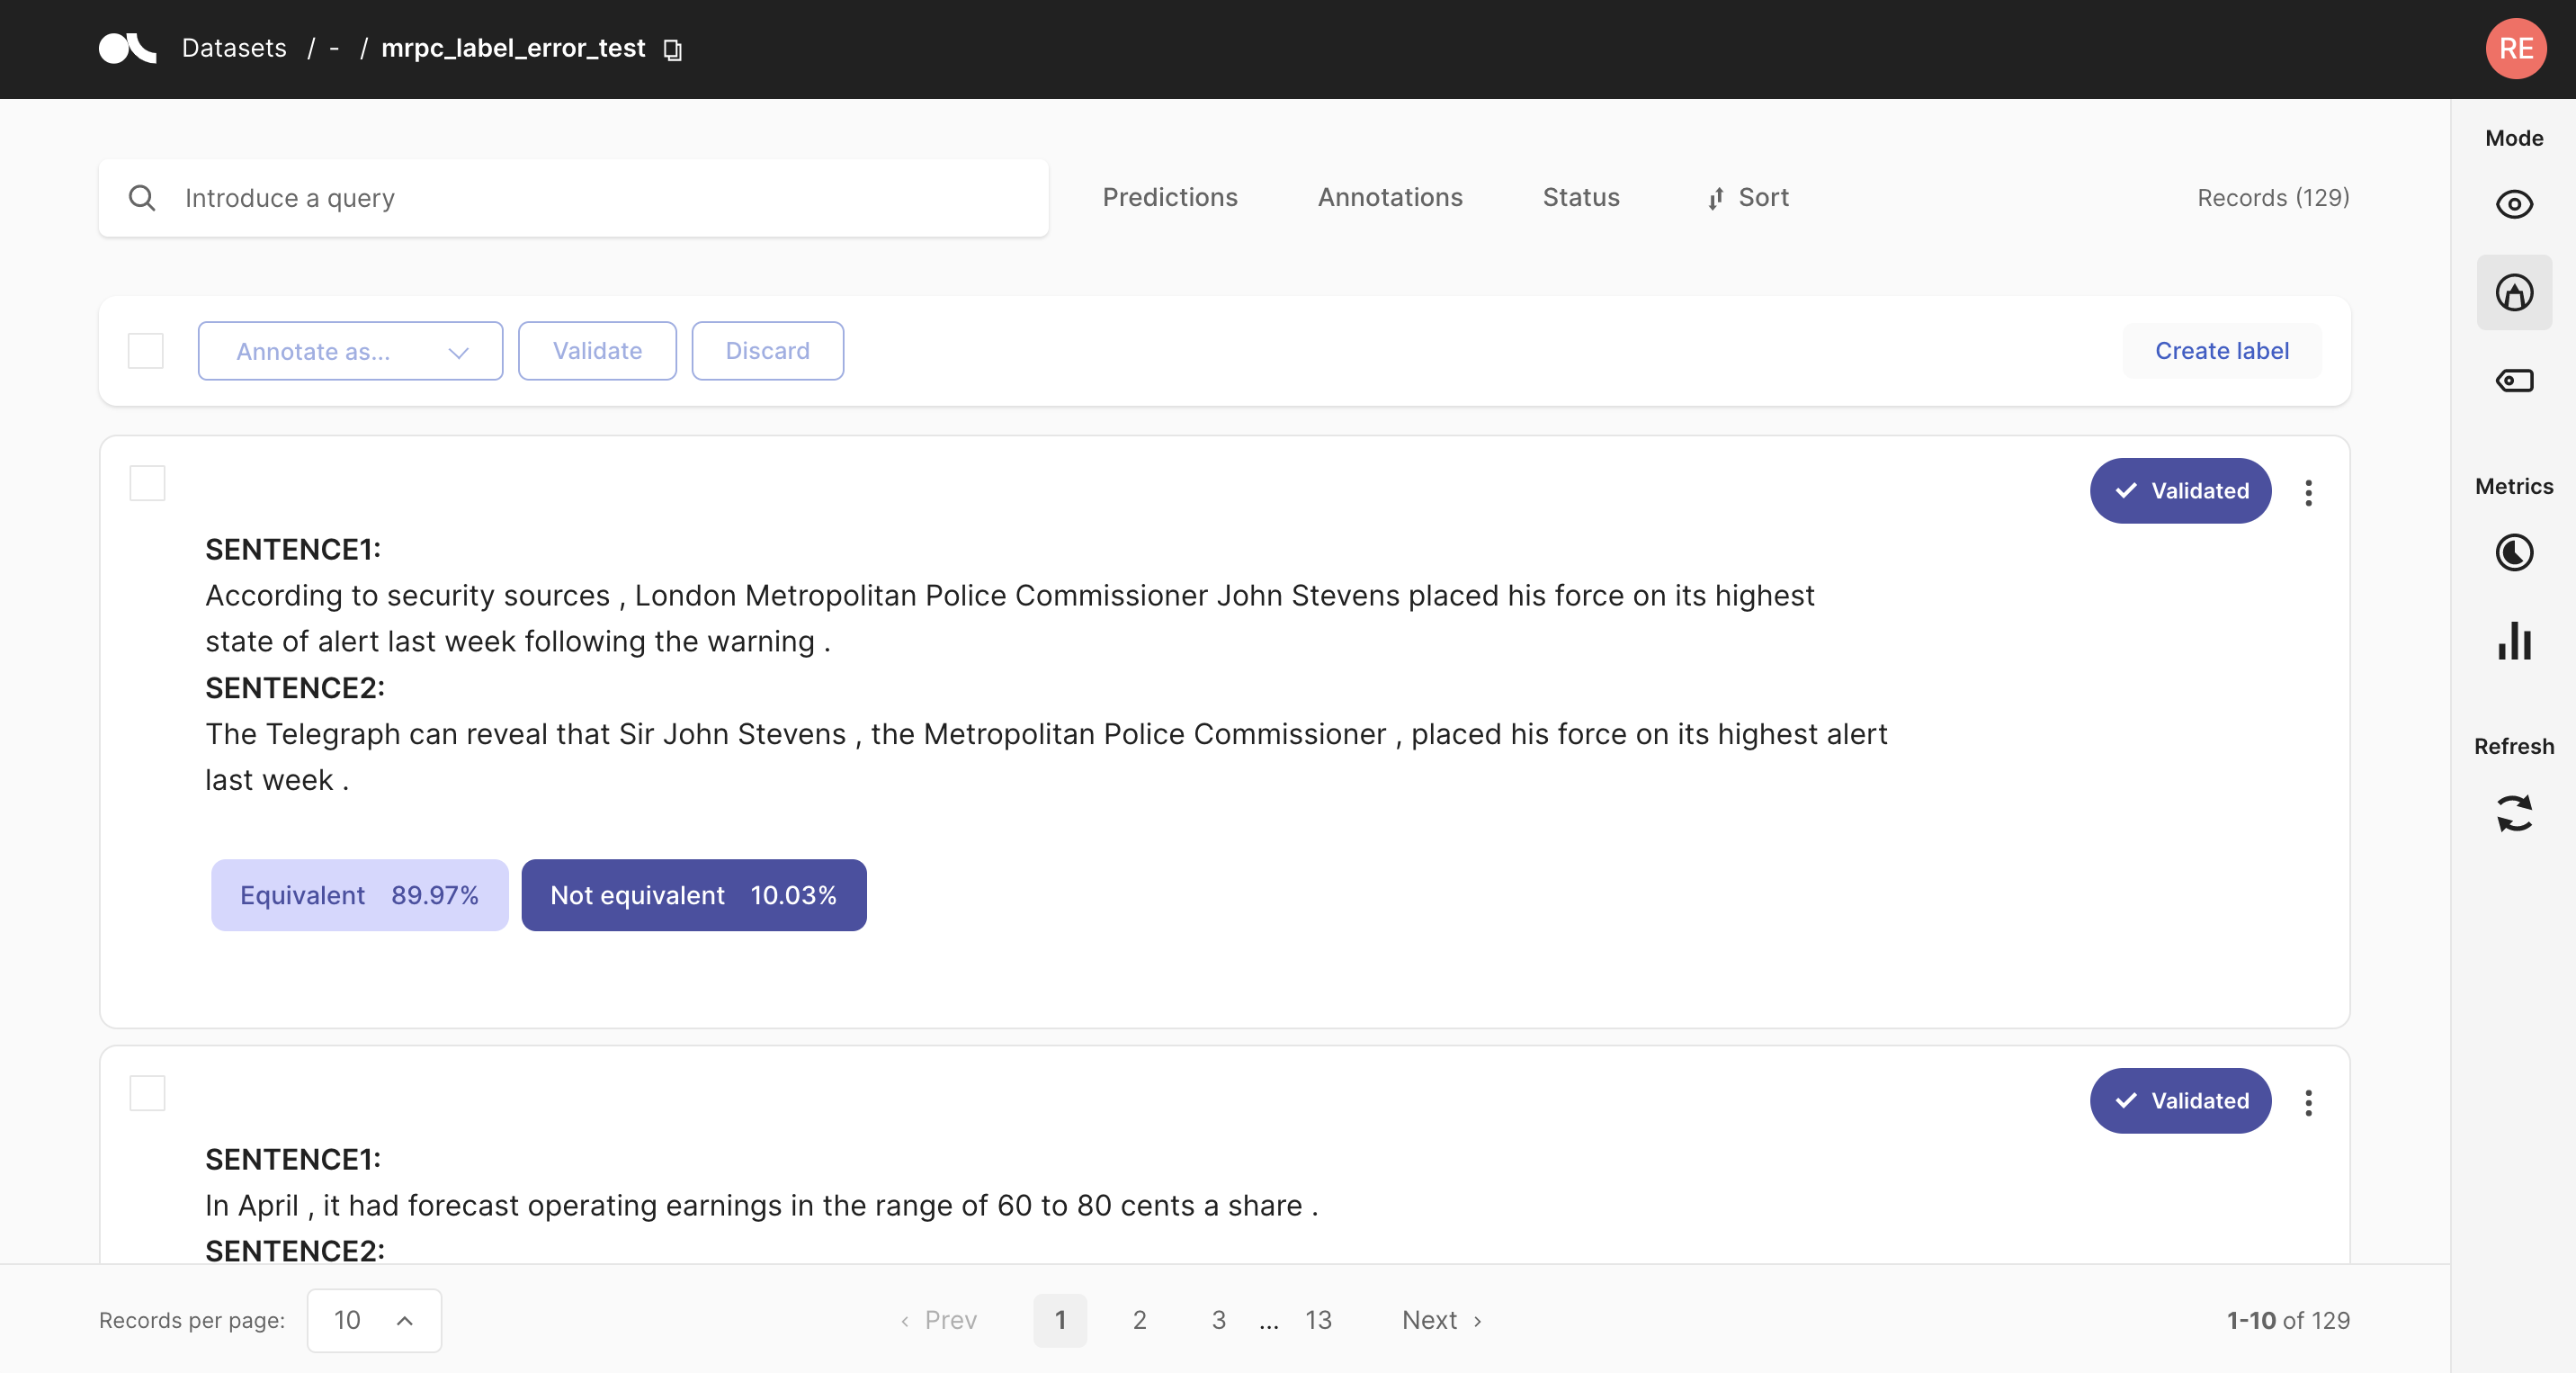
将记录记录到 Argilla 后,我们切换到 UI,在那里我们可以在 active_learning_tutorial 数据集中找到新记录的示例。
为了仅显示仍缺少注释的示例,您可以在状态过滤器中选择“默认”,如下面的屏幕截图所示。注释一些示例后,您可以按左侧边栏中的刷新按钮,以根据过滤器更新视图。
完成注释示例后,您可以继续进行主动学习循环。如果您的注释仅包含一个类,请考虑增加 n_instances 参数。
步骤 2:教导学习器
循环中的第二步是教导学习器。在我们使用新注释的示例训练了我们的分类器后,我们可以将分类器应用于测试数据并记录准确率,以跟踪我们的改进。
[ ]:
# Load the annotated records into a pandas DataFrame
records_df = rg.load("active_learning_tutorial", ids=query_idx.tolist()).to_pandas()

# Check if all examples were annotated
if any(records_df.annotation.isna()):
    raise UserWarning(
        "Please annotate first all your samples before teaching the model"
    )

# Train the classifier with the newly annotated examples
y_train = records_df.annotation.map(lambda x: int(x == "SPAM"))
learner.teach(X=X_train[query_idx], y=y_train.to_list())

# Keep track of our improvement
accuracies.append(learner.score(X=X_test, y=test_df.CLASS))
现在返回步骤 1 并重复这两个步骤几次。
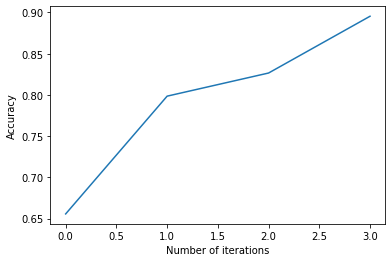
步骤 3. 绘制改进(可选)
经过几次迭代后,我们可以通过绘制准确率来检查我们分类器的当前性能。如果您认为性能仍可提高,则可以重复步骤 1 和 2 并再次检查准确率。
[39]:
# Plot the accuracy versus the iteration number
plt.plot(accuracies)
plt.xlabel("Number of iterations")
plt.ylabel("Accuracy")
总结
在本教程中,我们了解了如何将 Argilla 嵌入到主动学习循环中,以及它如何帮助您通过仅注释最具决定性的示例来收集样本高效的数据集。我们创建了一个相当精简的主动学习循环,但 Argilla 实际上并不关心循环的复杂性。它将始终帮助您记录和注释数据示例及其模型预测,从而使您能够从头开始快速构建数据集。
奖励:比较查询策略,随机与最大不确定性
在本奖励中,我们快速演示了仅注释最不确定预测与随机注释相比的有效性。因此,下次您想从头开始构建数据集时,请记住此策略,也许可以使用 Argilla 进行注释过程!😀
[ ]:
n_iterations = 150
n_instances = 10
random_samples = 50


# Max uncertainty strategy
accuracies_max = []
for i in range(random_samples):
    train_rnd_df = train_df  # .sample(frac=1)
    test_rnd_df = test_df  # .sample(frac=1)
    X_rnd_train = vectorizer.transform(train_rnd_df.CONTENT)
    X_rnd_test = vectorizer.transform(test_rnd_df.CONTENT)

    accuracies, learner = [], ActiveLearner(estimator=MultinomialNB())

    for i in range(n_iterations):
        query_idx, _ = learner.query(X_rnd_train, n_instances=n_instances)
        learner.teach(
            X=X_rnd_train[query_idx], y=train_rnd_df.CLASS.iloc[query_idx].to_list()
        )
        accuracies.append(learner.score(X=X_rnd_test, y=test_rnd_df.CLASS))
    accuracies_max.append(accuracies)

# Random strategy
accuracies_rnd = []
for i in range(random_samples):
    accuracies, learner = [], ActiveLearner(estimator=MultinomialNB())

    for random_idx in np.random.choice(
        X_train.shape[0], size=(n_iterations, n_instances), replace=False
    ):
        learner.teach(
            X=X_train[random_idx], y=train_df.CLASS.iloc[random_idx].to_list()
        )
        accuracies.append(learner.score(X=X_test, y=test_df.CLASS))
    accuracies_rnd.append(accuracies)

arr_max, arr_rnd = np.array(accuracies_max), np.array(accuracies_rnd)
[ ]:
plt.plot(range(n_iterations), arr_max.mean(0))
plt.fill_between(
    range(n_iterations),
    arr_max.mean(0) - arr_max.std(0),
    arr_max.mean(0) + arr_max.std(0),
    alpha=0.2,
)
plt.plot(range(n_iterations), arr_rnd.mean(0))
plt.fill_between(
    range(n_iterations),
    arr_rnd.mean(0) - arr_rnd.std(0),
    arr_rnd.mean(0) + arr_rnd.std(0),
    alpha=0.2,
)

plt.xlim(0, 15)
plt.title("Sampling strategies: Max uncertainty vs random")
plt.xlabel("Number of annotation iterations")
plt.ylabel("Accuracy")
plt.legend(["max uncertainty", "random sampling"], loc=4)
<matplotlib.legend.Legend at 0x7fa38aaaab20>

附录:我们是如何获得训练/测试数据的?
[ ]:
def load_data() -> pd.DataFrame:
    """
    Downloads the [YouTube Spam Collection](http://www.dt.fee.unicamp.br/~tiago//youtubespamcollection/)
    and returns the data as a tuple with a train and test DataFrame.
    """
    links, data_df = [
        "http://lasid.sor.ufscar.br/labeling/datasets/9/download/",
        "http://lasid.sor.ufscar.br/labeling/datasets/10/download/",
        "http://lasid.sor.ufscar.br/labeling/datasets/11/download/",
        "http://lasid.sor.ufscar.br/labeling/datasets/12/download/",
        "http://lasid.sor.ufscar.br/labeling/datasets/13/download/",
    ], None

    with TemporaryDirectory() as tmpdirname:
        dfs = []
        for i, link in enumerate(links):
            file = Path(tmpdirname) / f"{i}.csv"
            request.urlretrieve(link, file)
            df = pd.read_csv(file)
            df["VIDEO"] = i
            dfs.append(df)
        data_df = pd.concat(dfs).reset_index(drop=True)

    train_df, test_df = train_test_split(data_df, test_size=0.2, random_state=42)

    return train_df, test_df


train_df, test_df = load_data()
train_df.to_csv("data/active_learning/train.csv", index=False)
test_df.to_csv("data/active_learning/test.csv", index=False)