🔐 使用 DVC 备份和版本控制 Argilla Datasets#
在本教程中,我们将向您展示如何使用 DVC 存储和版本控制您的数据。或者,您可以查看我们的关于直接从 Elasticsearch 集群创建保留快照的 Elasticsearch 文档。它将引导您完成以下步骤
⚙️ 配置 DVC
🧐 确定备份配置
🧪 测试备份配置

简介#
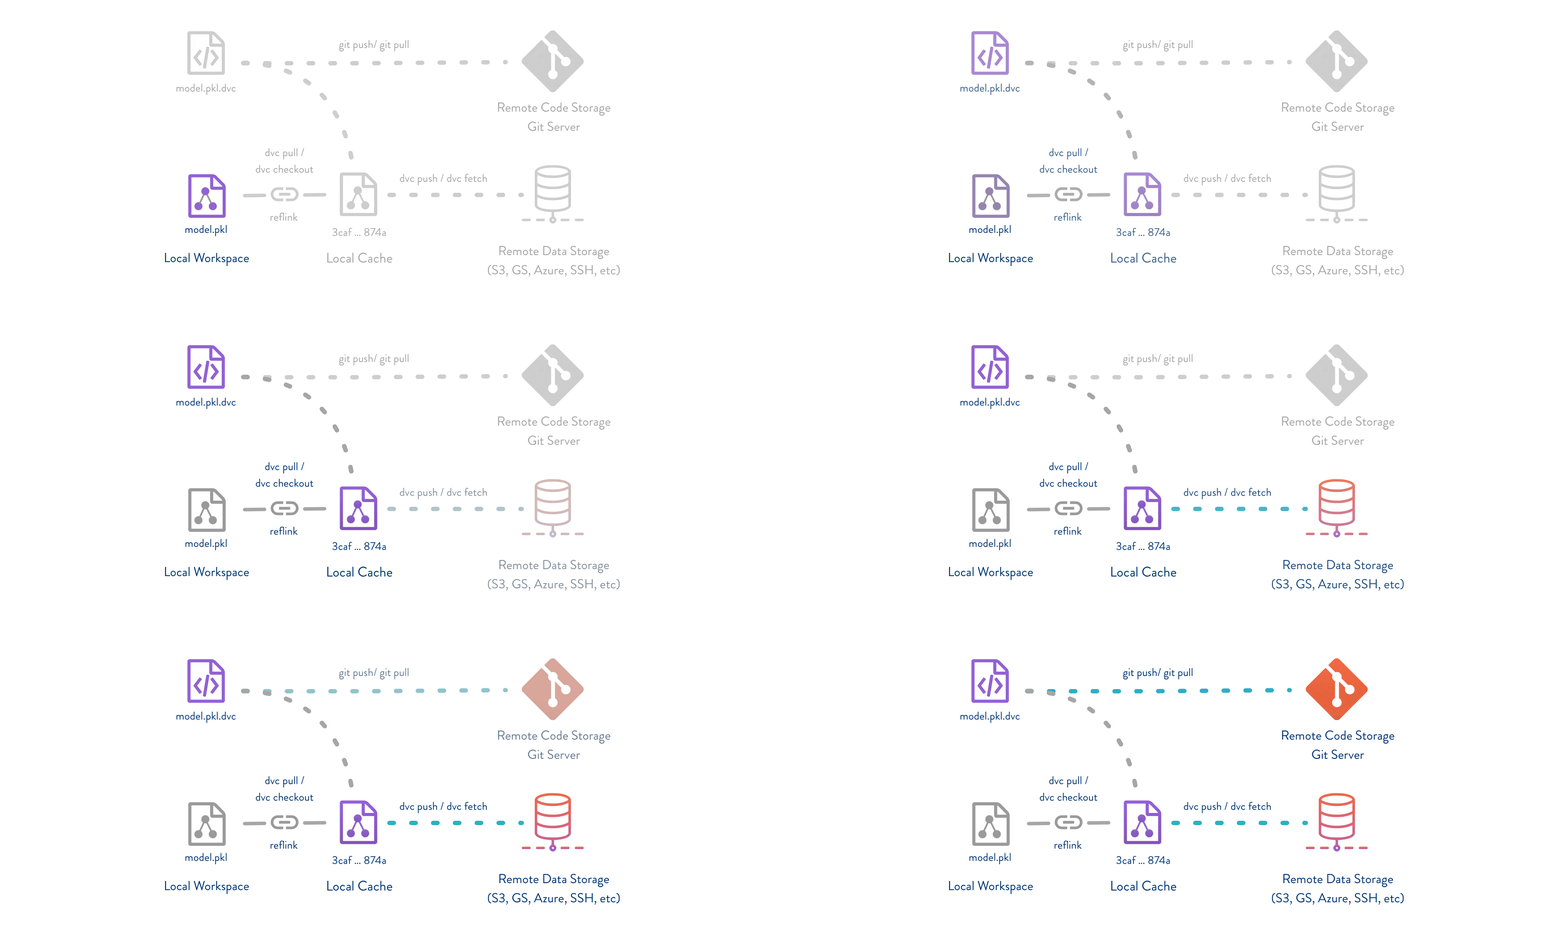
能够跟踪和存储数据以版本控制训练周期中使用的数据并避免数据丢失非常重要。DVC 创建对您的数据的引用,并将其存储在外部存储库中。将此引用推送到 git 允许我们重现存储库的特定阶段,同时拥有在该确切时间存储库中的确切数据的副本。可以将其视为“数据的 git”。
查看 DVC 文档,以更熟悉此版本控制原则背后的思想。
让我们开始吧!
运行 Argilla#
对于本教程,您需要运行 Argilla 服务器。部署和运行 Argilla 有两个主要选项
在 Hugging Face Spaces 上部署 Argilla:如果您想使用外部 Notebook(例如,Google Colab)运行教程,并且您在 Hugging Face 上有一个帐户,则只需单击几下即可在 Spaces 上部署 Argilla
有关配置部署的详细信息,请查看 Hugging Face Hub 官方指南。
使用 Argilla 的快速入门 Docker 镜像启动 Argilla:如果您想在 本地计算机上运行 Argilla,建议使用此选项。请注意,此选项仅允许您在本地运行教程,而不能与外部 Notebook 服务一起运行。
有关部署选项的更多信息,请查看文档的部署部分。
提示
本教程是 Jupyter Notebook。有两种运行它的选项
使用此页面顶部的“在 Colab 中打开”按钮。此选项允许您直接在 Google Colab 上运行 Notebook。不要忘记将运行时类型更改为 GPU,以加快模型训练和推理速度。
通过单击页面顶部的“查看源代码”链接下载 .ipynb 文件。此选项允许您下载 Notebook 并在本地计算机或您选择的 Jupyter Notebook 工具上运行它。
设置包#
要完成本教程,您需要安装 Argilla 客户端和 DVC。
[ ]:
%pip install argilla -qqq
[ ]:
!brew install dvc # mac
# !snap install --classic dvc # linux
# !choco install dvc # windows
让我们导入 Argilla 模块以进行数据读取和写入
[ ]:
import argilla as rg
如果您使用 Docker 快速入门镜像或公共 Hugging Face Spaces 运行 Argilla,则需要使用 URL 和 API_KEY 初始化 Argilla 客户端
[ ]:
# Replace api_url with the url to your HF Spaces URL if using Spaces
# Replace api_key if you configured a custom API key
rg.init(
    api_url="https://:6900",
    api_key="admin.apikey"
)
如果您运行的是私有 Hugging Face Space,您还需要按如下方式设置 HF_TOKEN
[ ]:
# # Set the HF_TOKEN environment variable
# import os
# os.environ['HF_TOKEN'] = "your-hf-token"

# # Replace api_url with the url to your HF Spaces URL
# # Replace api_key if you configured a custom API key
# rg.init(
#     api_url="https://https://[your-owner-name]-[your_space_name].hf.space",
#     api_key="admin.apikey",
#     extra_headers={"Authorization": f"Bearer {os.environ['HF_TOKEN']}"},
# )
最后,让我们包含我们需要的导入
[ ]:
import datetime
import os
import glob
import time
from typing import List
启用遥测#
我们从您与我们的教程互动的方式中获得宝贵的见解。为了改进我们自己,为您提供最合适的内容,使用以下代码行将帮助我们了解本教程是否有效地为您服务。虽然这是完全匿名的,但如果您愿意,可以选择跳过此步骤。有关更多信息,请查看遥测页面。
[ ]:
try:
    from argilla.utils.telemetry import tutorial_running
    tutorial_running()
except ImportError:
    print("Telemetry is introduced in Argilla 1.20.0 and not found in the current installation. Skipping telemetry.")
配置 .git#
我们将使用 GitHub 作为跟踪存储文件的方式。这要求我们将目录链接到 git 远程仓库。我们假设环境已经设置了正确的 git 凭据,并且它已链接到 .git 文件。可以使用 git remote -v 进行测试。
[ ]:
!git remote -v
配置 DVC#
我们将首先初始化我们的 DVC 仓库,它将自动链接到我们的 git 远程仓库。
[8]:
!dvc init
Initialized DVC repository.

You can now commit the changes to git.

+---------------------------------------------------------------------+
|                                                                     |
|        DVC has enabled anonymous aggregate usage analytics.         |
|     Read the analytics documentation (and how to opt-out) here:     |
|             <https://dvc.org/doc/user-guide/analytics>              |
|                                                                     |
+---------------------------------------------------------------------+

What's next?
------------
- Check out the documentation: <https://dvc.org/doc>
- Get help and share ideas: <https://dvc.org/chat>
- Star us on GitHub: <https://github.com/iterative/dvc>
接下来,我们假设 DVC 将与 Google Drive 结合用作远程存储。还有其他选项可用,但配置 Google Drive 是最直接的方法。这需要通过添加类似如下所示的内容进行配置,其中 <your-gdrive-folder-id> 替换为您要用于存储的 Google Drive 文件夹 ID。或者,您可以转到他们的 配置页面。
[ ]:
!dvc remote add myremote gdrive://<your-gdrive-folder-id>
[ ]:
!dvc remote default myremote
此外,我们为 dvc 设置了自动暂存,这也将自动将其提交到 git。
[13]:
!dvc config core.autostage true
定义后台进程#
设置 DVC 后,我们现在可以定义一个函数来收集和存储数据。这将遵循以下步骤:- 使用命名约定 /data/YY-mm-dd_dataset 导出数据 - (可选)创建 /data_descriptions 以添加到 GitHub - 将数据添加到 DVC,创建对 /data/* 的 .dvc 引用 - 将 .dvc 引用提交到 GitHub - 将 /data/* 推送到 DVC 并将 .dvc 推送到 GitHub
这种版本控制允许我们通过首先使用 git checkout(切换分支或检出 .dvc 文件版本)然后在运行 dvc checkout 来同步数据,从而在 GitHub 中探索数据。
[22]:
def dataset_backupper(datasets: List[str], duration: int=60*60*24):
    while True:
        # load datasets and save as .pkl files
        for dataset_name in datasets:
            ds = rg.load(dataset_name)
            df = ds.to_pandas()
            df.to_pickle(f"data/{dataset_name}.pkl")

        # get all .pkl files using glob
        files = glob.glob('data/*.pkl', recursive=True)
        [os.system(f'dvc add {file}') for file in files]

        # push all .pkl.dvc files to github via git push
        os.system("dvc push")
        os.system("git commit -m 'update DVC files'")
        os.system("git push")

        time.sleep(duration)

dataset_backupper(["argilla-dvc"])
Everything is up to date.
[WARNING] Unstaged files detected.
[INFO] Stashing unstaged files to /Users/davidberenstein/.cache/pre-commit/patch1673435632-44248.
check yaml...........................................(no files to check)Skipped
fix end of files.....................................(no files to check)Skipped
trim trailing whitespace.................................................Passed
Insert license header in Python source files.........(no files to check)Skipped
black................................................(no files to check)Skipped
isort................................................(no files to check)Skipped
[INFO] Restored changes from /Users/davidberenstein/.cache/pre-commit/patch1673435632-44248.
[docs/tutorial-on-dvc-usage c86cb402] update DVC files
 4 files changed, 10 insertions(+)
 create mode 100644 docs/_source/tutorials/notebooks/.dvc/.gitignore
 create mode 100644 docs/_source/tutorials/notebooks/.dvc/config
 create mode 100644 docs/_source/tutorials/notebooks/.dvcignore
 create mode 100644 docs/_source/tutorials/notebooks/data/zingg.pkl.dvc
To https://github.com/argilla-io/argilla.git
   2ea0912d..c86cb402  docs/tutorial-on-dvc-usage -> docs/tutorial-on-dvc-usage
这只是一个玩具示例,但它可以根据您的需求进行高度配置。考虑一下:- 仅备份超过 X 天的记录 - 在备份后删除记录 - 按时间段分隔备份 - 将 模型版本控制 混合到其中
发挥创意,玩得开心 🤓
检索数据版本#
接下来,我们可以根据我们的 git 提交哈希探索数据。git checkout <commit> 打开之前的提交,以及相应的 *.dvc 引用。接下来,我们可以使用 dvc pull 来 fetch 和 checkout 在特定 <commit> 期间存在的数据文件。
总结#
在本教程中,我们了解了一些关于 DVC 的知识,以及如何使用这个很酷的软件包在 Argilla 生态系统中备份和版本控制数据。这可以帮助保存数据并保持对您的数据和模型历史的清晰概览。


