👮 弱监督#
FeedbackDataset#
信息
FeedbackDataset 目前不支持弱监督。如果您想使用它,您需要使用其他数据集之一。要获取有关数据集差异的更多信息,您可以查看此处。
其他数据集#
本指南简要介绍了 Argilla 的弱监督。
Argilla 目前支持用于多类和多标签文本分类用例的弱监督。对 token 分类(例如,命名实体识别)的支持即将添加。
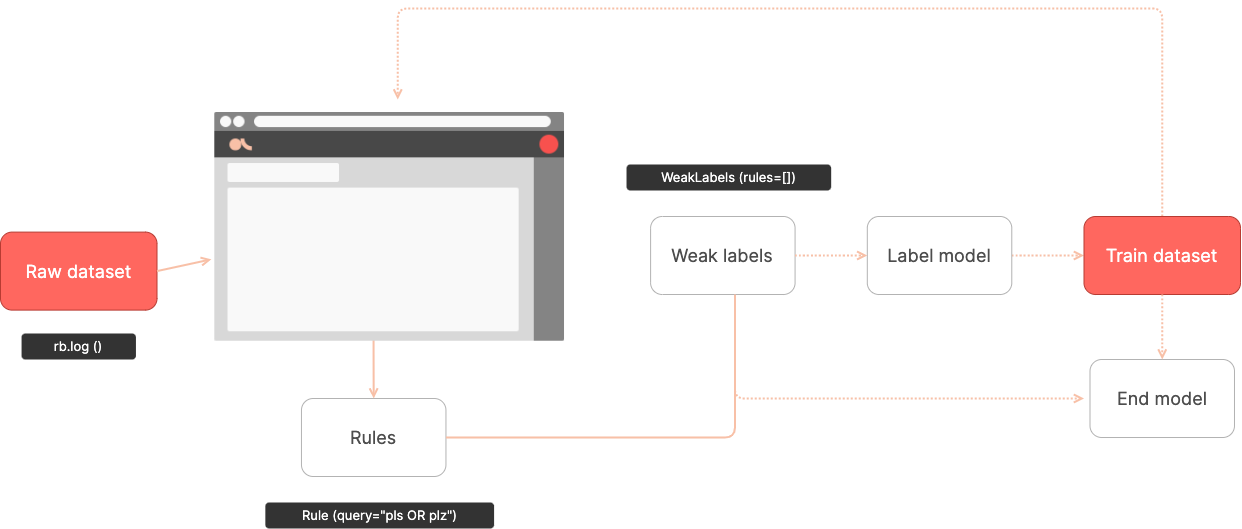
Argilla 弱监督概览#
弱监督的推荐工作流程是
将未标记的数据集记录到 Argilla 中。
使用
Annotate模式进行手动和/或批量标记验证集。此验证是衡量规则的质量和性能的关键。此外,您需要构建一个不用于定义规则的测试集。此测试集将用于衡量您的最终模型的性能,就像任何其他监督模型一样。使用
Define rules模式来评估和定义规则。规则使用搜索查询(使用 ES 查询字符串 DSL)定义。此外,您可以使用 Python 客户端方法以编程方式添加、删除或修改规则,使其可在 UI 中进行改进。使用 Python 客户端读取规则,在需要时定义其他规则,并训练标签(用于构建训练集)或下游模型(用于构建最终分类器)。
from argilla.labeling.text_classification import Rule, WeakLabels

rules = [
    Rule(query="plz OR please", label="SPAM"),
]

weak_labels = WeakLabels(
    rules=rules,
    dataset="weak_supervision_yt"
)

# returns a summary of the applied rules
weak_labels.summary()
接下来的部分涵盖了此工作流程的主要组成部分。
使用 UI 进行弱标记#
自 0.8.0 版本起,您可以在 UI 中直接查找和定义弱标记规则。弱标记模式 用于定义规则,位于数据集页面的右侧边栏中。
来自 Python 的弱监督#
使用 Argilla 进行弱监督非常简单。与库的其他部分保持相同的精神,您可以使用任何弱监督库或方法,例如 Snorkel 或 Flyingsquid。
Argilla 弱监督支持围绕两个基本抽象概念构建
Rule#
规则编码了用于标记记录的启发式方法。
启发式方法可以使用Elasticsearch 的查询来定义
plz = Rule(query="plz OR please", label="SPAM")
或使用 Python 函数(类似于 Snorkel 的标记函数,您也可以使用它)
from typing import Optional

def contains_http(record: rg.TextClassificationRecord) -> Optional[str]:
    if "http" in record.inputs["text"]:
        return "SPAM"
除了文本特征外,Python 标记函数还可以利用元数据特征
def author_channel(record: rg.TextClassificationRecord) -> Optional[str]:
    # the word channel appears in the comment author name
    if "channel" in record.metadata["author"]:
        return "SPAM"
规则应返回表示弱标签的字符串值,或者在弃权的情况下返回 None。
这些规则可以是
使用 UI 的无代码功能定义(请参阅弱标记模式参考)。
Rule对象可以使用如上所示的 Python 创建。这些对象可以由开发人员在本地应用(这对于在不使服务器过载的情况下进行测试可能很有趣),或者添加到 Argilla 服务器中的数据集中,从而使这些规则可从 UI 中获得。Python 函数不能使用无代码功能定义,并且只能在本地应用,但不能添加到 Argilla 服务器中的数据集。数据团队可以使用这些 Python 标记函数在构建弱标记数据集之前添加额外的启发式方法。此函数应用于无法使用 ES 查询定义的启发式方法。
Weak Labels#
Weak Labels 对象捆绑并将一组规则应用于 Argilla 数据集的记录。将规则应用于记录意味着分配弱标签或弃权。
此抽象为您提供了训练和测试弱监督“去噪”、“标签”甚至“最终”模型的构建块
rules = [contains_http, author_channel]
weak_labels = WeakLabels(
    rules=rules,
    dataset="weak_supervision_yt"
)

# returns a summary of the applied rules
weak_labels.summary()
有关这些抽象的更多信息,请参见Python 标注模块文档。
内置标签模型#
为了使事情变得更轻松,我们提供了围绕最常见的标签模型的包装类,这些类直接使用 WeakLabels 对象。这使得使用这些模型变得轻而易举。查看标注模块文档中内置模型的列表。
详细工作流程#
使用弱监督的典型工作流程是
使用您的原始数据集创建 Argilla 数据集。如果您实际上有一些标记数据,您可以将其记录到同一数据集中。
使用 UI 中的规则定义模式或使用 Python 客户端
add_rules方法定义一组弱标记规则。创建
WeakLabels对象并使用 Python 客户端应用规则。您可以从数据集中加载规则,并使用 Python 添加其他规则和标记函数。通常,您会在步骤 2 和此步骤之间迭代。一旦您对弱标签感到满意,请将
WeakLabels实例的矩阵与您选择的库/方法一起使用,以构建训练集,甚至训练下游文本分类模型。
本指南向您展示了使用 Snorkel、Flyingsquid 和 Weasel 的端到端示例。让我们开始吧!
示例数据集#
我们将使用一个众所周知的数据集作为弱监督示例,即YouTube 垃圾评论收集数据集,这是一个用于检测 Youtube 视频中垃圾评论的二元分类任务。
[1]:
import pandas as pd

# load data
train_df = pd.read_csv("../../tutorials/notebooks/data/yt_comments_train.csv")
test_df = pd.read_csv("../../tutorials/notebooks/data/yt_comments_test.csv")

# preview data
train_df.head()
[1]:
| Unnamed: 0 | 作者 | 日期 | 文本 | 标签 | 视频 | |
|---|---|---|---|---|---|---|
| 0 | 0 | Alessandro leite | 2014-11-05T22:21:36 | pls http://www10.vakinha.com.br/VaquinhaE.aspx... | -1.0 | 1 |
| 1 | 1 | Salim Tayara | 2014-11-02T14:33:30 | if your like drones, plz subscribe to Kamal Ta... | -1.0 | 1 |
| 2 | 2 | Phuc Ly | 2014-01-20T15:27:47 | go here to check the views :3 | -1.0 | 1 |
| 3 | 3 | DropShotSk8r | 2014-01-19T04:27:18 | Came here to check the views, goodbye. | -1.0 | 1 |
| 4 | 4 | css403 | 2014-11-07T14:25:48 | i am 2,126,492,636 viewer :D | -1.0 | 1 |
1. 使用未标记数据和测试数据创建 Argilla 数据集#
让我们加载训练(未标记)数据集和测试(包含标签)数据集。
[ ]:
import argilla as rg

# build records from the train dataset
records = [
    rg.TextClassificationRecord(
        text=row.text, metadata={"video": row.video, "author": row.author}
    )
    for i, row in train_df.iterrows()
]

# build records from the test dataset with annotation
labels = ["HAM", "SPAM"]
records += [
    rg.TextClassificationRecord(
        text=row.text,
        annotation=labels[row.label],
        metadata={"video": row.video, "author": row.author},
    )
    for i, row in test_df.iterrows()
]

# log records to Argilla
rg.log(records, name="weak_supervision_yt")
完成此步骤后,您将拥有一个完全可浏览的数据集,您可以通过Argilla Web 应用程序访问该数据集。
2. 定义和管理规则#
现在让我们定义教程Snorkel Intro Tutorial: Data Labeling中提出的一些规则。
Argilla 中的规则可以通过多种方式定义和使用,特别是:(1)使用 UI,(2)使用 Python 客户端将规则添加到服务器,以及(3)使用 Python 客户端在本地添加其他规则,可以使用 Python 函数或 Rule 对象。
使用 UI 定义规则#
规则可以直接在我们的 Web 应用程序的弱标记模式和Elasticsearch 的查询字符串中定义。
之后,您可以使用load_rules 函数方便地将它们加载到您的 Notebook 中。
使用 Python 客户端定义规则#
规则也可以通过编程方式定义,如下所示。根据您的用例和团队结构,您可以混合和匹配两种界面(UI 或 Python)。根据您的工作流程,您可以决定是使用 add_rules 方法将它们添加到数据集,还是仅在本地应用它们(而不将它们添加到 Argilla 数据集)。
让我们在这里看一些编程规则
[ ]:
from argilla.labeling.text_classification import Rule, WeakLabels

#  rules defined as Elasticsearch queries
check_out = Rule(query="check out", label="SPAM")
plz = Rule(query="plz OR please", label="SPAM")
subscribe = Rule(query="subscribe", label="SPAM")
my = Rule(query="my", label="SPAM")
song = Rule(query="song", label="HAM")
love = Rule(query="love", label="HAM")
您还可以定义纯 Python 标记函数
[ ]:
import re

# rules defined as Python labeling functions
def contains_http(record: rg.TextClassificationRecord):
    if "http" in record.inputs["text"]:
        return "SPAM"


def short_comment(record: rg.TextClassificationRecord):
    return "HAM" if len(record.inputs["text"].split()) < 5 else None


def regex_check_out(record: rg.TextClassificationRecord):
    return (
        "SPAM" if re.search(r"check.*out", record.inputs["text"], flags=re.I) else None
    )
您可以加载预定义的规则并将其转换为 Rule 实例,然后将其添加到数据集
[ ]:
labeling_rules_df = pd.read_csv("../../_static/datasets/weak_supervision_tutorial/labeling_rules.csv")
[23]:
# preview labeling rules
labeling_rules_df.head()
[23]:
| Unnamed: 0 | query | 标签 | |
|---|---|---|---|
| 0 | 0 | your | SPAM |
| 1 | 1 | rich | SPAM |
| 2 | 2 | film | HAM |
| 3 | 3 | meeting | HAM |
| 4 | 4 | help | HAM |
[ ]:
predefined_labeling_rules = []
for index, row in labeling_rules_df.iterrows():
    predefined_labeling_rules.append(
        Rule(row["query"], row["label"])
    )
3. 构建和分析弱标签#
[ ]:
from argilla.labeling.text_classification import load_rules, add_rules, delete_rules

# bundle our rules in a list
rules = [
    check_out,
    plz,
    subscribe,
    my,
    song,
    love
]

labeling_functions = [
    contains_http,
    short_comment,
    regex_check_out
]

# add rules to dataset
add_rules(dataset="weak_supervision_yt", rules=rules)


# add the predefined rules loaded from external file
add_rules(dataset="weak_supervision_yt", rules=predefined_labeling_rules)
完成上述步骤后,规则将在 weak_supervision_yt 数据集中可访问。
[ ]:
# load all the rules available in the dataset including interactively defined in the UI
dataset_labeling_rules = load_rules(dataset="weak_supervision_yt")

# extend the labeling rules with labeling functions
dataset_labeling_rules.extend(labeling_functions)

# apply the final rules to the dataset
weak_labels = WeakLabels(dataset="weak_supervision_yt", rules=dataset_labeling_rules)
[27]:
# show some stats about the rules, see the `summary()` docstring for details
weak_labels.summary()
[27]:
| 标签 | coverage | annotated_coverage | overlaps | conflicts | correct | incorrect | precision | |
|---|---|---|---|---|---|---|---|---|
| check out | {SPAM} | 0.224401 | 0.176 | 0.224401 | 0.031590 | 44 | 0 | 1.000000 |
| plz OR please | {SPAM} | 0.104575 | 0.088 | 0.098039 | 0.036492 | 22 | 0 | 1.000000 |
| subscribe | {SPAM} | 0.101852 | 0.120 | 0.082244 | 0.031590 | 30 | 0 | 1.000000 |
| my | {SPAM} | 0.192810 | 0.192 | 0.168845 | 0.062636 | 42 | 6 | 0.875000 |
| song | {HAM} | 0.118192 | 0.172 | 0.070806 | 0.037037 | 34 | 9 | 0.790698 |
| love | {HAM} | 0.090959 | 0.140 | 0.071351 | 0.034858 | 28 | 7 | 0.800000 |
| your | {SPAM} | 0.052832 | 0.088 | 0.041939 | 0.019608 | 19 | 3 | 0.863636 |
| rich | {SPAM} | 0.000545 | 0.000 | 0.000000 | 0.000000 | 0 | 0 | NaN |
| film | {} | 0.000000 | 0.000 | 0.000000 | 0.000000 | 0 | 0 | NaN |
| meeting | {} | 0.000000 | 0.000 | 0.000000 | 0.000000 | 0 | 0 | NaN |
| help | {HAM} | 0.027778 | 0.036 | 0.023965 | 0.023965 | 0 | 9 | 0.000000 |
| contains_http | {SPAM} | 0.106209 | 0.024 | 0.078431 | 0.055556 | 6 | 0 | 1.000000 |
| short_comment | {HAM} | 0.245098 | 0.368 | 0.101307 | 0.064270 | 84 | 8 | 0.913043 |
| regex_check_out | {SPAM} | 0.226580 | 0.180 | 0.226035 | 0.032135 | 45 | 0 | 1.000000 |
| total | {SPAM, HAM} | 0.762527 | 0.880 | 0.458061 | 0.147059 | 354 | 42 | 0.893939 |
您可以从数据集中删除错误的规则
[ ]:
not_informative_rules = [
    Rule("rich", "SPAM"),
    Rule("film", "HAM"),
    Rule("meeting", "HAM")
]
[ ]:
from argilla.labeling.text_classification import delete_rules
delete_rules(dataset="weak_supervision_yt", rules=not_informative_rules)
您可以更新规则
help {HAM} 0.027778 0.036 0.023965 0.023965 0 9 0.000000
[ ]:
help_rule = Rule("help", label="SPAM")
help_rule.update_at_dataset(dataset="weak_supervision_yt")
让我们再次加载规则并应用弱标记
[ ]:
final_rules = labeling_functions + load_rules(dataset="weak_supervision_yt")
[ ]:
weak_labels = WeakLabels(dataset="weak_supervision_yt", rules=final_rules)
[33]:
weak_labels.summary()
[33]:
| 标签 | coverage | annotated_coverage | overlaps | conflicts | correct | incorrect | precision | |
|---|---|---|---|---|---|---|---|---|
| contains_http | {SPAM} | 0.106209 | 0.024 | 0.078431 | 0.049020 | 6 | 0 | 1.000000 |
| short_comment | {HAM} | 0.245098 | 0.368 | 0.101307 | 0.064270 | 84 | 8 | 0.913043 |
| regex_check_out | {SPAM} | 0.226580 | 0.180 | 0.226035 | 0.027778 | 45 | 0 | 1.000000 |
| check out | {SPAM} | 0.224401 | 0.176 | 0.224401 | 0.027778 | 44 | 0 | 1.000000 |
| plz OR please | {SPAM} | 0.104575 | 0.088 | 0.098039 | 0.023420 | 22 | 0 | 1.000000 |
| subscribe | {SPAM} | 0.101852 | 0.120 | 0.082244 | 0.025054 | 30 | 0 | 1.000000 |
| my | {SPAM} | 0.192810 | 0.192 | 0.168845 | 0.050654 | 42 | 6 | 0.875000 |
| song | {HAM} | 0.118192 | 0.172 | 0.070806 | 0.037037 | 34 | 9 | 0.790698 |
| love | {HAM} | 0.090959 | 0.140 | 0.071351 | 0.034858 | 28 | 7 | 0.800000 |
| your | {SPAM} | 0.052832 | 0.088 | 0.041939 | 0.015795 | 19 | 3 | 0.863636 |
| help | {SPAM} | 0.027778 | 0.036 | 0.023965 | 0.003813 | 9 | 0 | 1.000000 |
| total | {SPAM, HAM} | 0.761983 | 0.880 | 0.458061 | 0.126906 | 363 | 33 | 0.916667 |
4. 使用弱标签#
在此步骤中,您至少有两种选择
使用弱标签训练“去噪”或标签模型,以构建噪声较小的训练集。对此非常流行的选项是 Snorkel 或 Flyingsquid。完成此步骤后,您可以使用“干净”的标签训练下游模型。
让我们看一些示例
简单的多数投票#
作为第一个示例,我们将向您展示如何将 WeakLabels 对象与简单的多数投票模型一起使用,这可以说是最直接的标签模型。在每个记录的基础上,它只是计算规则返回的每个标签的票数,并采取多数票。Argilla 在其 MajorityVoter 类中提供了这种逻辑的简洁实现。
[ ]:
from argilla.labeling.text_classification import MajorityVoter

# instantiate the majority vote label model by simply providing the weak labels object
majority_model = MajorityVoter(weak_labels)
与我们将进一步讨论的其他标签模型相比,多数投票者不需要拟合。您只需调用其 score() 方法即可直接检查其性能。
[35]:
# check its performance
print(majority_model.score(output_str=True))
              precision    recall  f1-score   support

        SPAM       0.99      0.93      0.96       102
         HAM       0.94      0.99      0.96       108

    accuracy                           0.96       210
   macro avg       0.96      0.96      0.96       210
weighted avg       0.96      0.96      0.96       210
0.96 的准确率似乎出奇地高,但您需要记住,我们只是从评估中排除了模型弃权的记录(即票数相同或根本没有票数)。因此,让我们对此进行说明,并通过假设模型对于这些弃权记录的表现类似于随机分类器来纠正准确率
\(accuracy_c = frac_{non} \times accuracy + frac_{abs} \times accuracy_{random}\)
其中 \(frac_{non}\) 是未弃权记录的比例,\(frac_{abs}\) 是弃权记录的比例。
[ ]:
# calculate fractions using the support metric (see above)
frac_non = 200 / len(weak_labels.annotation())
frac_abs = 1 - (200 / len(weak_labels.annotation()))

# accuracy without abstentions: 0.96; accuracy of random classifier: 0.5
print("accuracy_c:", frac_non * 0.96 + frac_abs * 0.5)
# accuracy_c: 0.868
正如我们将在下文中看到的,0.868 的准确率仍然是一个非常不错的基线。
注意
要获得校正准确率的噪声估计,您还可以设置 “tie_break_policy” 参数:majority_model.score(..., tie_break_policy="random")。
但是,在预测弱标签以训练下游模型时,您可能需要丢弃弃权。默认情况下,在多数投票者上调用 predict() 方法会排除弃权,并且仅返回没有注释的记录。这些通常用于为下游模型构建训练集。
在为训练下游文本分类器构建训练集之前,您可以使用 Argilla 快速浏览预测记录。此步骤对于验证、手动修订或定义分数阈值以接受来自您的标签模型的标签(例如,仅考虑得分大于 0.8 的标签)非常有用。
[ ]:
# get your training records with the predictions of the label model
records_for_training = majority_model.predict()

# optional: log the records to a new dataset in Argilla
rg.log(records_for_training, name="majority_voter_results")

# extract training data
training_data = pd.DataFrame(
    [{"text": rec.text, "label": rec.prediction[0][0]} for rec in records_for_training]
)
[38]:
# preview training data
training_data
[38]:
| 文本 | 标签 | |
|---|---|---|
| 0 | http://www.rtbf.be/tv/emission/detail_the-voic... | SPAM |
| 1 | http://www.ermail.pl/dolacz/V3VeYGIN CLICK ht... | SPAM |
| 2 | Perfect! <3 | HAM |
| 3 | Check out Melbourne shuffle, everybody! | SPAM |
| 4 | Check out my videos guy! :) Hope you guys had ... | SPAM |
| ... | ... | ... |
| 1048 | Great song | HAM |
| 1049 | subscribe | HAM |
| 1050 | LoL | HAM |
| 1051 | Love this song | HAM |
| 1052 | LOVE THE WAY YOU LIE .." | HAM |
1053 行 × 2 列
使用 Snorkel 的标签模型#
Snorkel 的标签模型是迄今为止使用弱监督最流行的选择,Argilla 为其提供了内置支持。将 Snorkel 与 Argilla 的 WeakLabels 一起使用非常简单,只需
[ ]:
%pip install snorkel -qqq
[ ]:
from argilla.labeling.text_classification import Snorkel

# we pass our WeakLabels instance to our Snorkel label model
snorkel_model = Snorkel(weak_labels)

# we fit the model
snorkel_model.fit(lr=0.001, n_epochs=50)
注意
Snorkel 标签模型不适合多标签分类任务,也不支持它们。
在拟合 snorkel 模型时,我们建议对学习率 lr 和 epoch 数 n_epochs 执行快速网格搜索。
[41]:
# we check its performance
print(snorkel_model.score(output_str=True))
              precision    recall  f1-score   support

        SPAM       0.93      0.93      0.93       106
         HAM       0.94      0.94      0.94       114

    accuracy                           0.94       220
   macro avg       0.94      0.94      0.94       220
weighted avg       0.94      0.94      0.94       220
乍一看,该模型的性能似乎比多数投票基线差。但是,让我们再次纠正弃权的准确率。
[ ]:
# calculate fractions using the support metric (see above)
frac_non = 209 / len(weak_labels.annotation())
frac_abs = 1 - (209 / len(weak_labels.annotation()))

# accuracy without abstentions: 0.95; accuracy of random classifier: 0.5
print("accuracy_c:", frac_non * 0.95 + frac_abs * 0.5)
# accuracy_c: 0.8761999999999999
现在我们可以看到,0.876 的准确率,它在整个测试集上的性能实际上略好。
在拟合您的标签模型后,您可以在为训练下游文本分类器构建训练集之前快速浏览其预测。此步骤对于验证、手动修订或定义分数阈值以接受来自您的标签模型的标签(例如,仅考虑得分大于 0.8 的标签)非常有用。
[ ]:
# get your training records with the predictions of the label model
records_for_training = snorkel_model.predict()

# optional: log the records to a new dataset in Argilla
rg.log(records_for_training, name="snorkel_results")

# extract training data
training_data = pd.DataFrame(
    [{"text": rec.text, "label": rec.prediction[0][0]} for rec in records_for_training]
)
[44]:
# preview training data
training_data
[44]:
| 文本 | 标签 | |
|---|---|---|
| 0 | http://www.rtbf.be/tv/emission/detail_the-voic... | SPAM |
| 1 | http://www.ermail.pl/dolacz/V3VeYGIN CLICK ht... | SPAM |
| 2 | Perfect! <3 | HAM |
| 3 | Check out Melbourne shuffle, everybody! | SPAM |
| 4 | Facebook account HACK!! http://hackfbaccountl... | HAM |
| ... | ... | ... |
| 1174 | Great song | HAM |
| 1175 | subscribe | HAM |
| 1176 | LoL | HAM |
| 1177 | Love this song | HAM |
| 1178 | LOVE THE WAY YOU LIE .." | HAM |
1179 行 × 2 列
注意
有关如何将 WeakLabels 对象与 Snorkel 的原始 LabelModel 类一起使用的示例,您可以查看WeakLabels 参考。
使用 FlyingSquid 的标签模型#
FlyingSquid 是 Hazy Research 开发的一种功能强大的方法,Hazy Research 是斯坦福大学的一个研究小组,在程序化数据标记方面取得了突破性进展,包括 Snorkel。FlyingSquid 使用闭式解来拟合标签模型,具有极大的速度提升和相似的性能。与 Snorkel 一样,Argilla 也为 FlyingSquid 提供了内置支持。
[ ]:
%pip install flyingsquid pgmpy -qqq
[ ]:
from argilla.labeling.text_classification import FlyingSquid

# we pass our WeakLabels instance to our FlyingSquid label model
flyingsquid_model = FlyingSquid(weak_labels)

# we fit the model
flyingsquid_model.fit()
注意
FlyingSquid 标签模型不适合多标签分类任务,也不支持它们。
[47]:
# we check its performance
print(flyingsquid_model.score(output_str=True))
              precision    recall  f1-score   support

        SPAM       0.92      0.93      0.93       106
         HAM       0.94      0.92      0.93       114

    accuracy                           0.93       220
   macro avg       0.93      0.93      0.93       220
weighted avg       0.93      0.93      0.93       220
再次,让我们纠正弃权的准确率。
[ ]:
# calculate fractions using the support metric (see above)
frac_non = 209 / len(weak_labels.annotation())
frac_abs = 1 - (209 / len(weak_labels.annotation()))

# accuracy without abstentions: 0.93; accuracy of random classifier: 0.5
print("accuracy_c:", frac_non * 0.93 + frac_abs * 0.5)
# accuracy_c: 0.85948
在这里,似乎 0.859 的准确率,它在整个测试集上的性能实际上略逊于多数投票的基线。
在拟合您的标签模型后,您可以在为训练下游文本分类器构建训练集之前快速浏览其预测。此步骤对于验证、手动修订或定义分数阈值以接受来自您的标签模型的标签(例如,仅考虑得分大于 0.8 的标签)非常有用。
[ ]:
# get your training records with the predictions of the label model
records_for_training = flyingsquid_model.predict()

# log the records to a new dataset in Argilla
rg.log(records_for_training, name="flyingsquid_results")

# extract training data
training_data = pd.DataFrame(
    [{"text": rec.text, "label": rec.prediction[0][0]} for rec in records_for_training]
)
[50]:
# preview training data
training_data
[50]:
| 文本 | 标签 | |
|---|---|---|
| 0 | http://www.rtbf.be/tv/emission/detail_the-voic... | SPAM |
| 1 | http://www.ermail.pl/dolacz/V3VeYGIN CLICK ht... | SPAM |
| 2 | Perfect! <3 | HAM |
| 3 | Check out Melbourne shuffle, everybody! | SPAM |
| 4 | Facebook account HACK!! http://hackfbaccountl... | SPAM |
| ... | ... | ... |
| 1174 | Great song | HAM |
| 1175 | subscribe | HAM |
| 1176 | LoL | HAM |
| 1177 | Love this song | HAM |
| 1178 | LOVE THE WAY YOU LIE .." | HAM |
1179 行 × 2 列
使用 Weasel 的联合模型#
Weasel 让您可以直接使用弱标签端到端地训练下游模型。与 Snorkel 或 FlyingSquid 等两阶段方法相比,Weasel 是一种单阶段方法,可同时联合训练标签和最终模型。有关更多详细信息,请查看在 NeurIPS 2021 上提出的端到端弱监督论文。
在本指南中,我们将向您展示如何使用 Weasel 使用弱标签直接训练 Hugging Face transformers 模型。由于 Weasel 使用 PyTorch Lightning 进行训练,因此一些 PyTorch 基本知识会有所帮助,但并非绝对必要。
让我们从安装 Weasel Python 包开始
[53]:
!python -m pip install git+https://github.com/autonlab/weasel#egg=weasel[all]
第一步是获取我们的弱标签。为此,我们使用与上述示例(Snorkel 和 FlyingSquid)中相同的规则和数据集。
[ ]:
# obtain our weak labels
weak_labels = WeakLabels(rules=rules, dataset="weak_supervision_yt")
在第二步中,我们实例化我们的最终模型,在我们的例子中,它将是来自 Hugging Face Hub 的预训练 Transformer。在这里,我们选择 Google 的小型 ELECTRA 模型,该模型在参数数量适中的情况下表现出色。由于其尺寸,您可以在合理的时间内在 CPU 上对其进行微调。
[ ]:
from weasel.models.downstream_models.transformers import Transformers

# instantiate our transformers end model
end_model = Transformers("google/electra-small-discriminator", num_labels=2)
有了我们的最终模型,我们现在可以实例化 Weasel 模型。除了最终模型外,它还包括一个神经编码器,该编码器尝试估计潜在标签。
[ ]:
from weasel.models import Weasel

# instantiate our weasel end-to-end model
weasel = Weasel(
    end_model=end_model,
    num_LFs=len(weak_labels.rules),
    n_classes=2,
    encoder={"hidden_dims": [32, 10]},
    optim_encoder={"name": "adam", "lr": 1e-4},
    optim_end_model={"name": "adam", "lr": 5e-5},
)
之后,我们将数据包装在 TransformersDataModule 中,以便 Weasel 和 PyTorch Lightning 可以使用它。在此步骤中,我们还对数据进行标记化。在这里,我们需要注意使用与我们的最终模型相对应的 tokenizer。
[ ]:
from transformers import AutoTokenizer
from weasel.datamodules.transformers_datamodule import (
    TransformersDataModule,
    TransformersCollator,
)

# tokenizer for our transformers end model
tokenizer = AutoTokenizer.from_pretrained("google/electra-small-discriminator")

# tokenize train and test data
X_train = [
    tokenizer(rec.text, truncation=True)
    for rec in weak_labels.records(has_annotation=False)
]
X_test = [
    tokenizer(rec.text, truncation=True)
    for rec in weak_labels.records(has_annotation=True)
]

# instantiate data module
datamodule = TransformersDataModule(
    label_matrix=weak_labels.matrix(has_annotation=False),
    X_train=X_train,
    collator=TransformersCollator(tokenizer),
    X_test=X_test,
    Y_test=weak_labels.annotation(),
    batch_size=8,
)
现在,我们已准备好开始训练我们的 Weasel 模型。对于训练过程,Weasel 依赖于出色的 PyTorch Lightning Trainer。它提供了大量的选项和功能来优化训练过程,但下面的默认值应该为您提供合理的结果。请记住,您正在微调一个成熟的 Transformer 模型,尽管它是一个小型模型。
[ ]:
import pytorch_lightning as pl

# instantiate the pytorch-lightning trainer
trainer = pl.Trainer(
    gpus=0,  # >= 1 to use GPU(s)
    max_epochs=2,
    logger=None,
    callbacks=[pl.callbacks.ModelCheckpoint(monitor="Val/accuracy", mode="max")],
)

# fit the model end-to-end
trainer.fit(
    model=weasel,
    datamodule=datamodule,
)
训练完成后,我们可以调用 Trainer.test 方法来检查最终性能。该模型应达到约 0.94 的测试准确率。
[ ]:
trainer.test()
# {'accuracy': 0.94, ...}
要将模型用于推理,您可以使用其 predict 方法
[ ]:
# Example text for the inference
text = "In my head this is like 2 years ago.. Time FLIES"

# Get predictions for the example text
predicted_probs, predicted_label = weasel.predict(tokenizer(text, return_tensors="pt"))

# Map predicted int to label
weak_labels.int2label[int(predicted_label)]  # HAM
或者您可以实例化流行的 Transformers 管道之一,直接提供最终模型和 tokenizer
[ ]:
from transformers import pipeline

# modify the id2label mapping of the model
weasel.end_model.model.config.id2label = weak_labels.int2label

# create transformers pipeline
classifier = pipeline(
    "text-classification", model=weasel.end_model.model, tokenizer=tokenizer
)

# use pipeline for predictions
classifier(text)  # [{'label': 'HAM', 'score': 0.6110987663269043}]