🗂️ 将记录分配给您的标注团队#
在本教程中,您将学习如何将记录分配给特定用户,以便您可以避免或控制标注中的重叠。它将引导您完成以下步骤
📥 加载数据集
🔀 进行随机分配
💾 在 Argilla 中记录您的数据集和分配
✍️ 标注分配给您的记录
注意
本教程仅适用于 Text2Text、Token Classification 和 Text Classification 数据集。要在反馈数据集中分配标注,请遵循本指南。
简介#
标注通常由团队完成,团队共享工作负载。在这种情况下,我们希望避免标注重叠以提高效率,或者控制何时以及如何发生这种重叠。为了在 Argilla (v1.6.0) 中做到这一点,我们有两种选择
我们可以保留单个数据集,并将一组记录分配给每个用户。
我们可以将数据集拆分为不同的数据集,这些数据集具有分配给每个用户的记录,并将它们记录在他们个人的工作区中。
如果您希望保持整个数据集可用,以便每个团队成员都可以查看和探索,但仍然希望他们在标注时专注于一组记录,您可能想要使用选项 1。如果您的标注员还基于整个团队的标注制定弱标签规则,这可能会很有趣。
如果您希望每个团队成员独立工作,并且看不到其他队友正在处理的记录,则选项 2 更好。如果您想在之后衡量标注员之间的一致性,这可能会很有趣。
在本教程中,我们将进行随机分配,其中每个记录仅由一个人标注,并引导您使用每个选项与您的团队共享您的分配。
让我们开始吧!
运行 Argilla#
对于本教程,您需要运行 Argilla 服务器。部署和运行 Argilla 有两个主要选项
在 Hugging Face Spaces 上部署 Argilla:如果您想使用外部 Notebook(例如,Google Colab)运行教程,并且您在 Hugging Face 上有一个帐户,则只需点击几下即可在 Spaces 上部署 Argilla

有关配置部署的详细信息,请查看官方 Hugging Face Hub 指南。
使用 Argilla 的快速入门 Docker 镜像启动 Argilla:如果您想在本地机器上运行 Argilla,建议使用此选项。请注意,此选项仅允许您在本地运行教程,而不能与外部 Notebook 服务一起运行。
有关部署选项的更多信息,请查看文档的部署部分。
提示
本教程是一个 Jupyter Notebook。有两种运行方式
使用此页面顶部的“在 Colab 中打开”按钮。此选项允许您直接在 Google Colab 上运行 Notebook。不要忘记将运行时类型更改为 GPU 以加快模型训练和推理速度。
通过点击页面顶部的“查看源代码”链接下载 .ipynb 文件。此选项允许您下载 Notebook 并在本地机器或您选择的 Jupyter Notebook 工具上运行它。
设置#
对于本教程,您需要使用 pip 安装 Argilla 客户端和一些第三方库
[ ]:
%pip install argilla datasets==2.10.1 httpx==0.23.3 -qqq
让我们导入 Argilla 模块以进行数据读取和写入
[1]:
import argilla as rg
如果您使用 Docker 快速入门镜像或 Hugging Face Spaces 运行 Argilla,则需要使用 URL 和 API_KEY 初始化 Argilla 客户端
[ ]:
# Replace api_url with the url to your HF Spaces URL if using Spaces
# Replace api_key if you configured a custom API key
rg.init(
    api_url="https://:6900",
    api_key="admin.apikey"
)
如果您正在运行私有的 Hugging Face Space,您还需要按如下方式设置 HF_TOKEN
[ ]:
# # Set the HF_TOKEN environment variable
# import os
# os.environ['HF_TOKEN'] = "your-hf-token"

# # Replace api_url with the url to your HF Spaces URL
# # Replace api_key if you configured a custom API key
# rg.init(
#     api_url="https://[your-owner-name]-[your_space_name].hf.space",
#     api_key="admin.apikey",
#     extra_headers={"Authorization": f"Bearer {os.environ['HF_TOKEN']}"},
# )
启用遥测#
我们从您与教程的互动中获得宝贵的见解。为了改进自身,为您提供最合适的内容,使用以下代码行将帮助我们了解本教程是否有效地为您服务。虽然这是完全匿名的,但如果您愿意,可以选择跳过此步骤。有关更多信息,请查看遥测页面。
[ ]:
try:
    from argilla.utils.telemetry import tutorial_running
    tutorial_running()
except ImportError:
    print("Telemetry is introduced in Argilla 1.20.0 and not found in the current installation. Skipping telemetry.")
📥 加载数据集#
我们可以使用 Argilla 中已存在的数据集,也可以加载全新的数据集。
加载现有的 Argilla 数据集#
我们可以加载已记录在 Argilla 实例中的整个数据集,或者由查询定义的数据集中的一部分记录。在本例中,我们包含了一个查询,以便我们仅加载尚未标注的记录。了解有关查询的更多信息,请点击此处。
[ ]:
# load records with the "Default" status from a dataset
ds = rg.load("gutenberg_spacy-ner", query="status:Default")
创建新数据集#
如果您正在使用新的数据集,则需要创建一个新的 Argilla 数据集对象。在这里,我们从 Huggingface Hub 加载了相同的数据集。
[ ]:
from datasets import load_dataset

ds = rg.DatasetForTokenClassification.from_datasets(
    dataset=load_dataset('argilla/gutenberg_spacy-ner', split='train')
)
了解有关加载和创建 Argilla 数据集的更多信息,请点击此处。
🔀 进行随机分配#
第一步,我们想要获取将标注我们数据集的用户列表。
[ ]:
# get workspace where the dataset is (or will be) located
ws = rg.Workspace.from_name("my_workspace")
# get the list of users with access to the workspace
# make sure that all users who will work on the dataset have access to the workspace
# optional: filter users to get only those with annotator role
users = [u for u in rg.User.list() if u.role == "annotator"]
注意
如果您使用的版本早于 1.11.0,则需要直接调用 API 以获取用户列表,如下面的单元格所示。请注意,在这种情况下,用户将作为字典返回,因此 users.username 将变为 users['username']。
[ ]:
import httpx

rg_client= rg.active_client().client
auth_headers = {"X-Argilla-API-Key": rg_client.token}
http=httpx.Client(base_url=rg_client.base_url, headers=auth_headers)

# make a request using our Argilla Client
users = http.get("/api/users").json()

# optional: filter users to get only those with annotator role
users = [u for u in users if u['role']=='annotator']
我们将打乱数据集,以便分配是随机的,但此步骤是可选的。
[ ]:
# skip this cell if you don't want to shuffle the dataset
import random

random.shuffle(ds)
现在我们准备好开始进行分配了。为此,我们将数据集分成与可用标注员数量相同的块,并将分配保存在字典中。
[ ]:
from collections import defaultdict

# build a dictionary where the key is the username and the value is the list of records assigned to them
assignments = defaultdict(list)

# divide your dataset into chunks of the same length as the users list and make the assignments
n = len(users)
chunked_records = [ds[i:i + n] for i in range(0, len(ds), n)]
for chunk in chunked_records:
    for idx, record in enumerate(chunk):
        assignments[users[idx].username].append(record)
💾 在 Argilla 中记录您的数据集和分配#
选项 1#
如果您想遵循选项 1,即我们有一个所有队友都可以访问的数据集,则需要在记录之前将分配保存为记录元数据。
确保您将此数据集记录在所有将参与工作的用户都可以访问的工作区中。
[ ]:
# loop through the assignments dictionary to save the metadata and build a list with all records
assigned_records = []
for user, records in assignments.items():
    for record in records:
        record.metadata['user'] = user
        assigned_records.append(record)

# log the records in Argilla
rg.log(
    records=assigned_records,
    workspace='recognai',
    name='gutenberg_spacy-ner',
    tags={'with assignments': True}
)
选项 2#
如果您遵循选项 2,即标注员只能访问分配给他们的记录,则需要将每个用户的分配记录为单独的数据集,放在他们各自的工作区中。
为了使此方法有效,要进行标注的用户应具有 annotator 角色,以便他们无法访问彼此的工作区。负责监督项目的人员应具有 admin 角色,以便他们可以使用与此项目关联的数据集。
了解有关管理用户角色和访问权限的更多信息,请点击此处。
[ ]:
# loop through the dictionary and log the dataset for each user
for user, records in assignments.items():
    rg.log(
        records=records,
        workspace=user,
        name='gutenberg_spacy-ner'
    )
提示:如果您计划让多个用户标注同一条记录,我们建议在将记录拆分为多个数据集之前,为每条记录添加 ID。这样,您就可以在后处理数据集时检索每条记录的不同标注。
✍️ 标注分配给您的记录#
现在是时候打开 Argilla UI 并开始标注了!
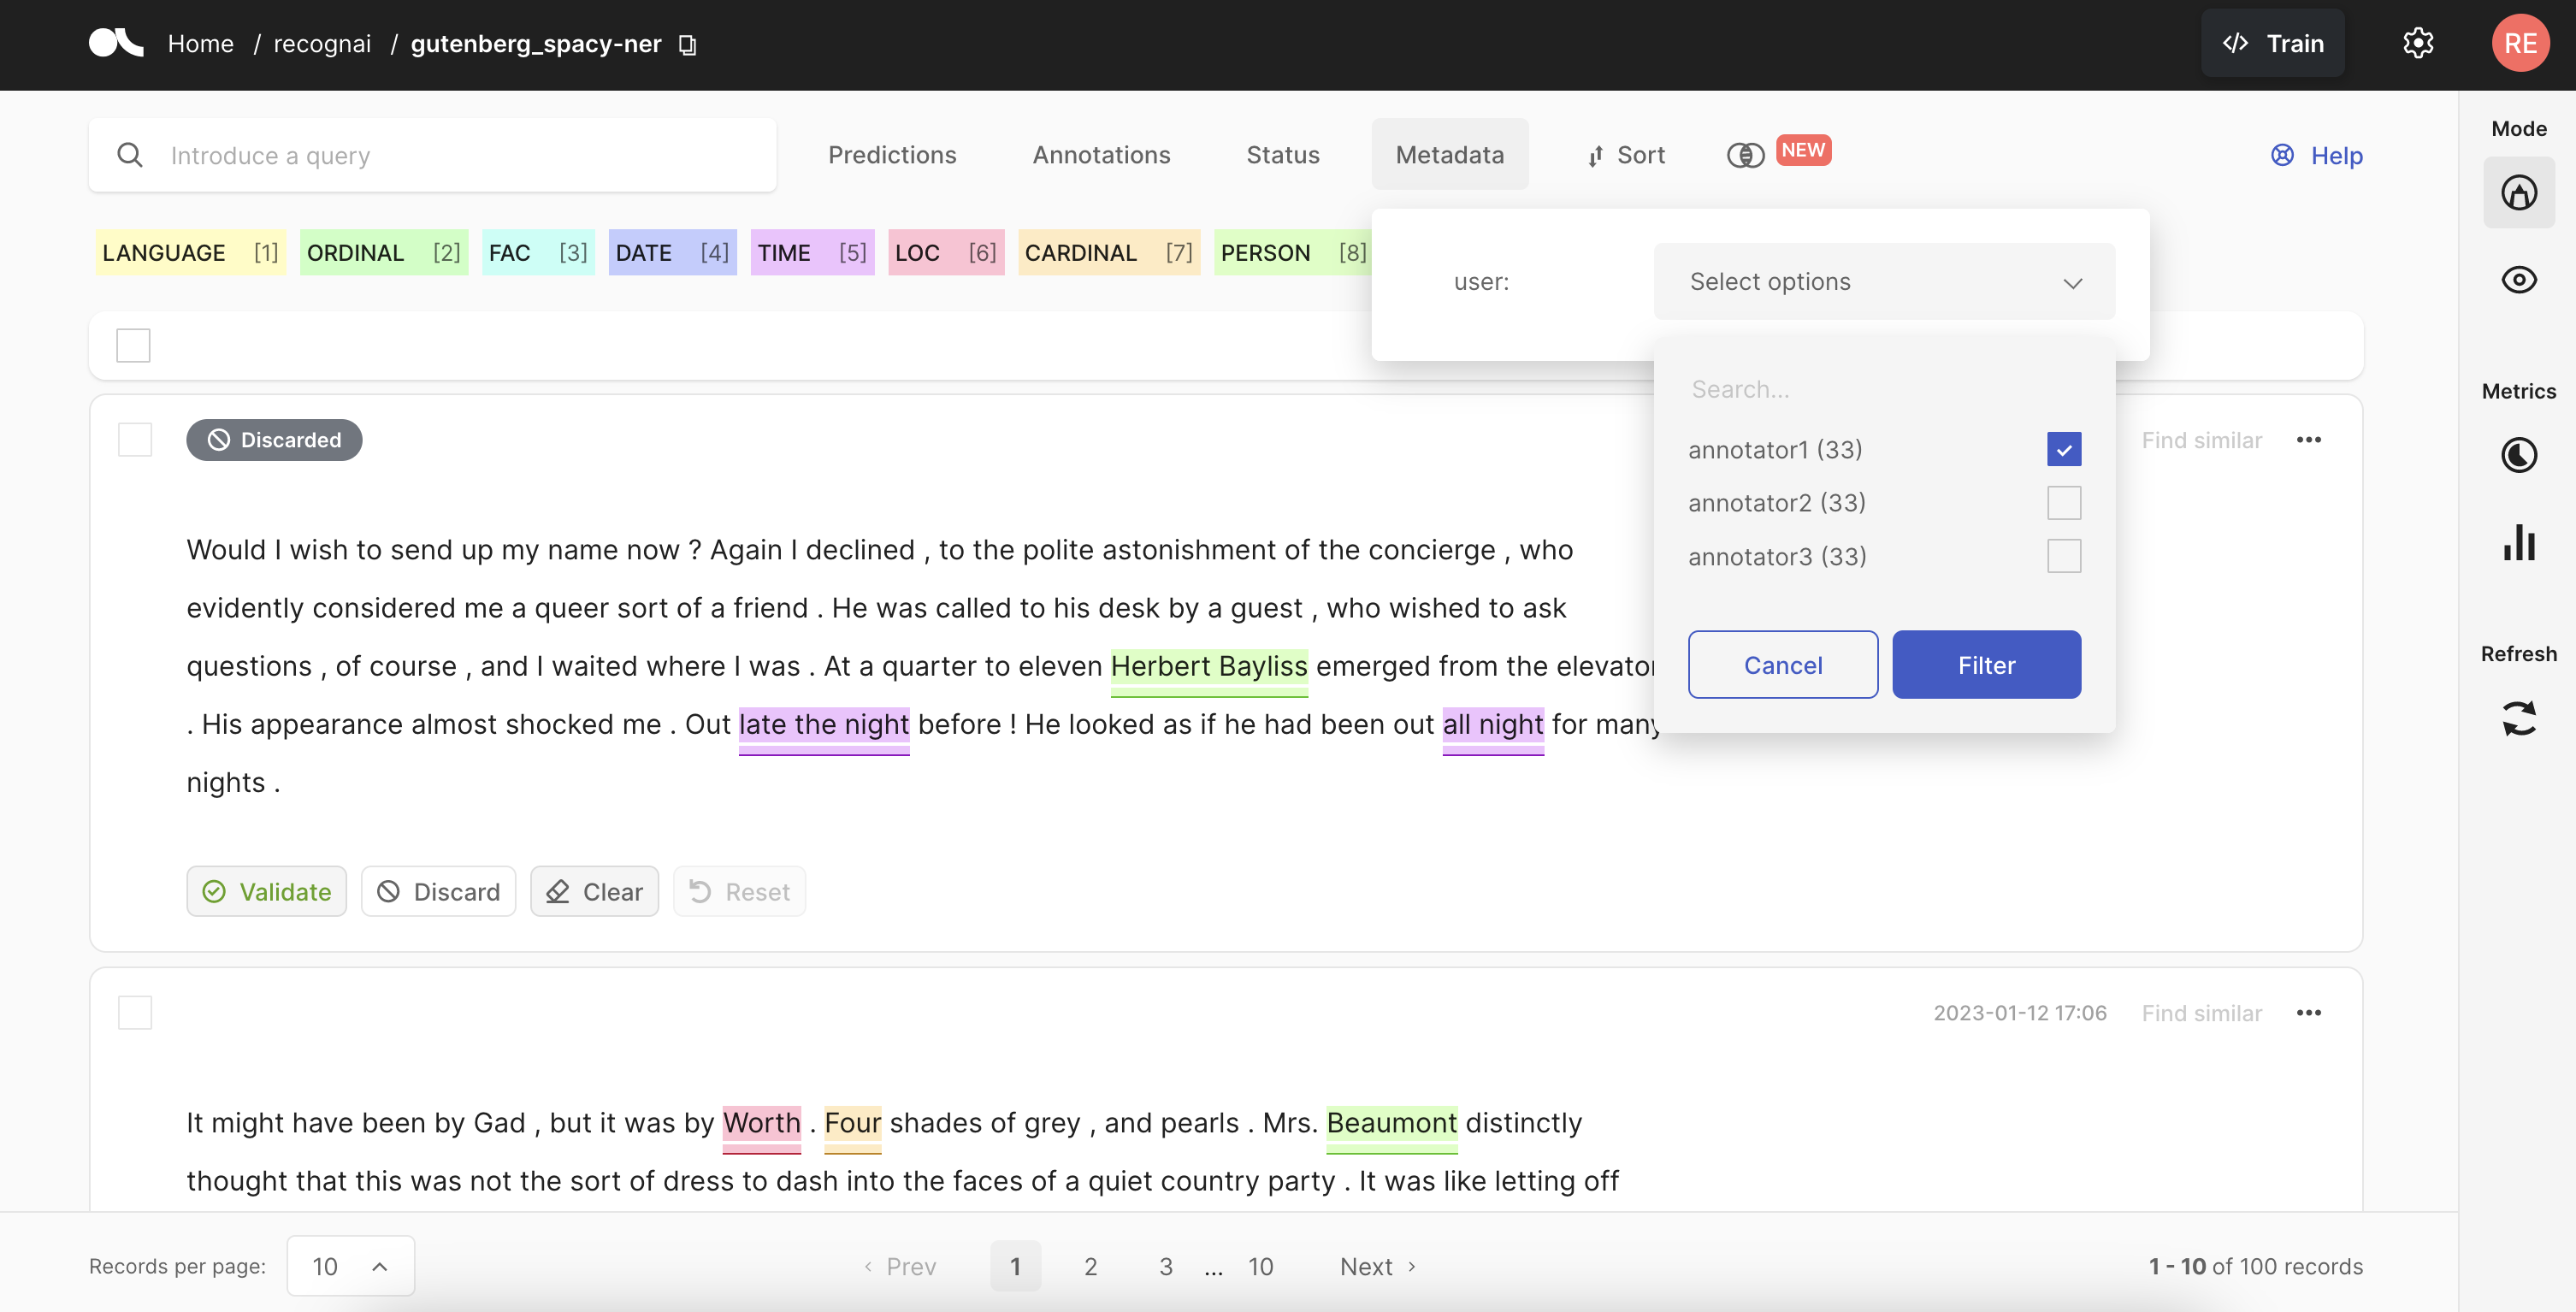
如果您遵循了选项 1,您需要要求标注员在 UI 中打开数据集,在元数据>用户下选择他们的用户名,然后点击过滤按钮。这将自动过滤分配给他们的记录。
如果您遵循了选项 2,只需让您的标注员在他们自己的工作区中打开数据集并开始标注即可。
总结#
在本教程中,我们学习了如何将数据集拆分为随机块,以便您可以通过两种方式将记录分配给标注团队的每个成员。在第一种方式中,我们保留了单个数据集,以便我们的团队可以选择查看整个数据集还是专注于分配给他们的记录。在第二种方式中,每个标注员都有一个包含分配给他们的记录的数据集,并且他们无法访问其他队友的记录。
这使您可以管理您的标注团队,并帮助他们更有效地工作。🚀